![]()
PropertyMapper leverages on your Core Data model to infer how to map your JSON values into Core Data. It's simple and it's obvious. Why the hell isn't everybody doing this?
- Filling a NSManagedObject with JSON
- JSON representation from a NSManagedObject
- Installation
- Contributing
- Credits
- License
Mapping your Core Data objects with your JSON providing backend has never been this easy.
{
  "firstName": "John",
  "lastName": "Sid"
}
let userJSON = JSON["user"]
user.fill(with: userJSON)Your Core Data entities should match your backend models. Your attributes should match their JSON counterparts. For example firstName maps to firstName, address to address.
{
  "first_name": "John",
  "last_name": "Sid"
}
let userJSON = json["user"]
user.fill(with: userJSON)Your Core Data entities should match your backend models but in camelCase. Your attributes should match their JSON counterparts. For example first_name maps to firstName, address to address.
This is pretty straightforward and should work as you would expect it. A JSON string maps to NSString and double, float, ints and so on, map to NSNumber.
We went for supporting ISO 8601 and unix timestamp out of the box because those are the most common formats when parsing dates, also we have a quite performant way to parse this strings which overcomes the performance issues of using NSDateFormatter.
let values = ["created_at" : @"2014-01-01T00:00:00+00:00",
              "updated_at" : @"2014-01-02",
              "published_at": @"1441843200",
              "number_of_attendes": 20]

managedObject.fill(with: values)

let createdAt = managedObject.value(forKey: "createdAt")
// ==> "2014-01-01 00:00:00 +00:00"

let updatedAt = managedObject.value(forKey: "updatedAt")
// ==> "2014-01-02 00:00:00 +00:00"

let publishedAt = managedObject.value(forKey: "publishedAt")
// ==> "2015-09-10 00:00:00 +00:00"
If your date is not ISO 8601 compliant, you can use a transformer attribute to parse your date, too. First set your attribute to Transformable, and set the name of your transformer like, in this example is DateStringTransformer:

You can find an example of date transformer in DateStringTransformer.
For mapping for arrays first set attributes as Binary Data on the Core Data modeler.

let values = ["hobbies" : ["football", "soccer", "code"]]
managedObject.fill(with: values)
let hobbies = NSKeyedUnarchiver.unarchiveObject(with: managedObject.hobbies) as! [String]
// ==> "football", "soccer", "code"For mapping for dictionaries first set attributes as Binary Data on the Core Data modeler.
let values = ["expenses" : ["cake" : 12.50, "juice" : 0.50]]
managedObject.fill(with: values)
let expenses = NSKeyedUnarchiver.unarchiveObject(with: managedObject.expenses) as! [String: Any]
// ==> "cake" : 12.50, "juice" : 0.50There are two exceptions to this rules:
ids should matchremoteID- Reserved attributes should be prefixed with the
entityName(typebecomesuserType,descriptionbecomesuserDescriptionand so on). In the JSON they don't need to change, you can keeptypeanddescriptionfor example. A full list of reserved attributes can be found here.

- If you want to map your Core Data identifier (key) attribute with a JSON attribute that has different naming, you can do by adding
sync.remoteKeyin the user info box with the value you want to map.
{
  "id": 1,
  "name": "John Monad",
  "company": {
    "name": "IKEA"
  }
}
In this example, if you want to avoid creating a Core Data entity for the company, you could map straight to the company's name. By adding this to the User Info of your companyName field:
sync.remoteKey = company.name
Sometimes values in a REST API are not formatted in the way you want them, resulting in you having to extend your model classes with methods and/or properties for transformed values. You might even have to pre-process the JSON so you can use it with PropertyMapper, luckily most of this cases could be solved by using a ValueTransformer.
For example, in my user model instead of getting this:
{
  "name": "Bob Dylan"
}
Our backend developer decided he likes arrays, so we're getting this:
{
  "name": [
    "Bob Dylan"
  ]
}
Since PropertyMapper expects just a name with value Bob Dylan, we have to pre-process this value before getting it into Core Data. For this, first we'll create a subclass of ValueTransformer.
import Foundation

class BadAPIValueTransformer : ValueTransformer {
    override class func transformedValueClass() -> AnyClass {
        return String.self as! AnyClass
    }

    override class func allowsReverseTransformation() -> Bool {
        return true
    }

    // Used to transform before inserting into Core Data using `fill(with:)
    override func transformedValue(_ value: Any?) -> Any? {
        guard let valueToTransform = value as? Array<String> else {
            return value
        }

        return valueToTransform.first!
    }

    // Used to transform before exporting into JSON using `export`
    override func reverseTransformedValue(_ value: Any?) -> Any? {
        guard let stringValue = value as? String else { return value }

        return [stringValue]
    }
}
Then we'll add another item in the user key of our Core Data attribute. The key will be sync.valueTransformer and the value BadAPIValueTransformer.

Then before fill(with:) we'll do
ValueTransformer.setValueTransformer(BadAPIValueTransformer(), forName: NSValueTransformerName(rawValue: "BadAPIValueTransformer"))That's it! Then your name will be Bob Dylan, congrats with the Peace Nobel Prize.
By the way, it works the other way as well! So using export() will return ["Bob Dylan"].
let user = //...
user.set(value: "John" for: "firstName")
user.set(value: "Sid" for: "lastName")

let userValues = user.export()
That's it, that's all you have to do, the keys will be magically transformed into a snake_case convention.
{
  "first_name": "John",
  "last_name": "Sid"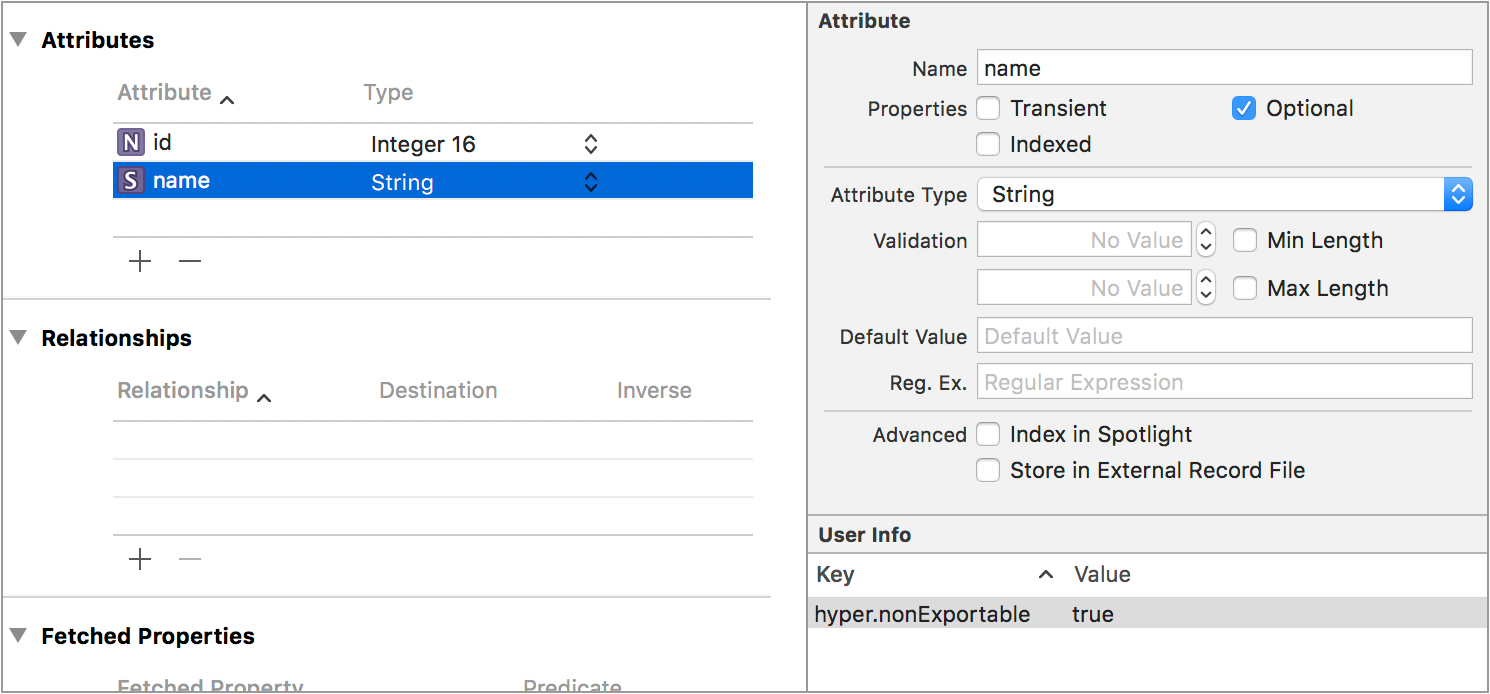
}If you don't want to export certain attribute or relationship, you can prohibit exporting by adding sync.nonExportable in the user info of the excluded attribute or relationship.
It supports exporting relationships too.
"first_name": "John",
"last_name": "Sid",
"notes": [
  {
    "id": 0,
    "text": "This is the text for the note A"
  },
  {
    "id": 1,
    "text": "This is the text for the note B"
  }
]
If you don't want relationships you can also ignore relationships:
let dictionary = user.export(using: .excludedRelationships)"first_name": "John",
"last_name": "Sid"Or get them as nested attributes, something that Ruby on Rails uses (accepts_nested_attributes_for), for example for a user that has many notes:
var exportOptions = ExportOptions()
exportOptions.relationshipType = .nested
let dictionary = user.export(using: exportOptions)"first_name": "John",
"last_name": "Sid",
"notes_attributes": [
{
"0": {
"id": 0,
"text": "This is the text for the note A"
},
"1": {
"id": 1,
"text": "This is the text for the note B"
}
}
]