All components should be rinsed in nuclease-free water and dried before assembly.
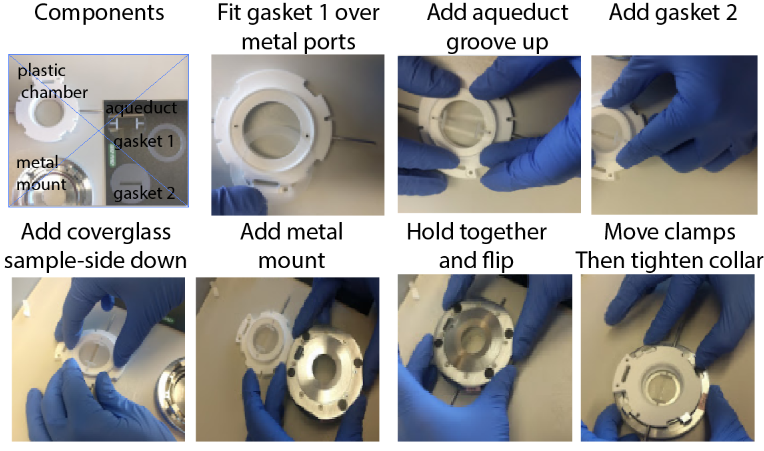
- Place the plastic chamber top upside down on the bench
- Fit the rubber gasket over the two metal aqueduct ports
- Place the glass aqueduct chamber on the gasket, aligning the holes with the metal aqueduct ports. The aqueduct wells cut in the glass should be face up.
- Place the aqueduct gasket on top of the glass aqueduct,to form a canal between the aqueduct wells.
- Wick off excess buffer from the coverslip and place sample side down ontop of the aqueduct gasket. The sample should align with the canal.
- Place the metal part of the chamber on top of the coverslip by aligning the clamps and holes (it only fits one way).
- Clasp the plastic chamber top against the metal chamber bottom to hold everything together, then invert the chamber.
- Move the metal clamps into place, and tighten using the metal collar.
- Glucose Oxidase powder
- Catalase
- 20x SSC buffer
- 50% Glucose Solution
- 15 g Glucose + 30 mL water,
- heat up to 60C and Nutate overnight to dissolve,
- or microwave 15s and vortex.
- ( Recipe for 40 mL, rescale appropriately, the enzymes are expensive, Buffer lasts 72 hours at RT under 1" of mineral oil)
- In a 1.5 uL tube measure out 10 mg Glucose Oxidase (yellow powder, stored at -20C) and dissolve it in 500 uL 2x SSC by vortexing
- Add 100 uL dissolved Catalase solution (20 mg/mL stock) (yellow brown liquid, sediment free). Mix gently. Do Not vortex.
- In a 50 mL flask, add 4 mL 20x SSC
- Add 8 mL of 50% Glucose Solution (stored at RT, filter sterilize)
- Add all 520 uL of enzyme mix
- Gently fill to 10 mL with ddH2O.
- (avoid mixing in extra air, the point of this buffer is to remove disolved oxygen from the buffer).
- overlay solution with ~1 in (2-3 mL) of mineral oil.
- (this prevents oxygen from the air dissolving back into the buffer)
- Ethylene carbonate
- 20x SSC
- Nuclease-free water
- universal readout probe (200 uM stock)
- adapter-probes (10 uM stock)
- toehold-probes (10 uM stock)
- Prepare labeling buffer mix with a final composition of:
- 2X SSC
- 0.1 uM universal-readout probe (0.5 uL of 200 uM stock per mL of hybridization buffer)
- 25% ethylene carbonate (EC)
- Note: heat pure EC to >42C in water bath to liquify
- Add the 25% EC to the diluted SSC to avoid crystallization.
- Prepare enough for 600 uL per hybridization
- Add 600 uL of labelling buffer mix to every well
- negative controls (hybridizations/wells that don't get an adapter probe) don't need universal-readout probe (which is expensive).
- Add desired adapters at 0.1 uM final concentration (6 uL of 10 uM working stock in 600 uL of buffer)
- Add the toehold probes for each adapter to the following well at 0.3 uM final concentration.
- turn on microscope main-power switch (if necessary)
- turn on lasers (if necessary). Allow 5 min to heat up before activating
- open the MPB GUIs to activate the 560 and 647 lasers
- it may be necessary to select the serial-port icon and search COM ports for the GUI to connect to the laser.
- turn on the IR focus lock laser (if necessary)
- Power on the fluidics system (if necessary)
- Open the Hal-software (controls the microscope camera)
- Load parameter files into Hal
- currently these are Bleach_Pars.xml and ConvZscan_Pars.xml
- Open the Kilroy-software (controls the fluidics system)
- Load desired fluidics protocol into Kilroy.
- Create an Experiment folder on the data drive using the naming convention:
- YYYY-MM-DD_SampleType_ProbeType
- Create a Settings folder inside the data folder to save your parameter settings, recipes, and other run-documentation.
- Add oil to objective and mount flow-chamber with sample firmly on microscope stage.
- center the objective in the middle of the flow chamber, or aligned with the sample if you can see it.
- Connect the fluidics tubes to the flow chamber.
- check flow connections by flowing 2X SSC (Bleach buffer), using Kilroy
- Mount the 96-well plate of readout probes on the flow system
- Fill up the Bleaching Buffer (2X SSC) and Wash buffer reservoirs (30% formamide in 2X SSC).
- Wash Buffer should be made fresh every 1 - 2 weeks.
- In Hal, get the sample in focus, and activate the focus lock.
- this is a good time to check your sample staining.
- also a good time to calibrate the laser intensities.
- Open the Steve-software and record a mosaic around the sample
- this can be done in brightfield or using the fluorescence
- "run-shutters" in hal needs to be unchecked to use the fluorescence, since the camera's first frame fires before the lasers do.
- Select and save positions.
- Save your positions in the Settings folder.
- Save the mosaic in a Mosaic folder in your data folder.
- Write the "Dave Recipe"
- it is recommended you copy a previous recipe into your Settings folder and modify that.
- Check that the save directory paths are updated
- Check that the hybridization valve commands are correct.
- Check that the offset value in the movie parameters matches the center of focus of your sample.
- Generate all the empty folders ti save your hybridization data in.
- There is a little matlab script to autocreate the folders and hybridization commands, which can speed things up over copy-paste.
- Launch Dave
- open the Dave software
- drag you Dave recipe into Dave to load it
- select your saved position file
- save the Dave XML that saves a record of Dave's actions (we typically call it "Run.xml").
- Run the validate button
- this will make sure the parameter files are loaded and that the target folders exist
- Final checks
- make sure the Laser intensities are set as desired for each parameter / movie type
- make sure run-shutters is checked for each parameter type.
- make sure the focus lock is set to Z-scan and is "Locked"
- Make sure all the fluidics wells are properly aligned.
- Start!
- when all is ready, select "Start" in Dave.