In United States, cases of human injuries, loss of pets and livestocks caused by wild coyotes are reported every year. Since wild coyotes usually inhabit in rural area, pets and livestocks in those places are more vulnerable to coyote attacks. However, there are few specialized solution or devices created to solve this problem.
Similar studies whose purpose is to detect animals use WiFi. However to cover large areas such as farmland, it's range of communication is too short. (45 meters at 2.4GHz, 15 meters at 5GHz) Also devices for its communication have high cost, making it totally unaffordable to use in any agricultural solution. This is why LoRaWAN is implemented in this project. It has wider communication range, especially in rural area. (5 kilometers in urban area, 15 kilometers in rural area) And the equipment cost is lower than WiFi.

-
Heltec ESP32 WiFi LoRa 32 (V2)
-
Raspberry Pi v3
-
USB microphone AK5371

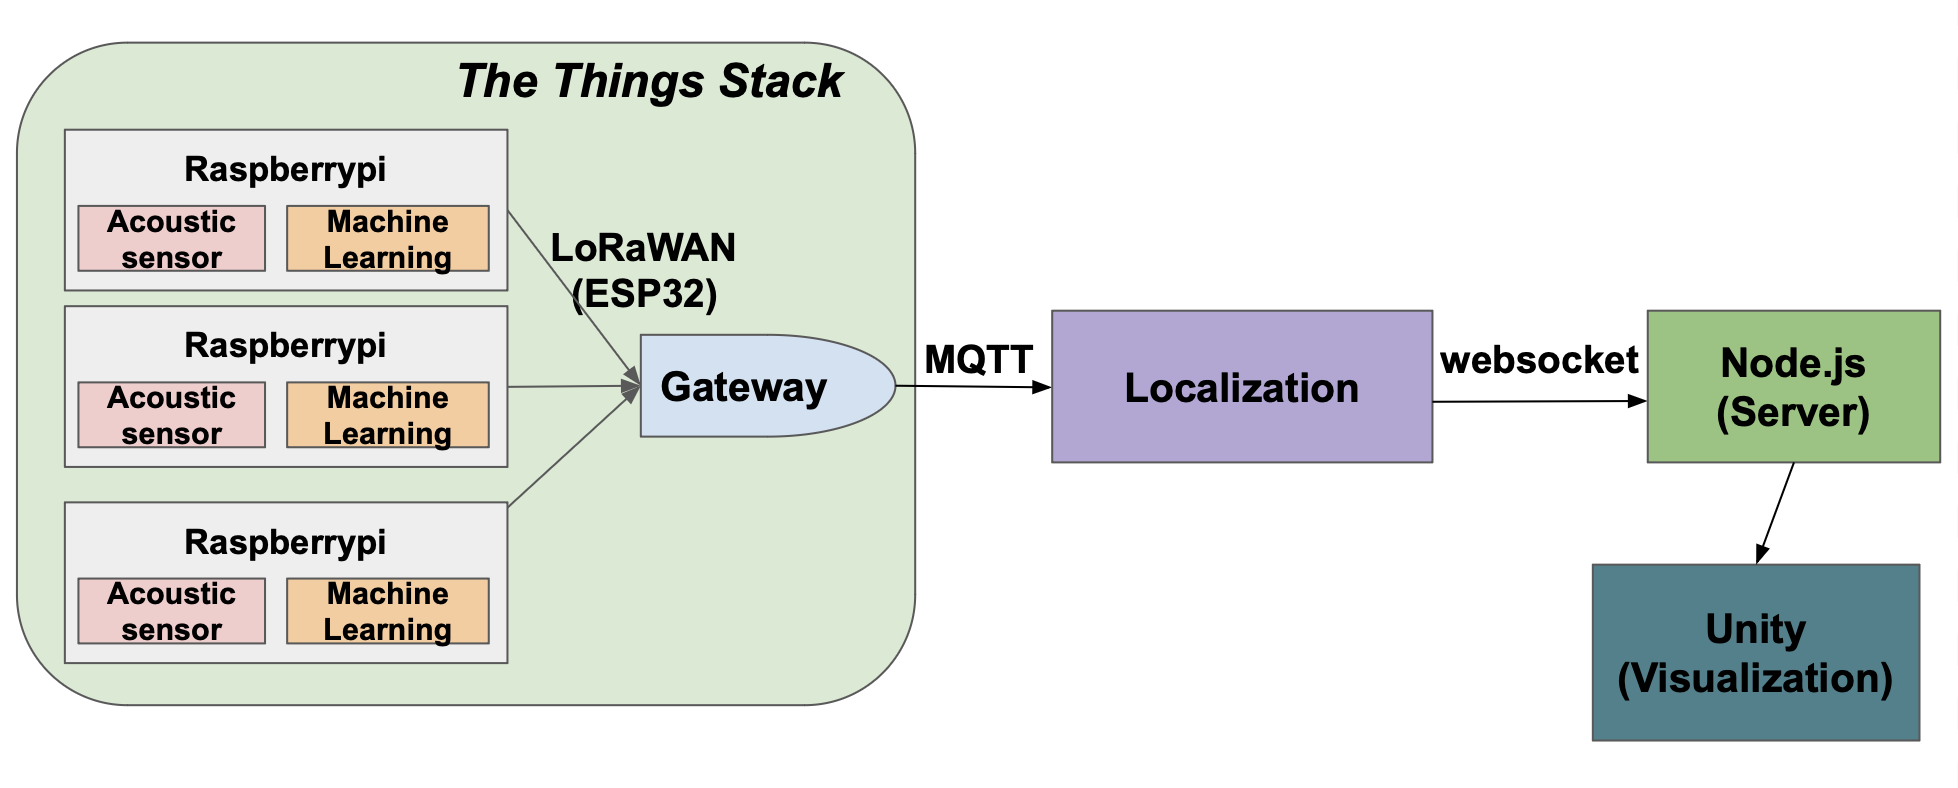
Microphone - Raspberry Pi - ESP 32
code/rec_voice_ver1.py should be run inside the Raspberry Pi.
-
dependencies
  #install sounddevice ver 0.4.1
  python3 -m pip install sounddevice

  #install pyserial ver 3.4
  python -m pip install pyserial
The microphone(acoustic sensor) needs port setting due to the usb port changing issue. It happens when the Raspberry Pi reboots, so it needs to be fixed to a custom port ttyUSB_DEV1. Following is the setting process of the Raspberry Pi.
-
USB port setting
  check ttyUSB port using
      $ ls /dev
  check idProduct value using
      $ udevadm info --name=/dev/"checked tty usb port" --attribute-walk
  check rules file
      $ sudo nano /etc/udev/rules.d/**
  write this in the rules file
      SUBSYSTEM=="tty", ATTRS{idProduct}=="idProduct value checked before", SYMLINK+="ttyUSB_DEV1"
  run
      $ sudo udevadm trigger
  check the new fixed port
      $ ls -l /dev/ttyUSB*
ESP 32 - Arduino IDE Settings
-
Arduino IDE version: 2.0.0 (available on Windows)
-
Installation guide: https://docs.heltec.org/en/node/esp32/quick_start.html#via-arduino-board-manager
1. go to File>Preference and add additional board manager (link: https://github.com/Heltec-Aaron-Lee/WiFi_Kit_series/releases/download/0.0.6/package_heltec_esp32_index.json) 2. go to Tools>Board>Borads Manager, search 'Heltec ESP32' and download the boards manager 3. go to Sketch>Include library>Manage libraries and install MCCI LoRaWAN LMIC library by IBM, Matthijs Kooijman, Terry Moore, ChaeHee Won, Frank Rose 4. add #define hal_init LMICHAL_init in lmic_project_config.h file. 5. put APPEUI, DEVEUI, APPKEY of your own end node. -
board manager for Heltec ESP32 WiFi LoRa 32 (V2) : https://github.com/Heltec-Aaron-Lee/WiFi_Kit_series/releases/download/0.0.6/package_heltec_esp32_index.json
-
end device - server communication guide: https://www.aeq-web.com/lorawan-ttn-mit-heltec-esp32-lora-board-abp-mode/?lang=en
-
library used for communication between end device and tts(the things stack): https://github.com/mcci-catena/arduino-lmic
The code is also dockerized, check code/end_node/esp32_send_dockerized to compile the code in docker. .ino file is in volumes/Arduino/esp32_send. You have to change the APPKEY, DEVEUI, APPEUI for each sensor.
To compile the code, run the following command in /esp32_send_dockerized
docker build -t esp32_send .
To run the docker image
docker run -it --rm -v $PWD/volumes/Arduino:/Arduino esp32_send
-
To stop the container, type in
exit -
inside the container
To compile the code, type in
arduino-cli compile --fqbn esp32:esp32:heltec_wifi_lora_32_V2 --verbose esp32_send.ino
Inside the container, and the code in /volume/Arduino/esp32_send will be compiled
To upload the code, the device must be connected to the computer, and device should be connected with docker
To connect the device with docker, for ubuntu, type in
docker run -it --rm -v $PWD/volumes/Arduino:/Arduino --device=/dev/ttyUSB0 esp32_send
-
Then, inside the container, type in
arduino-cli upload -p /dev/ttyUSB0 --fqbn esp32:esp32:heltec_wifi_lora_32_V2 --verbose esp32_send.ino -
For the other OS, please refer to this page
RAK7249 WisGate Edge Max from RAKwireless
-
User Manual: https://docs.rakwireless.com/Product-Categories/WisGate/RAK7249/Quickstart/
-
Configuration Setting to Connect to the TTS(the things stack) server: https://www.thethingsnetwork.org/forum/t/setting-up-basic-station-protocol-on-rak7240-and-rak7249-industrial-gateways/37011/11
The Things Stack Community Edition v3.22.1
-
confidentials
  console address: https://nam1.cloud.thethings.network/console/

  id: lim406@purdue.edu

  pw: featherC9130*

  (expired by 2022.12.22)
This code is working on the premise of the fact that all of timestamp data from three sensors are received and the time difference between them are less than certain threshold described in the code. Otherwise, the code will loop and nothing will show up in the terminal until it gets the right input from the things stack.
-
dependencies
paho-mqtt
pip install paho-mqttsympy
pip install sympy -
mqtt subscribe settings
documentation link: https://www.thethingsindustries.com/docs/integrations/mqtt/mqtt-clients/eclipse-paho/
change mqtt subscribe settings to connect to your own tts server
sub = subscribe.simple(topics=['#'], keepalive=10 ,hostname="your tts server", port=1883, auth={'username':"your application name",'password':"your application's api key"}, msg_count=3) -
Environment setting
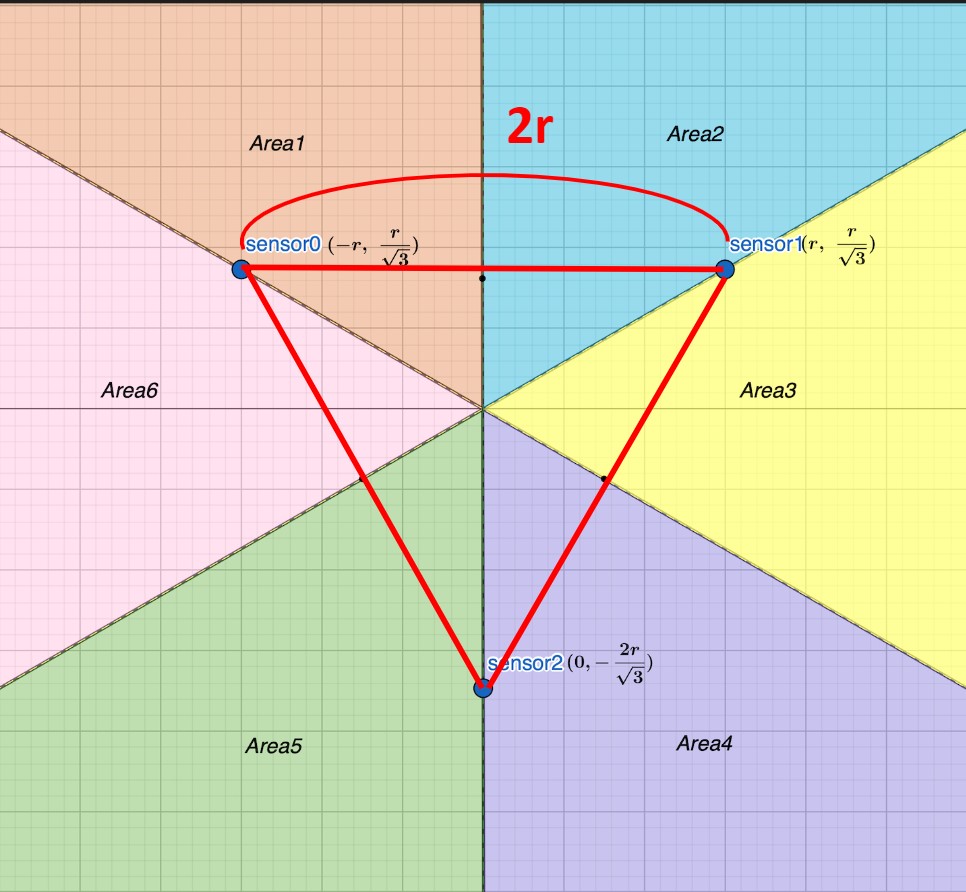
2r is the distance between sensors. and sensors are located in the form of an equilateral triangle. time_obj is the timestamp that indicates the detection time. td0 is the difference of 0, 1 and td1 is between 1, 2 and td2 is between 2, 0. v is the speed of sound. the area represents the section sound source is located.
The input you have to change is 2r, (m, n), which are the distance between sensors, and the location coordinates of the center of the triangle. Set those values of your own experiment environment. The default values are 304.8 cm and the location of KSW-square at purdue university.
You need to measure the cardinal direction and put the difference to the value theta. The default value is 8 degrees.
install docker desktop, at code/server/coyote-main, run
    docker build . -t your username/coyote-main
    docker run -p 8081:8081 -p 3333:3333 -d your username/coyote-main
server will run on your localhost.
http connection (port 8081)
    POST http://localhost:8081/api/sensors/getSound1Coord : get the coordinate information of sound 1 sensor

    POST http://localhost:8081/api/sensors/getSound2Coord : get the coordinate information of sound 2 sensor

    POST http://localhost:8081/api/sensors/getSound3Coord : get the coordinate information of sound 3 sensor

    POST http://localhost:8081/api/coyotes/getInitialCoyotes : get the coordinate information of last 5 detected coyotes
websocket connection (port 3333)
ws://127.0.0.1:3333
version
- 2021.3.9f1
Imported files and assets
- Jobs
- NodeJS plugins for Unity
- MapBox SDK (https://docs.mapbox.com/unity/maps/guides/)
- websocket-sharp.dll (https://github.com/sta/websocket-sharp)
- simple Android notifications free (https://assetstore.unity.com/packages/tools/integration/simple-android-notifications-free-68626)
- Clean Setting UI (https://assetstore.unity.com/packages/tools/gui/clean-settings-ui-65588)
- Loading screen animation (https://assetstore.unity.com/packages/tools/loading-screen-animation-98505)
- TextMesh Pro (download: Unity Editor -> window -> asset)
Configuration before executing
-
Make sure to insert the Unity Scene File before running
-
Unity Editor → File → Build setting → Putting a Assets/Scenes/LoadingScene, Assets/Scenes/Coyote inside ‘Scenes in Build’
-
Unity Editor → Edit → Project settings → Player → Android → OtherSettings → Identification → Set ‘Minimum API Level’ to Android 7.0 ‘Nougat’ (API Level 24), Set ‘Target API Level’ to Automatic(highest installed)
-
Unity Editor → File → Build setting → Platform →Set to ‘Android’
-
If you downloaded MapBox SDK again, change the SDK script
DeviceLocationProvider.csto code/unity/DeviceLocationProvider.cs -
How to set up a Mobile Phone Connection Environment for Project Run
1. Install the Unity Remote5 app on your phone device 2. Go to your phone developer options → Set USB Debugging Permissions to Allow 3. Unity Editor → Edit → Project settings → Editor → Unity Remote → Set ‘Device Settings’ to ‘Any Android Device’ 4. Run the Unity Remote5 app on your phone → Connect your phone to your computer (data cable) → Project Run -
Android only (version: Android 7.0 'Nougat', API Level 24 or higher)
Error debugging
- "namespace name does not exist" during MapBox SDK import": an error related to Mapbox AR, resolved after deleting all AR-related files in Mapbox.
- "warning: the option setting 'android.enabler8=false' is deprecated. it will be removed in version 5.0 of the android gradle plugin. you will no longer be able to disable r8", "starting a gradle daemon, 1 incompatible daemon could not be reused, use --status for details": an error due to android gradle file, resolved after changing version from com.android.tools.build:gradle:3.6.0 to 3.4.0 inside the 'baseProjectTemplate.gradle' file.
- "manifest merger failed 22 cannot be smaller than version 24 declared in library error": an error related to version error of minSDK and targetSDK in the AndroidManifest.xml in the Unity library file.
- "Import error: the name 'heading' does not exist in the current context": an error in DeviceLocationProvider.cs script file due to encoding issue. Change encoding method from ISO-8859 to UTF-8 or ASCII.
-
Jaehui Boo
Computer Engineering
Dankook University
Yongin, Republic of Korea
-
Hyemin Lim
Dept. of Computer Science and Engineering
Chung-Ang University
Seoul, Republic of Korea
-
Hyeongjun Kim
Computer Engineering
Daegu Catholic University
Gyeongsan-si, Republic of Korea
-
Nayoun Kim
Information Technology Convergence
Woosong University
Daejeon, Republic of Korea
-
Justin Anderson
Computer and Information Technology
Purdue University
West Lafayette, Indiana
-
WeiChieh Chin
Computer and Information Technology
Purdue University
West Lafayette, Indiana