
This section is for all students who are using FPGA technology at the University of Plymouth.
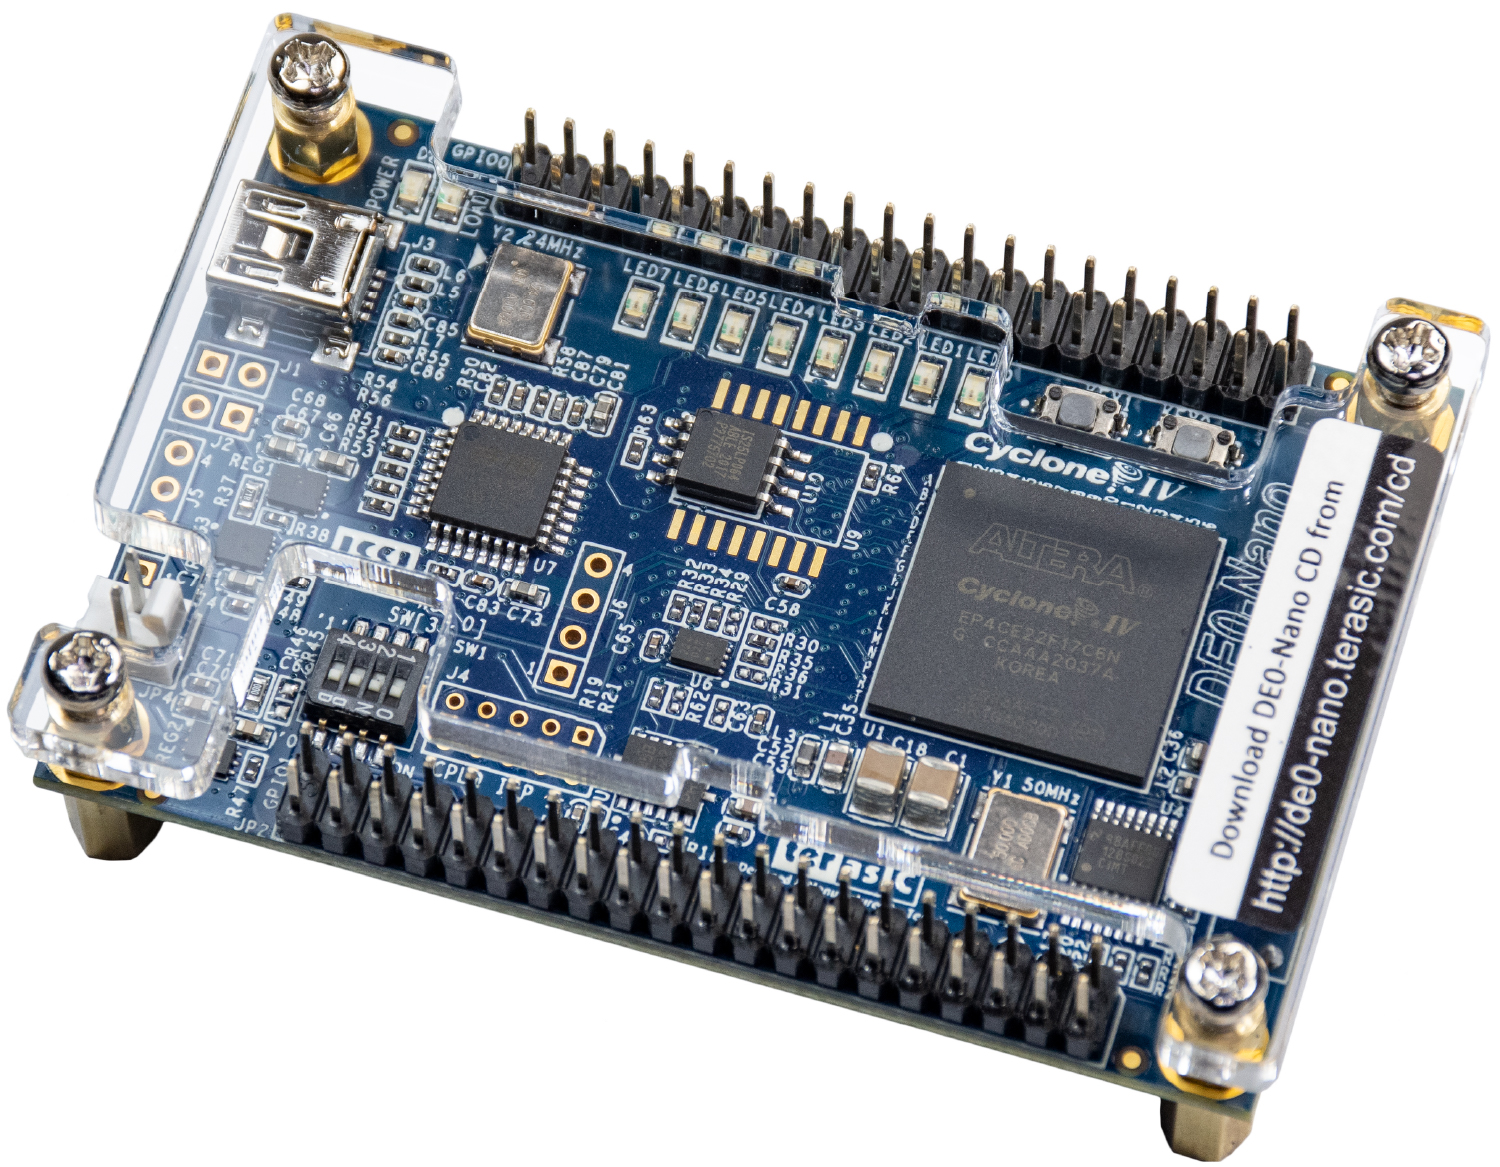
For this course, we use a Terasic DE-0 Nano based on an Intel / Altera Cyclone IV FPGA EP4CE22F17C6N
From the user manual:
The DE0-Nano is ideal for use with embedded soft processors—it features a powerful Altera Cyclone IV FPGA (with 22,320 logic elements), 32 MB of SDRAM, 2 Kb EEPROM, and a 64 Mb serial configuration memory device. For connecting to real-world sensors the DE0-Nano includes a National Semiconductor 8-channel 12-bit A/D converter, and it also features an Analog Devices 13-bit, 3-axis accelerometer device.
The DE0-Nano board includes a built-in USB Blaster for FPGA programming, and the board can be powered either from this USB port or by an external power source. The board includes expansion headers that can be used to attach various Terasic daughter cards or other devices, such as motors and actuators. Inputs and outputs include 2 pushbuttons, 8 user LEDs and a set of 4 dip-switches.
TIPS
Make a note of the FPGA part number: EP4CE22F17C6N
Bookmark the link to the [user manual for the DE0-Nano board]https://www.terasic.com.tw/cgi-bin/page/archive_download.pl?Language=English&No=593&FID=75023fa36c9bf8639384f942e65a46f3)
This is needed when creating new projects in Quartus.
All software used on this course is available to students at no cost.
Two software development tools are used in this course:
- Intel Quartus II Lite Edition (with Cyclone IV support) available from Intel
- ModelSim (Intel FPGA Starter Edition, bundled with Quartus II)
The current version we are using is Quartus II Lite. All support materials in this course refer to the version for Microsoft Windows.
If you are planning to work on your own computer (Running Windows 10), please please observe the following instructions when setting up your computer.
Installation Instructions
You should watch the following three videos:
The example project is located in <root of this repository>\tasks\Task-0-GettingStarted
A summary of the key points in provided below:
-
Download Quartus II from Intel
- Select the Lite edition
- Choose the release you want to install
- You can download the combined installer (larger)
- Alternatively, you can download the individual files
- Quartus Prime (Lite)
- ModelSim-Intel FPGA Edition (includes Starter Edition)
- Cyclone IV device support
-
Install Quartus II on your computer
- When asked, include Cyclone IV Support
- When asked, include install the ModelSim Starter Edition
-
Plug in your DE0-Nano Board
-
Run device manager on your PC
- Find the entry for "Altera USB Blaster" (it will have an exclamation mark against it)
- Right click this device, and click Update Driver
- Choose "Browse my Computer for Drivers"
- Browse to
C:\intelFPGA_lite\20.1.1\quartus\drivers
Device manager should be able to locate the driver and install it. If this does not succeed, see the "Cannot program the FPGA" section in the trouble shooting guide.
## Version Control
These notes and the examples that accompany them are hosted on GitHub. This requires the use of the git version control system.
For this course, you should install the following:
For this course, you will need to do two things:
- Create an account on GitHub
- Install GitHub Desktop and Sign In
First of all, you can simply create an account using https://github.com/
You might want to change your account to a student account in order to get additional benefits - https://education.github.com/pack
Once you have done this, you must register this using the following form:
CLICK HERE TO REGISTER YOUR GITHUB USERNAME
We need this information in order to share code with you. Never disclose your password!
You can download the very useful GitHub Desktop software on your own computer using the following link:
When you run this the first time, you make be asked for your GitHub username and password. Once this is entered for a particular computer account, it should remember it for you. If you change computer or user account, it will need to be reentered.
At some point, the tutor will email you a link to obtain a copy of various projects on GitHub. This link should launch use GitHub desktop automatically.
- Navigate to this page
- Click the
Codebutton and selectOpen with GitHub Desktop
Click here to watch a video explaining how to do this
IMPORTANT - PLEASE READ
Clone the files outside of any folder that is synchronized to the cloud (such as OneDrive, DropBox or iCloud). Building software generates thousands (even millions) of small temporary files which you probably do NOT want to synchronize to the cloud. To do so would use unnecessary CPU and network bandwidth.
On a personal machine (not shared with anyone else), I strongly suggest you use a folder with a short path and no spaces, such as
C:\git. You could also clone inC:\Users\<username>where<username>refers to your username.GitHubDesktop tends to default to your
Documentsfolder. I DO NOT RECOMMEND YOU USE THIS
Occasionally, the notes and sample code will be changed. Before you start any work, it is strongly suggested you click the "Fetch Origin" button in GitHub desktop.
I suggest you create your own repository for your own work. Copy the tasks from the Embedded-Systems repository into your own workspace. This way:
- You can push your changes to your own private repository
- You can easy obtain updates to the tasks / notes without having to merge them into your own code
You may already be using a cloud service, such as OneDrive, iCloud or DropBox. These services monitor a collection of folders and mirror everything in the cloud. This is often done in the background while you work.
This is fine for office documents and photos, but less suited to software development.
A key difference is:
- We can often identify certain files type we do NOT need to keep. These are identified in a file named
.gitignore(you can find this in the root of the repository) - With Git and GitHub, we choose when the files are synchronized and in which direction. However, this does mean getting into the habit of doing this.
There is much more than could be said about these tools, but for now, we will leave this and focus on coding.
GitHub has great support for "Pull Requests". If you find an error in the notes or the Tasks, you can do the following:
- Create a branch for the fix using the Embedded-Systems repository
- Make the edit
- Commit the change and push (it will offer a pull request)
This will generate an email for the tutor to review your proposed changes and the option to merge them in.
DE0-Nano User Manual, Terrasic.com , accessed 27/05/2021