Example of urls.py file :
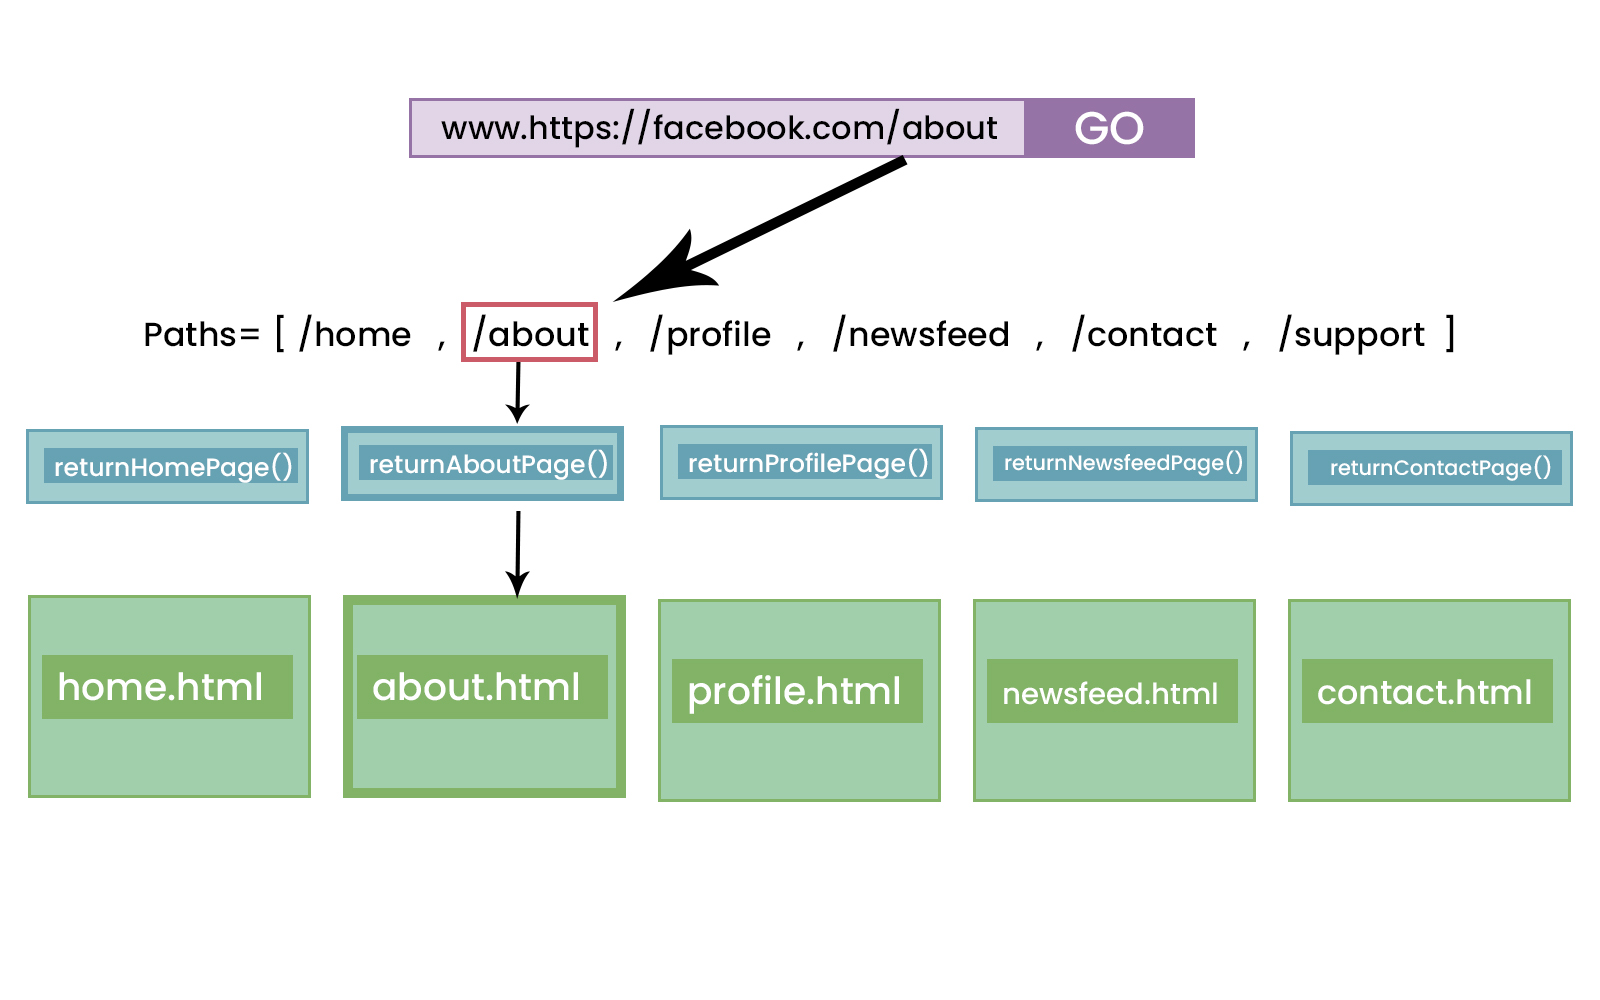
Section 2
- Specify views.py in main project folder if required
- Specify urls.py in the app folder as it cleans up the code
- Use include inside urls.py on main project folder .
- Template foder can be created either seperately and specifies under DIRS(inside settings) or can be created seperately inside each app .
Get familier with
- views and urls
- Templates
- Jinja syntax => include , extends
Section 3
-
Creating a super user means we now have a admin level permission and we can access the admin panel
-
We can perform basic crud operations with the help of admin panel .
Example of Django Models :
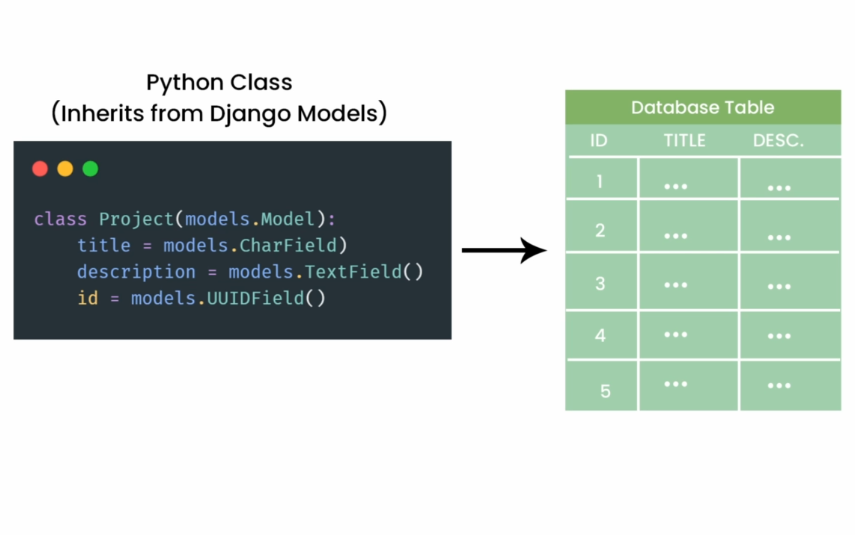
-
Once we migrate our Model class it turns into a database table
-
auto_now_add=True Means whenever this model instance will be created generate a DateTime accordingly
-
Create a model class -> makemigrations -> migrate -> register the model with the admin panel
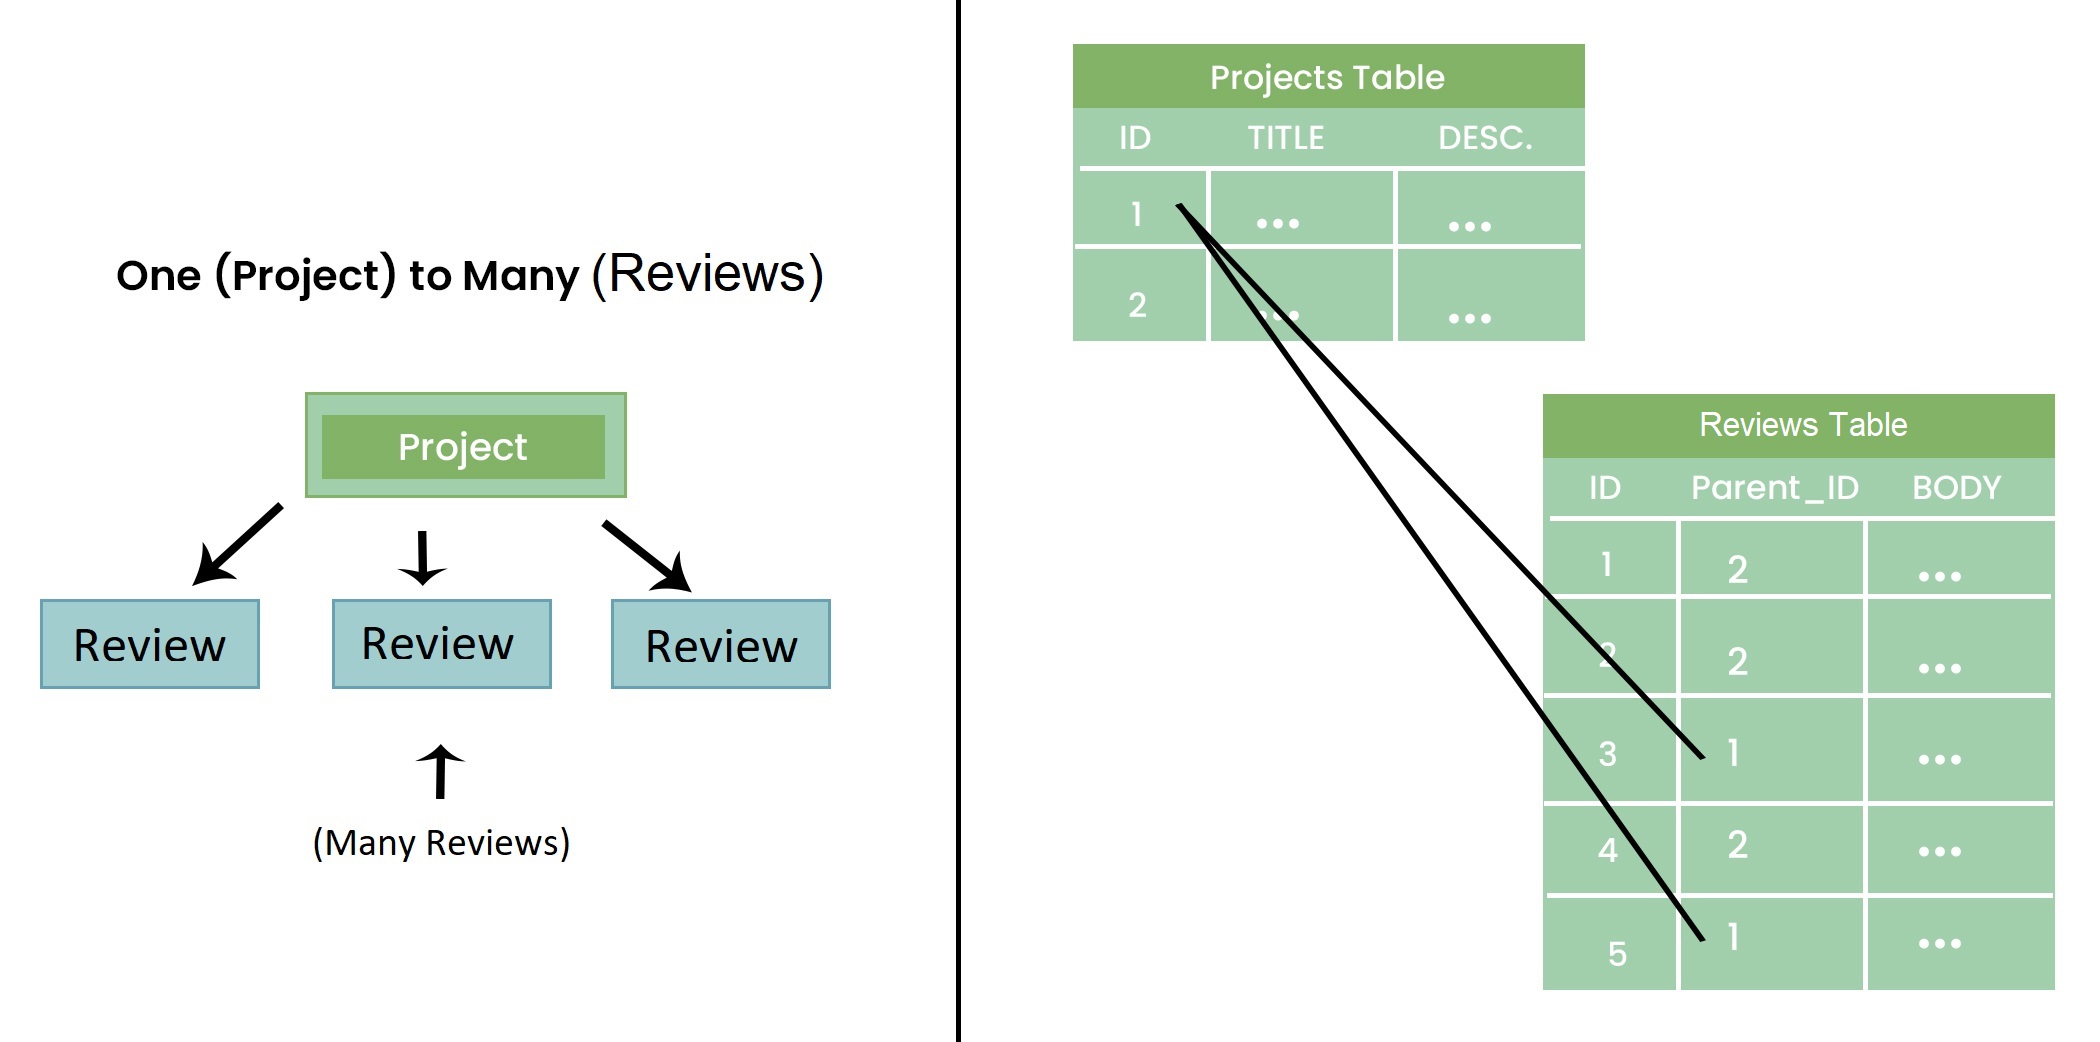
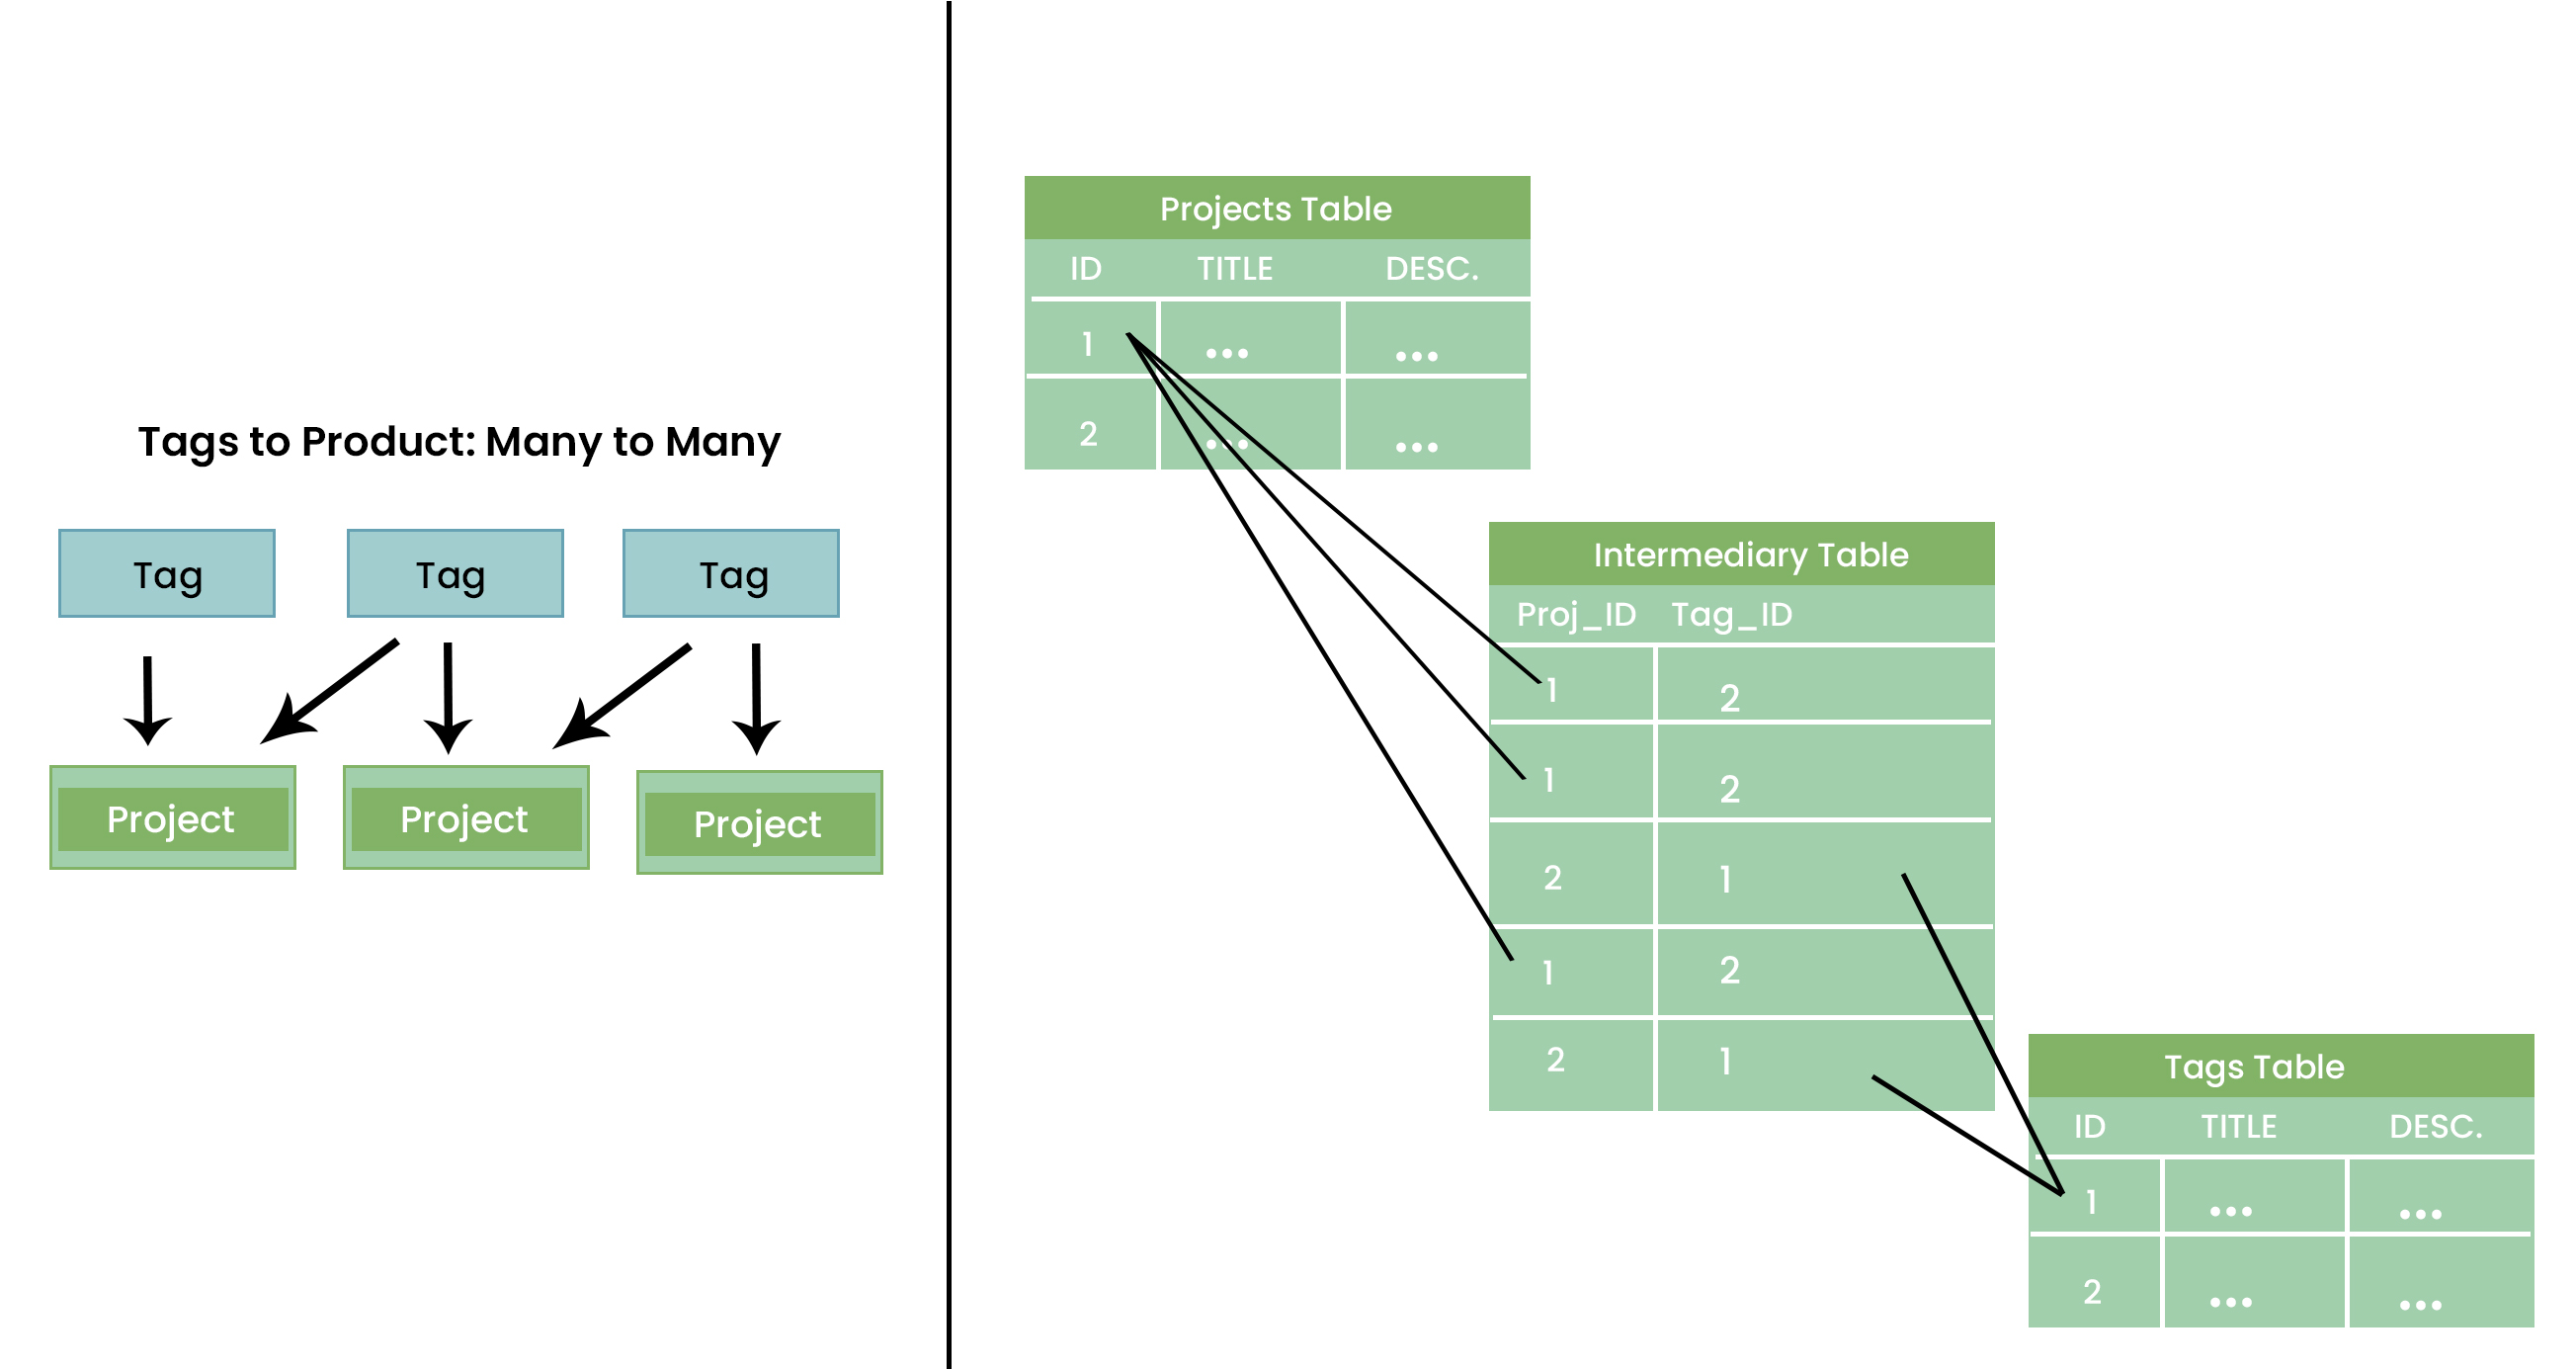
Relationships
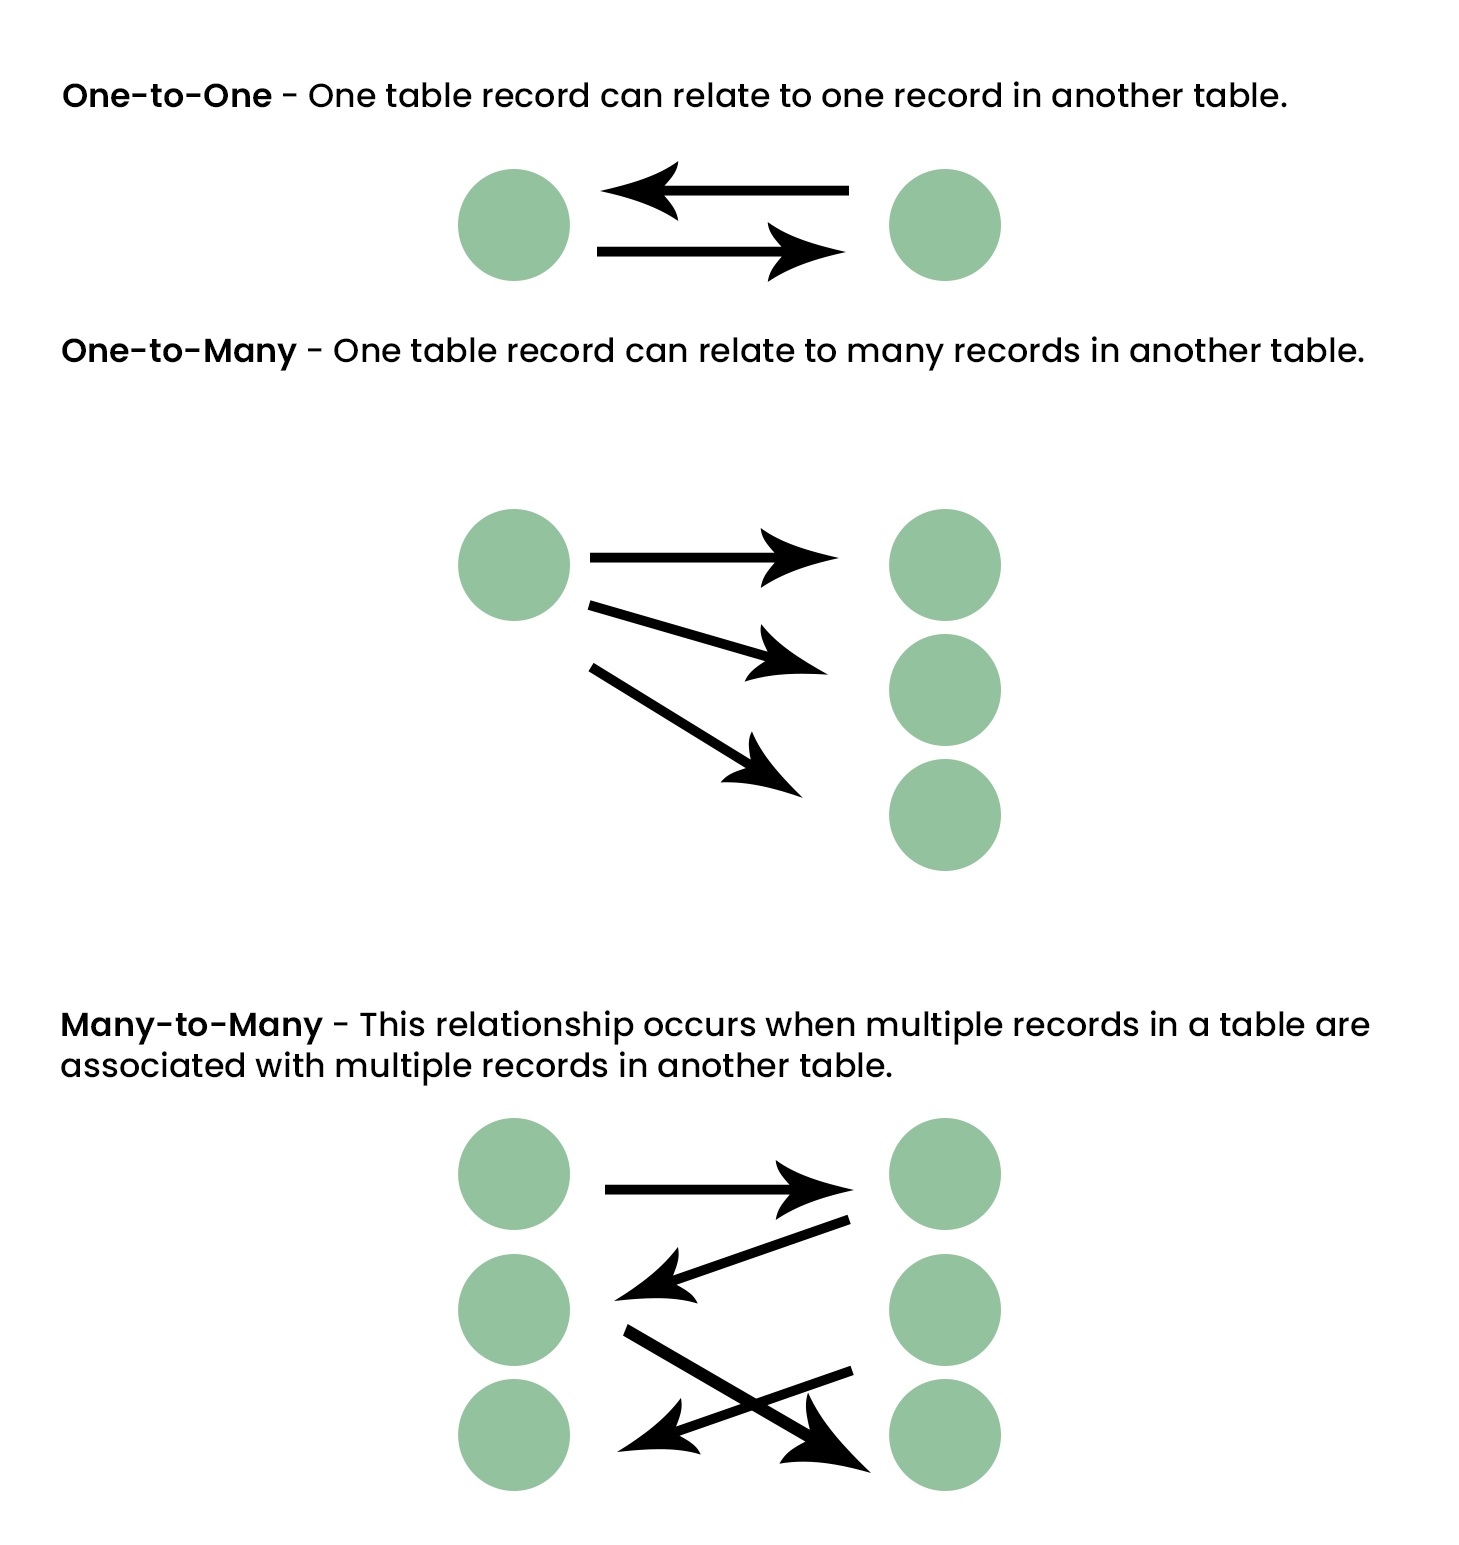
- One to Many Example
- Many to Many Example
- CSRF Token ensures that our data wasn't manipulated and it is safe and clean .
Section 4
-
Static files are any external files like css,js etc .
-
create a folder static -> images -> css -> js
-
Configure the statuc dir path in settings.py
-
Added a featured_image column in project table
-
Configure the media upload path in settings.py
-
When we put our project in production then we cannot access the static files so we need to define STATIC_ROOT in settings.py
-> STATIC_ROOT = os.path.join(BASE_DIR, 'staticfiles') -> After creating the above file we neet to use python manage.py collectstatic command
-
So our static files are bundled up but we still need a third party library to access the files .
-
pip install whitenoise , Whitenoise is a library which allows us to access the static files

Section 5
(Theam installation)
-
Applying Themes to the project
-
{% for tag in projects.tags.all %} {{ tag }} {% endfor %}
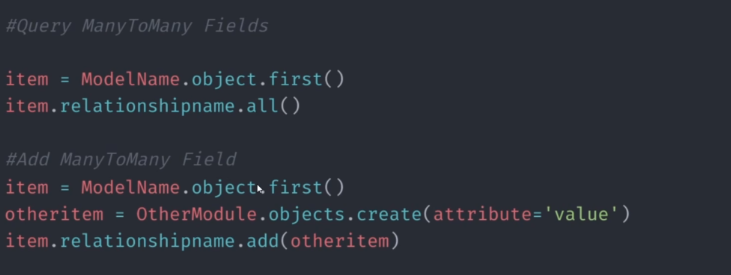
Allows us to access many to many relationship
-
If more then one vote is there then we will pluralize the vote Vote{{ project.vote_total | pluralize:"s" }}
-
Worked with the Themes
Section 6
(Adding more apps)
- Create a new app users
- Configure the app in setting.py file
- Added template->users->profiles.html
- added a function profiles in views.py file which renders the page profiels.html
- create a urls.py file and pass an empty path
- In the main project folders inside urls.py file set the patters users/
-
Profile has one to one relatio with the user
-
Every time we create a user , a profile is automatically generated
-
models.py -> Profile Class
-
Create a many to one relationship in project to profile by specifing a foreign key in owner column
-
Import the template for users page
-
{{ profile.bio|slice:"150" }} Limit the characters
-
Create Skills model inside users app
Add and render profiles
-
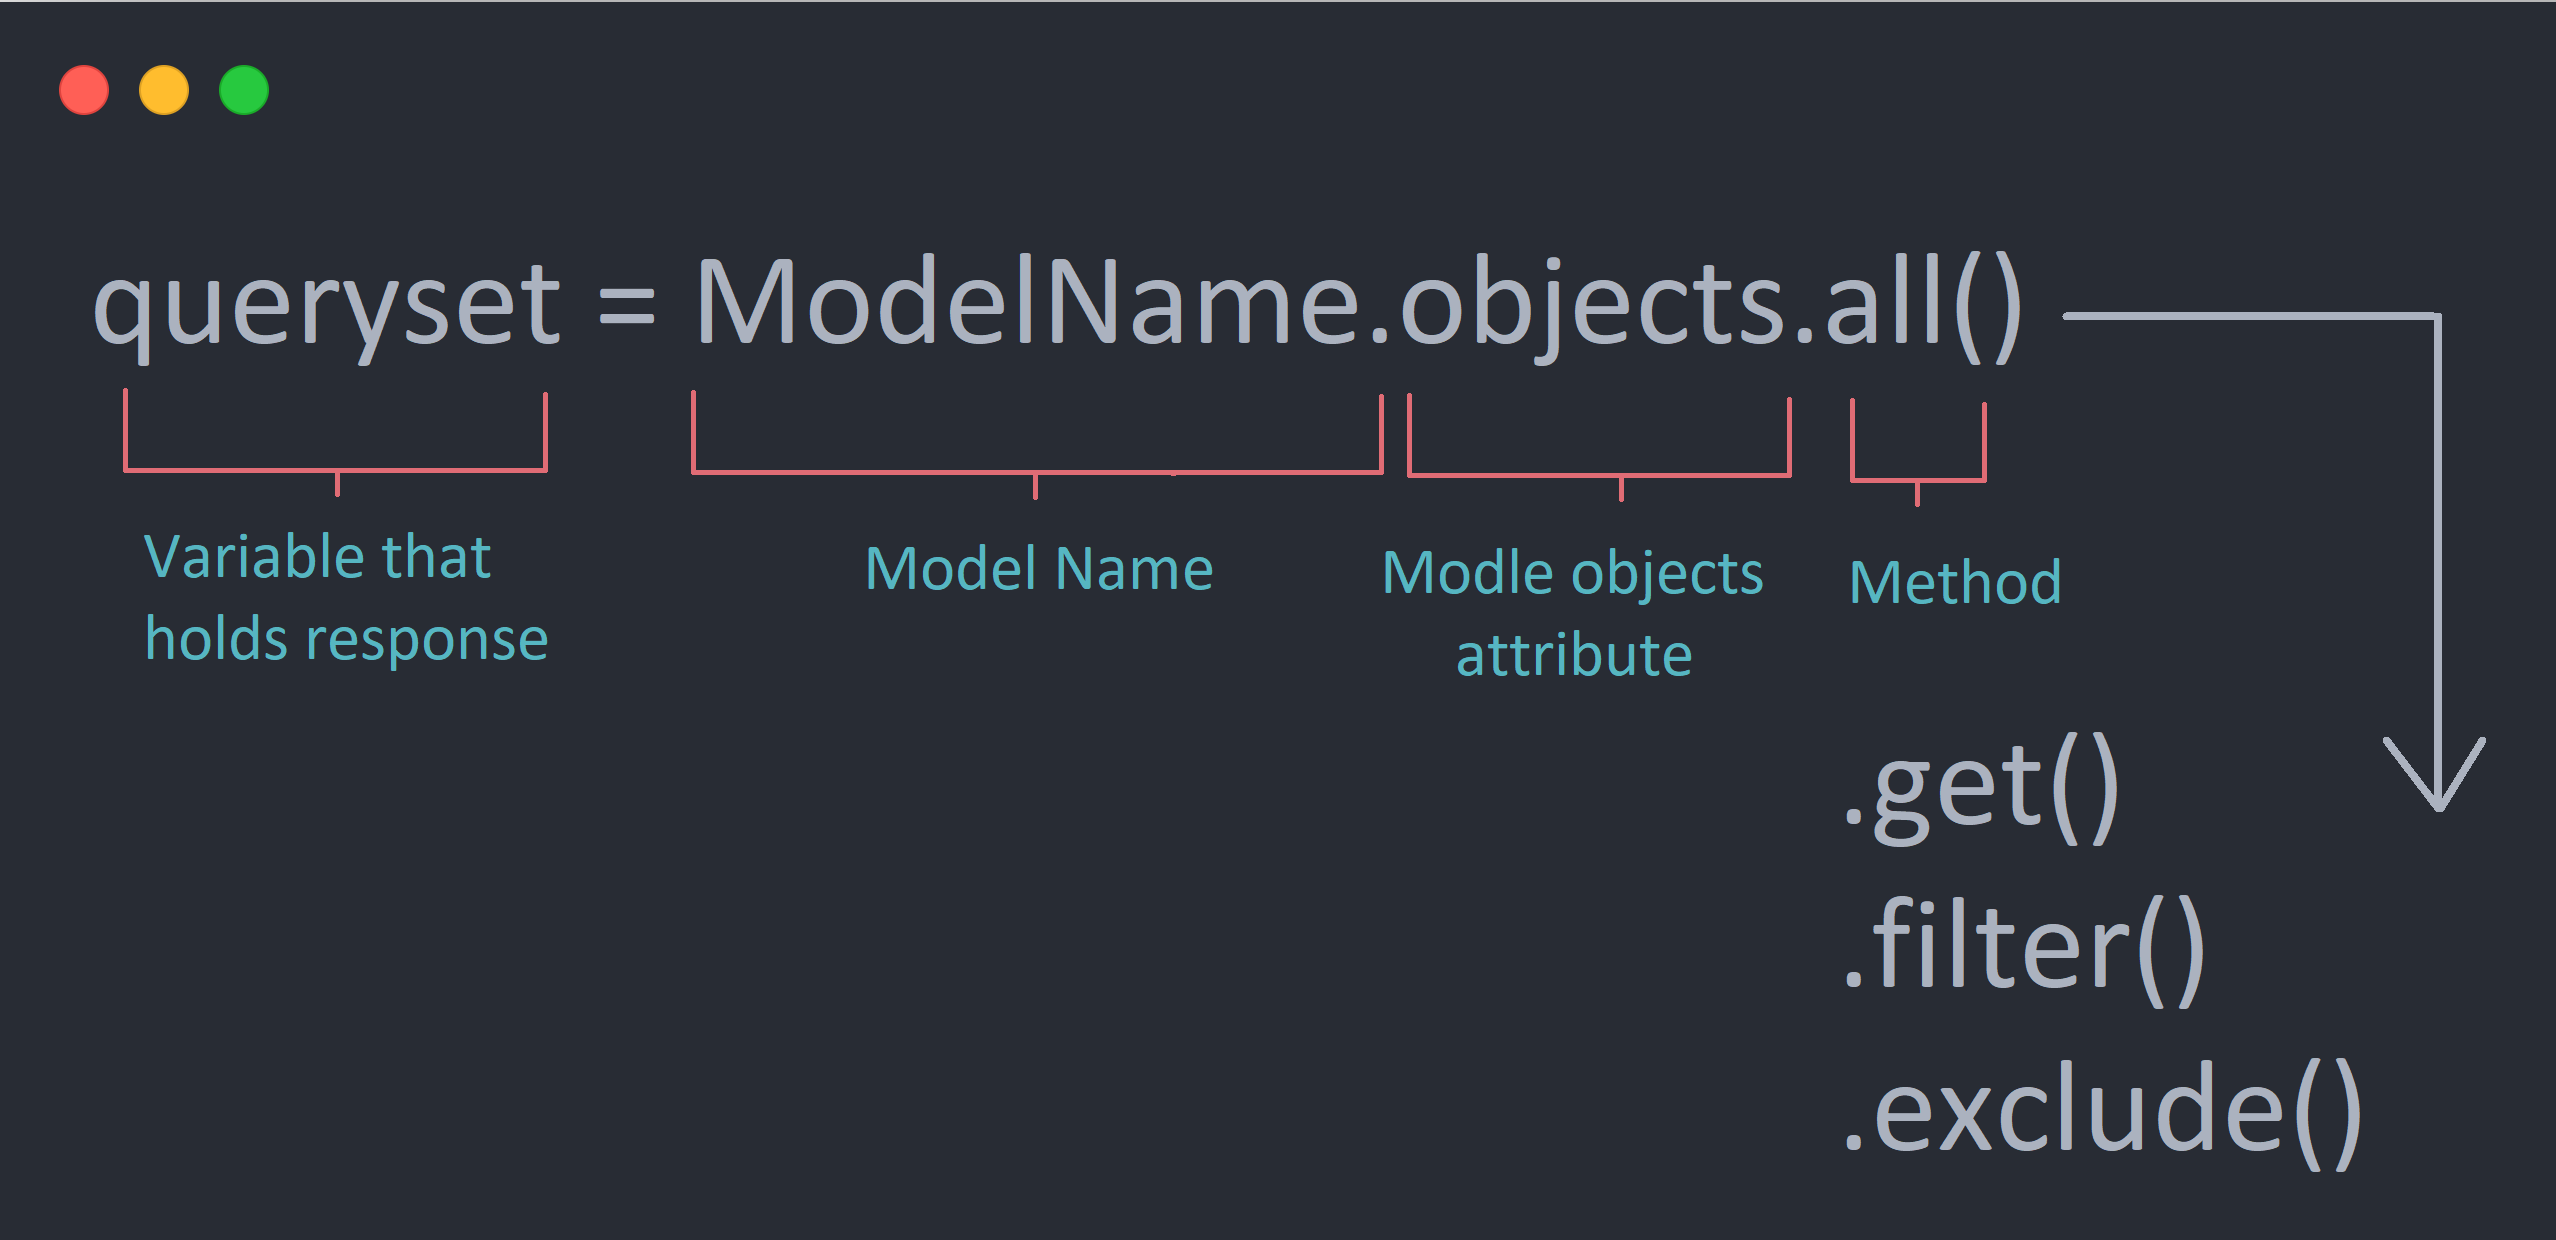
topSkills = profile.skill_set.exclude(description_exact="") -> If skills does not have a description do not includ it
-
otherSkills = profile.skill_set.filter(description="") -> Include the skills which has an empty description
-
Error in
href="{% url 'user-profile' project.owner.id %}"
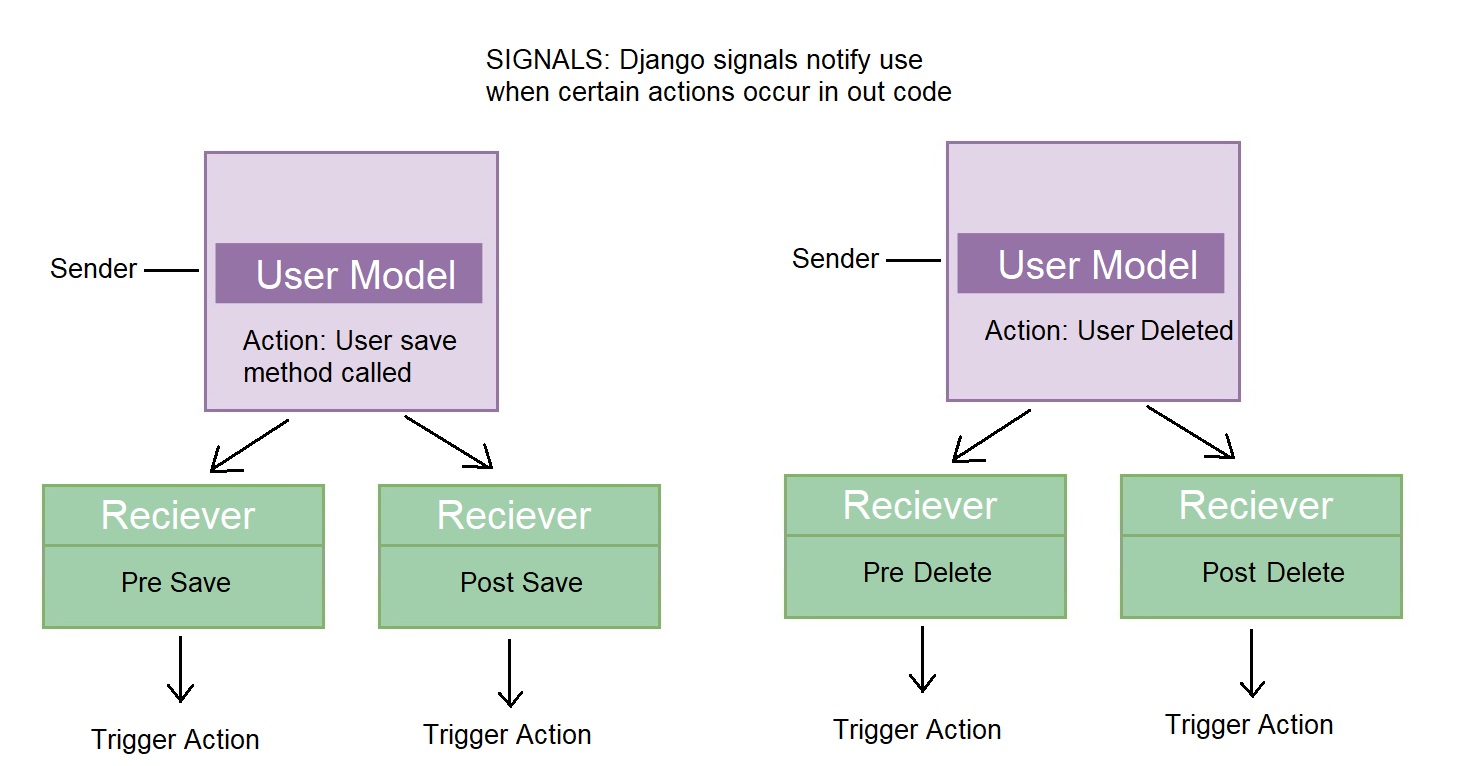
Signals
-
When a user registers itself and is added to the database so we want to fire up some event to let them know via email that they now have an account in some website .
-
Signals are the way to listen the actions performed in our website
- Create signals insider users -> models.py
from django.db.models.signals import post_save
def profileUpdated(sender, instance, created, **kwargs): print("Profile Saved!")
post_save.connect(profileUpdated, sender=Profile)
- Some issue in creating profile automatically(Solved)
Signals
- Whenever a new user is created or deleted the profile is automatically created or deleted
-
Create a seperate signals.py file under user app
-
def ready(self): import users.signals
- Create this method under app.py file to let django know about our signals.py file
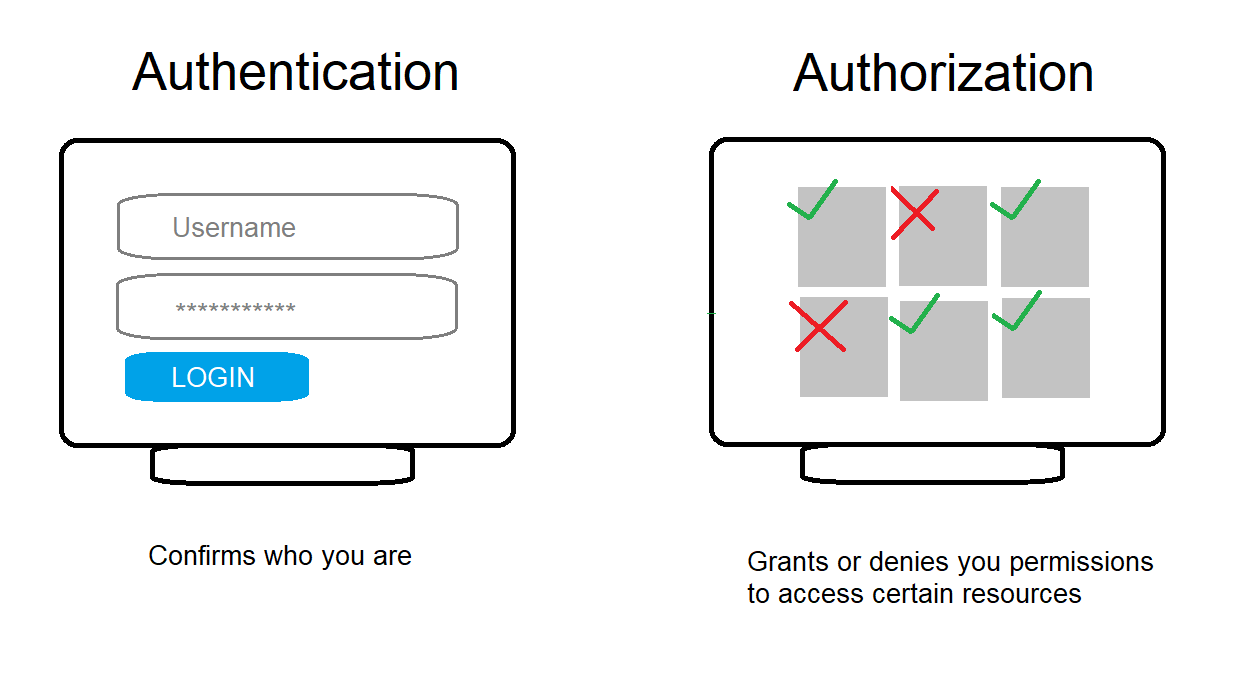
Section 7 (Authentication)
User Login, Logout and Flash Messages
-
When we run our initial migrations few of the tables are created one of them is sessions, which simply stores users sessions
-
It creates a session Id and puts it into the browser
-
Create a loginUser and logoutUser view
-
Inorder to restrict unauthorised users to access certain pages of our website we use
-
from django.contrib.auth.decorators import login_required
-
user @login_required(login_url="login") above the view which we want to restrict
- from django.contrib import messages
- Attach a pop up messages with the user sessions
User Registration
-
Create a registerUser view inside user app
-
from django.contrib.auth.forms import UserCreationForm
- Import UserCreation form so most of the things like password hashing is done internally we are not suppose to do it explicitly
-
Customize the user creation form
-
Create a form.py file inside users app
Styling Login and Register Page
-
Inorder to load static files in our templates
- {% load static %}
-
Reflect the login.html and signup.html templates in login_register.html under user -> template
-
Styling for register page will not get reflected because we are using django forms and the filed are automatically fetched .
-
Inorder to get the styling below code will be used which is picked up from
def init(self, *args, **kwargs): super(CustomUserCreationForm, self).init(*args, **kwargs)
    for name, field in self.fields.items():
        field.widget.attrs.update({ 'class':'input'})
-
Output some helper text and some error fields
-
{{ field.help_text }} will bring all the helper text
-
Style the alert messages
**Issue with the closing button in alert box
Section 8 (User Action)
User Account
-
Add a account section so that user can add projects from there itself
-
We will display the information of logdin user on the account page where user can edit the info.
-
Crete a userAccount view
-
Loggdin users info can be fetched via
requers.user -
Render all the userinfo in accounts page
-
skills are all rendered at once here we don't specipy skills with and without description .
User Edit Profile
-
User Should have the ability to edit there own account inside account page
-
Adding CRUD functionalities to user account page
-
Create a
editAccountview and a templateprofile_form -
Under forms.py create a class
ProfileForm -
Under signals.py create
updateUser
User Project CRUD
- We will add update project code and make sure that only the loggedin user can make modicifations to it .
Add, Edit & Delete add skills
-
Under users app template folder create
skill_form.html -
Under views.py create a
createSkillview -
Create
SkillFormclass under form.py- fields = 'all' => To fetch all the fields
- exclude = ['owner'] => To exclude some of the field
-
Create
UpdateSkillview -
Added template to our add and update skill forms
-
Create
deleteSkillview -
Dynamic link
href="{{ request.GET.next }"href="{% url 'delete-skill' skill.id %}?next=/account"
Section 9 (Search and Pagination)
Search
-
name__icontains means removing the case sensitivity
-
Inside users app cereate a utils.py file which contains all the utilities functions .
-
Create searchProfiles function inside utils.py file
-
Create search function for profile and for project
-
Create a utils.py file in projects app also
Pagination
-
Add Pagination to the projects and profiles
-
Order the projects by date
-
Insider models.py under projects app add
class Meta: ordering = ['-created'] # Ascending Oder
class Meta: ordering = ['-created'] # Descending Oder
-
❮add this to get the back arrow symbol andNext ❯for the next arrow symbol in HTML
25.16 (Customize the pagination section to not have buttons more then 10)
-
Create logic in pagination if the number of pages passes a certain limit .
-
create a
paginateProjectview in utils.py and keep all the pagination related login there . -
Create a seperate html page inside root templage foder
pagination.htmland put the pagination related html login in there -
{% include 'pagination.html' with queryset=projects custom_range=custom_range %}
- In the above include we are passing variable queryset and custom_range to the pagination.html code
Search + Pagination Hacky Fix
- Some issue with searching with pagination (Not Fixed)
Section 10 (Reviews and Messages )
Reviews
-
Under Review model inside project app class Meta: unique_together = [['owner','project']]
- No instance of a Review can have save owner and same project
-
Added a owner column with foreign key relation with the profile table
-
Inside single-project modify the code to iterate through reviews section
-
{{ review.body | linebreaks }} linebreak is added if we added some line break while giving reviews .
-
Added
ReviewForminside forms.py under projects app. -
create a method
getVoteCountinside models.py of projects and put a prpperty decorator above it. -
We run the method by
projectObj.getVoteCountinside views.py this is done because of the property decorator . -
Order the projects by vote_ratio, vote_total, title
-
Add a condition to make sure that we can't vote on our own project and the users which aren't logdin can't vote.
-
queryset = self.review_set.all().values_list('owner__id', flat=True)
- Here we are getting list of all the users and flat = True ensures that we will get the actual id not just the object.
-
Enter the above conditions in single-project.html
-
return redirect(request.GET['next'] if 'next' in request.GET else 'account')
- The above condition inside views.py will make sure that when we login to add a review then we will redirected to the same project page where we left.
Send Message to other users
-
Create a
Messageclass in models.py under users app -
Inside view.py and under templates of users app create a function
inboxandinbox.htmlfile . -
We have
related namesargument in our recepent column because both sender and recepent are having profile as a referenced table .
18:49 (Some issue while rendering message) (Fixed)
-
Add
message.htmlfile to template->user->message.html which allows user to read a specific message. -
Create a
viewMessageview inside users app -
{{ message.body|linebreaksbr }}will ensure that linebreaks are actually added -
Making sure that whenever the message is read it is marked as read
message.is_read = True -
Creating a form to send message to other developers .
-
Create a template
message_form.htmlinside users app -
create a
createMessageview -
Create a
MessageFormclass under form.py file -
send message option should not be visible to our own profile
Section 11 (Sending Emails and Passoword Reset)
Sending Welcome Emails
-
https://docs.djangoproject.com/en/3.2/topics/email/
EMAIL_BACKEND = 'django.core.mail.backends.smtp.EmailBackend' EMAIL_HOST = 'smtp.gmail.com' EMAIL_PORT = 587 EMAIL_USE_TLS = True EMAIL_HOST_USER = 'tanujshrivastava2@gmail.com' EMAIL_HOST_PASSWORD = '#######'
-
In signals.py file under createProfile section
-
Generate a app password from gmail account and add to setting.py
Password Reset
(Will be add soon)
Section 12 (Building an API)
(Will look at it soon)
Section 13 (Production Preparation and Deployemnt)
Code Cleanup and Bug Fixes
- Adding seperate form for tags. (Will add soon)
Connecting to Postgres DB
- Crediantials to connect with postgres DB
DATABASES = { 'default': { 'ENGINE': 'django.db.backends.postgresql', 'NAME': 'devsearch', 'USER':'postgres', 'PASSWORD':'tanuj', 'HOST':'localhost', 'PORT':'5432', } }
-
Installing driver
pip install psycopg2 -
After configuring the postgres DB with our application we will create users .
Deploying the project on Heroku