-
Notifications
You must be signed in to change notification settings - Fork 0
Expand file tree
/
Copy pathsetup_tools.qmd
More file actions
379 lines (233 loc) · 17.1 KB
/
setup_tools.qmd
File metadata and controls
379 lines (233 loc) · 17.1 KB
1
2
3
4
5
6
7
8
9
10
11
12
13
14
15
16
17
18
19
20
21
22
23
24
25
26
27
28
29
30
31
32
33
34
35
36
37
38
39
40
41
42
43
44
45
46
47
48
49
50
51
52
53
54
55
56
57
58
59
60
61
62
63
64
65
66
67
68
69
70
71
72
73
74
75
76
77
78
79
80
81
82
83
84
85
86
87
88
89
90
91
92
93
94
95
96
97
98
99
100
101
102
103
104
105
106
107
108
109
110
111
112
113
114
115
116
117
118
119
120
121
122
123
124
125
126
127
128
129
130
131
132
133
134
135
136
137
138
139
140
141
142
143
144
145
146
147
148
149
150
151
152
153
154
155
156
157
158
159
160
161
162
163
164
165
166
167
168
169
170
171
172
173
174
175
176
177
178
179
180
181
182
183
184
185
186
187
188
189
190
191
192
193
194
195
196
197
198
199
200
201
202
203
204
205
206
207
208
209
210
211
212
213
214
215
216
217
218
219
220
221
222
223
224
225
226
227
228
229
230
231
232
233
234
235
236
237
238
239
240
241
242
243
244
245
246
247
248
249
250
251
252
253
254
255
256
257
258
259
260
261
262
263
264
265
266
267
268
269
270
271
272
273
274
275
276
277
278
279
280
281
282
283
284
285
286
287
288
289
290
291
292
293
294
295
296
297
298
299
300
301
302
303
304
305
306
307
308
309
310
311
312
313
314
315
316
317
318
319
320
321
322
323
324
325
326
327
328
329
330
331
332
333
334
335
336
337
338
339
340
341
342
343
344
345
346
347
348
349
350
351
352
353
354
355
356
357
358
359
360
361
362
363
364
365
366
367
368
369
370
371
372
373
374
375
376
377
# Your New Tools
::: {.callout-note title="Learning Objectives"}
After completing this lesson learners will be able to:
- Install and access R and R Studio.
- Navigate the RStudio GUI.
- Install additional packages using R code.
- Create an organized class folder.
- Create and use an R Project.
:::
## Installing R and R Studio {#sec-install}
Follow the instructions appropriate for your operating system.
:::{.callout-warning title = "Tablet / iPad / Chromebook" icon=false collapse=true appearance=minimal}
<!---
If you are using a tablet, Chromebook or otherwise do not have a computer that you can install programs on, you can use Posit Cloud for this class.
- Make a **Cloud FREE** account at [https://posit.cloud/plans/free](https://posit.cloud/plans/free)
- Start a new project by clicking on the button in the top right corner
- Then go to @sec-nav_Rstudio to learn how to navigate RStudio.
The free account allows for 25 project hours/month, which may not be enough for this class. If you run into time limits or you are using this for another class you will have to upgrade to the **Cloud Student** plan which is $5/month.
--->
If you are using a tablet, Chromebook or otherwise do not have a computer that you can install programs on, you can use the Chico State JupyterHub for this class.
* Go to [https://chicostate.jupyter.cal-icor.org](https://chicostate.jupyter.cal-icor.org) and sign in with your Chico state account.
- You may have to click "Launch Server"
* On the "Launcher" page you will see all the programming resources available to you. Click on "RStudio"
You now have your own personal R Studio server to work in. You will have to upload homework script files and download compiled PDF assignment to your computer to submit your work.
Using the cloud is easier to initially setup, but having your own installation on your computer ensures that
- you want to keep the program free forever
- you will be able to put your files under version control
- you always have access to your code even with unstable or no internet
:::
:::{.callout-warning icon=false collapse="true" appearance=minimal title = "Windows"}
**Install R**
1. Go to <https://cran.r-project.org/bin/windows/base/> and download the latest **R installer**.
2. Double-click the downloaded file and follow the prompts (default settings are fine).
3. When finished, you can delete the desktop shortcut that looks like a blue R.
**Install RStudio**
1. Go to <https://posit.co/download/rstudio-desktop/> and download **RStudio Desktop (Free)** for Windows.
2. Double-click the installer and follow the prompts.
3. When installation finishes, open **RStudio** — it should detect R automatically.
:::
:::{.callout-warning icon=false collapse="true" appearance=minimal title = "MacOS"}
**Install R**
1. Go to <https://cran.r-project.org/bin/macosx/> and download the latest **.pkg** installer (Intel or Apple Silicon).
2. Double-click to install R.
3. If prompted to install **XQuartz**, use the link on that page to complete the setup.
**Install RStudio**
1. Go to <https://posit.co/download/rstudio-desktop/> and download **RStudio Desktop (Free)** for macOS.
2. Drag the **RStudio** icon into your **Applications** folder.
3. After installation, eject the downloaded drive by dragging it to **Trash**, then open RStudio from Applications.
:::
:::{.callout-warning icon=false appearance=minimal title = "Walkthrough videos"}
[Walk through video for Windows](https://youtu.be/KAeHFzxbHTA?si=xpeDGqt7gurg_rFR)
[Walkthrough video for Mac](https://youtu.be/ay25o485YXs?si=7r4qmmvtD15RM_eS)
:::
## Terminology
The basis of programming is that we write down instructions for the computer to follow, and then we tell the computer to follow those instructions.
We write, or *code*, instructions in R because it is a common language that both the computer and we can understand (with practice).
We call the instructions *commands* and we tell the computer to follow the instructions by *executing* (also called *running*) those commands.
Learning how to code is like learning a new language. There are rules and exceptions, and it can be extremely precise and sometimes frustrating in how literal it is.
[Writing clear commands can be like explaining how to make a PB&J sandwich to a child.]{.aside}
{{< video https://www.youtube.com/watch?v=cDA3_5982h8
title="Literal Programming"
start="37">}}
:::{.callout-note appearance=minimal}
This class does not assume that you have any knowledge in programming, and will provide all the codes that you need. For best results you should be trying to understand this new language, and how to tell R to do what you want it to do.
The tendency may be to reach out to AI to help write code for you, but this does not help you _learn_ and worse can provide code that is overly complicated and does not work as intended.
:::
## Navigating R Studio {#sec-nav_Rstudio}
We will be interacting with the programming language R *only* through R Studio. Not by itself. Typically are four panes, or windows, in R Studio. When you first start the program, you may only see three.
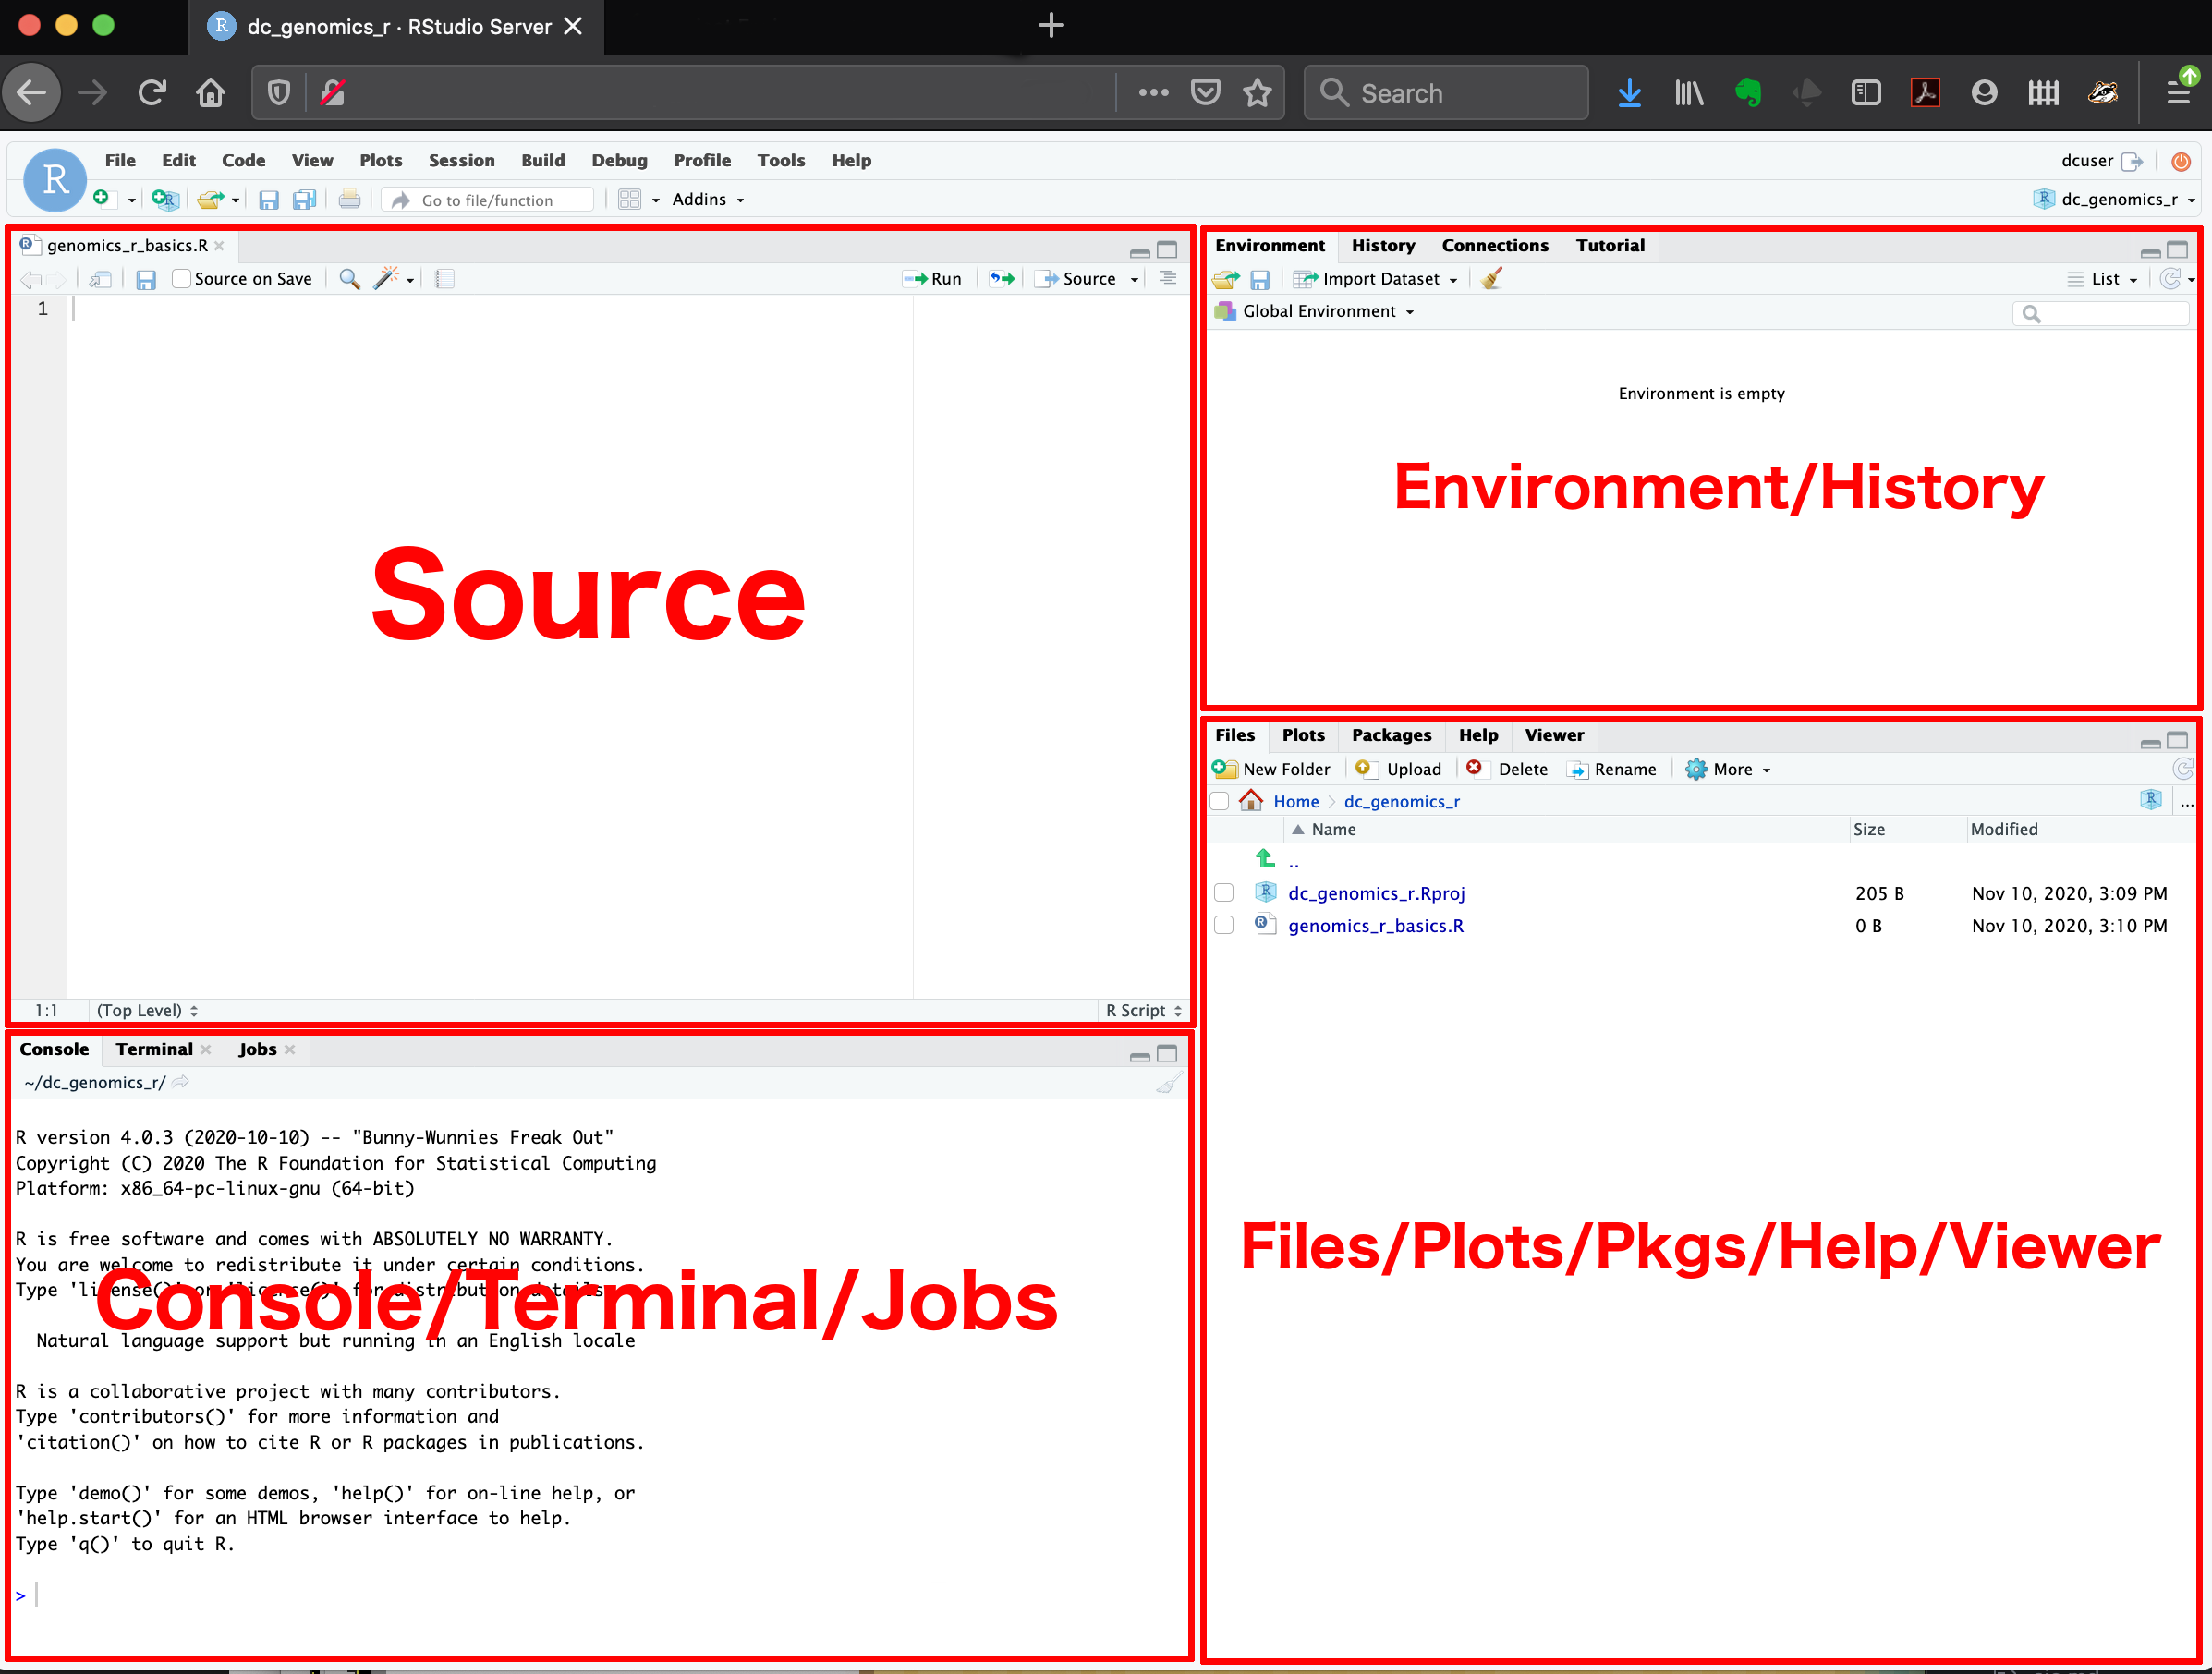{fig-alt="Screenshot of RStudio using the default white theme showing four panes"}
[<a href = "https://datacarpentry.github.io/genomics-r-intro/00-introduction.html#overview-and-customization-of-the-rstudio-layout">Details pulled from the Data Carpentry Genomics lesson</a>]{.aside}
::: {.callout-caution icon=false title = "Optional video"}
[Navigating R Studio by R Girls on YouTube](https://youtu.be/vx4SPeNvols?si=1iSqsH1uNLFkB7yF&t=239)
:::
#### Console/Terminal/Jobs {.unnumbered}
The **console** (left side) is where you see the execution of commands. You can type commands directly into the console and press <kbd>Enter</kbd> to execute those commands.
**R is an overgrown calculator**
:::{.callout-tip title = "👉 Your Turn" icon=false}
In the console type the following code, then press <kbd>Enter</kbd>.
```{r}
#| eval: true
2+2
```
:::
Once these commands are submitted (the code is run) they will be forgotten when you close the session. To save your commands you'll want to write them in a _script_ file.
#### Source {.unnumbered}
This pane is where you will write/view R and Quarto _scripts_. Some outputs (such as a dataset) will appear as a tab here.
:::{.callout-tip title = "👉 Your Turn" icon=false}
_Click on **File --> New File --> R Script**_ to open an R script file.
:::
You should now have four panes, with a new `untitled1.R` script file in the top left. When you write R code here you can save these commands, and rerun them later on demand.
:::{.callout-tip title = "👉 Your Turn" icon=false}
In the script file type `2+2` and then then press <kbd>CTRL+Enter</kbd> while your cursor is still on the same line.
```{r}
#| eval: true
#| code-line-numbers: true
2+2
```
:::
You will see the command echoed down in the Console along with the answer. We will come back to using scripts in the next lesson.
#### Environment / History {.unnumbered}
The **Environment / History** pane (top-right) shows all the objects you’ve created in your current R session — for example, data frames, variables, or plots you’ve assigned.
- The **Environment** tab lists everything that currently exists in memory. This could be data sets, model results and defined variables.
:::{.callout-tip title = "👉 Your Turn" icon=false}
In console run `data(cars)`. This loads a built-in data set named `cars` into your environment. Click on the word `cars` in the top right, and notice it opens the data set in a spreadsheet like view in the Source pane.
:::
- The **History** tab keeps a record of all the commands you’ve run.
There are also some additional tabs in this area, like **Connections**, **Build**, **Tutorial**, and sometimes **Git**. We won’t cover those here, but RStudio has many additional tools and features available as you learn more.
#### Files / Plots / Packages / Help {.unnumbered}
The **Files / Plots / Packages / Help** pane is used to explore files, view plots, manage packages, and read help pages.
## Customizing
Setting preferences in R Studio
[AKA: Retain sanity while troubleshooting]{.aside}
::: {.grid}
::: {.g-col-6}
{fig-alt="RStudio General settings window showing 'Restore .RData into workspace at startup' unchecked and 'Save workspace to .RData on exit: Never' selected." width="100%"}
:::
::: {.g-col-6}
1. Open **RStudio** and go to **Tools → Global Options…**
2. Uncheck **“Restore .RData into workspace at startup.”**
3. For **“Save workspace to .RData on exit:”** choose **Never.**
4. Click **Apply**, then **OK** to close the window.
This ensures that each time you restart R, you start with a clean environment instead of carrying forward objects from a previous session.
:::
:::
## Packages {#sec-packages}
[<a href="https://spaceballs.fandom.com/wiki/Spaceballs:_The%E2%80%A6">"Where the real money from the movie is
made."</a>]{.aside}
R is considered an **Open Source** software program. That means many (thousands) of people contribute to the software. They do this by writing commands (called functions) to make a particular analysis easier, or to make a graphic prettier.
When you download R, you get access to a lot of functions that we will use. However these other *user-written* packages add so much good stuff that it really is the backbone of the customizability and functionality that makes R so powerful of a language.
For example we will be creating graphics using functions like
`boxplot()` and `hist()` that exist in base R. But we will quickly move on to creating graphics using functions contained in the `ggplot2` package. We will be managing data using functions in `dplyr` and reading in Excel files using `readxl`. Installing packages will become your favorite past-time.
:::{.callout-tip title = "👉 Install `ggplot2`" icon=false}
Typing the following in the console to install the `ggplot2` package.
```{r}
#| eval: false
install.packages("ggplot2")
```
:::
When the download and install is complete, you should see a message similar to:
```
The downloaded binary packages are in
C:\Users\Robin\AppData\Local\Temp\Rtmpi8NAym\downloaded_packages
```
:::{.callout-important title = "R is Case sensitive"}
R is case sensitive and spelling matters. If you get an error message like the following.
``` r
Warning in install.packages :
package ‘ggplot’ is not available (for R version 3.5.1)
```
The correct package name is `ggplot2`, not `ggplot`.
:::
:::{.callout-note title = "Alternative Method of installing Packages"}
Additional packages can be installed from the ‘packages’ tab.
* On the packages tab, click the ‘Install’ icon and start typing the name of the package you want in the text box.
* At the bottom of the Install Packages window is a check box to ‘Install’ dependencies. This is ticked by default, which is usually what you want. Packages can (and do) make use of functionality built into other packages, so for the functionality contained in the package you are installing to work properly, there may be other packages which have to be installed with them. The ‘Install dependencies’ option makes sure that this happens.
:::
**Install all the things!**
{fig-alt="Cartoon shouting 'Get all the things!' representing package installation excitement." width="500"}
Now that you're a package installing pro, go ahead and install the following packages that we will be using in the next few weeks.
:::{.callout-tip title = "👉 Your Turn" icon=false}
Install the list of packages to the left one at a time and wait for it to finish before entering the next command. Some of these contain functions that we will use, others contain data sets that we will be working with.
:::: {.columns}
::: {.column width="50%"}
- `tidyverse`
- `sjPlot`
- `gtsummary`
- `ggpubr`
- `tinytex`
- `here`
:::
::: {.column width="50%"}
- `RColorBrewer`
- `viridisLite`
- `openintro`
- `palmerpenguins`
- `nycflights13`
:::
::::
:::
:::{.callout-important title = "Trust but Verify"}
Check to see if you have a package installed by looking in the packages tab. You can also type the command `installed.packages()` into the console and examine the output.
:::
:::{.callout-note title = "A note about the `tidyverse`."}
_"The tidyverse is an opinionated collection of R packages designed for data science. All packages share an underlying design philosophy, grammar, and data structures."_
We will specifically be using the `dplyr`, `ggplot2` and `readxl` packages that are part of, and thus installed with, the `tidyverse`. In these lessons we will load the specific package that we need (e.g. only `dplyr` or only `ggplot2`), but loading the `tidyverse` has the same effect of readying the necessary functions as loading each individual package. Learn more about the [tidyverse](https://tidyverse.org/).
:::
## Get oRganized!
It is good practice to keep a set of related data, analyses, and text self-contained in a single folder called the _working directory_. For example keeping all files related to one class in it's own folder, separate from other classes. If you are taking another class using R at the same time as this one, it's even MORE important to keep your files separate.
:::{.callout-important}
THIS SHOULD NOT BE YOUR DOWNLOADS FOLDER
:::
### Names are important
Choose one of the four naming convention shown below for your class folder and stick with it. These are `snake_case`, `camelCase`, `kebab-case` or `UPPER_SNAKE`.
{fig-alt="Cartoon representations of common cases in coding. A snake screams 'SCREAMING_SNAKE_CASE' into the face of a camel (wearing ear muffs) with 'camelCase' written along its back. Vegetables on a skewer spell out 'kebab-case' (words on a skewer). A mellow, happy looking snake has text 'snake_case' along it." width="600"}
:::{.callout-tip title = "Create your folders"}
1. On your computer, in an easy to find place, create a new folder named `math130` using your chosen naming convention.
2. Then create three subfolders: `data`, `homework`, `notes`.
:::
{fig-align="center"}
### Be the boss of your files
When you download a file, right click and "Save as" or "Save target as" and **actively choose** where to download this file.
:::{.callout-important title = "Avoid these pain points"}
* Do not left click on the links
* Do not let files live in your downloads folder.
* Do not open any files from your browser window after downloading.
:::
:::{.callout-tip title = "👉 Your Turn" icon=false}
Right click [[this link]](https://quarto.org/docs/get-started/hello/rstudio/_hello.qmd) to download and save this file into your `homework` folder. We will use this file in the next lesson.
:::
## Organization using R Projects {#sec-rproj}
R projects are a great way of keeping all files for one project all together, and makes importing data much easier by using relative paths instead of absolute ones. Plus this ensures reproducibility by others (because no-one else stores their files at `C:\users\rdonatello\myprojects\math130`)
:::{.callout-tip title = "👉 Your Turn" icon=false}
* Click on the R cube icon in the top right corner of RStudio and select _Crete new project_.
* Choose _Existing Directory_ and navigate to your Math 130 folder.
* Check _Open in new session_. This allows you to have multiple Rstudio windows open for different projects and the files/data/objects don't get cross-contaminated.
* Click _Create Project_.
:::
This will open a new R Studio window. Go ahead and close both R Studio windows for now (Don't save `Untitled1.R`). We'll see how to use R Projects next.
If you think about wanting to work on a report written in Microsoft Word, or a video that you want to edit, the common practice is to navigate to that file and double click to open that file in the appropriate program. We don't tend to open the program first, and then try to open the file from within the program. Using R Projects is somewhat the same.
:::{.callout-tip title = "👉 Using R Projects" icon=false}
* Navigate in your file explorer to the folder where you created your project.
* Click on the R cube icon to open the whole project. {width=10%}
* Using the `files` tab (bottom right) find and click to open the `hello.qmd` script file you downloaded earlier.
:::
You can tell you are in an R Project by looking in the top right corner by the Environment pane and seeing if the R project cube has your class folder name

## Final Tips
#### Saving and closing your work
Unless you're returning to work in R Studio in a short while, you should make a habit to save all open tabs and completely shut down R studio when you are done working. This ensures your environment is cleared. [This is a good thing]{.aside}
#### Restart R
To restart R without shutting the entire window down, go to the file menu bar in the top,
> *Session* --\> Restart R and Clear Output
This is good to do when switching between projects/classes.