- Updated with Prodege Android SDK v7.0.0-beta07
v7.0.0-beta06.0
- Updated with Prodege Android SDK v7.0.0-beta06
v7.0.0-beta05.0
- Updated with Prodege Android SDK v7.0.0-beta05
v7.0.0-beta04.0
- Updated with Prodege Android SDK v7.0.0-beta04
v7.0.0-beta03.0
- Updated with Prodege Android SDK v7.0.0-beta03
v7.0.0-beta01.0
- Updated with new Prodege Android SDK v7.0.0-beta01
- Introduced placements and rewarded video ads
V6.4.0.0
- Updated with Pollfish Android SDK v6.4.0
V6.3.3.0
- Updated with Pollfish Android SDK v6.3.3
V6.3.2.0
- Updated with Pollfish Android SDK v6.3.2
V6.3.1.0
- Updated with Pollfish Android SDK v6.3.1
V6.3.0.0
- Updated with Pollfish Android SDK v6.3.0
v6.2.5.0
- Updated with Pollfish Android SDK v6.2.5
v6.2.4.2
- Internal fixes
v6.2.4.1
- Internal fixes
v6.2.4.0
- Updated with Pollfish Android SDK v6.2.4
v6.2.3.0
- Updated with Pollfish Android SDK v6.2.3
v6.2.2.0
- Updated with Pollfish Andorid SDK v6.2.2
v6.2.1.0
- Updated with Pollfish Android SDK v6.2.1
v6.2.0.0
- Updated with Pollfish Android SDK v6.2.0
v6.1.6.0
- Updated with Pollfish Android SDK v6.1.6
v6.1.5.1
- Internal fixes
v6.1.5.0
- Updated with Pollfish Android SDK v6.1.5
v6.1.4.0
- Updated with Pollfish Android SDK v6.1.4
v6.1.3.0
- Updated with Pollfish Android SDK v6.1.3
v6.1.2.0
- Updated with Pollfish Andorid SDK v6.1.2
v6.1.1.0
- Updated with Pollfish Android SDK v6.1.1
v6.1.0.0
- Updated with Pollfish Android SDK v6.1.0
v6.0.4.0
- Updated with Pollfish Android SDK v6.0.4
v6.0.3.0
- Update with Pollfish Android SDK V6.0.3
v6.0.2.0
- Updated with Pollfish Android SDK v6.0.2
- Added build support for Android SDK lower than 21
- Updated with Google Play Ads v20
v5.6.0.1
- Updated with Pollfish Android SDK v5.6.0
v5.5.1.0
- Updated with Pollfish Android SDK v5.5.1
v5.4.1.0
- Updated with Pollfish Android SDK v5.4.1
v5.3.3.2
- Removed close notifications from User Rejected and User Not Eligible callbacks
v5.3.3.1
- Updated with Android SDK v5.3.3
v5.3.2.1
- Updated with Android SDK v5.3.2
v5.3.0.1
- Added functionality to render on top of called Activity
- Updated with Android SDK v5.3.0
v5.2.0.1
- Fixed issues with view hierarchy
- Updated with Android SDK v5.2.0
v5.1.0.3
- Updated User Not Eligible listener behaviour
v5.1.0.2
- Updated User Rejection listener behaviour
v5.1.0.1.
- Updated to Pollfish SDK v5.1.0.1
- Added check to dismiss multiple initializations when Pollfish panel is open
- Added JSON support for parameter retrieved from AdMob's UI
v5.0.2.1
- Initial Release
This guide is for publishers looking to use AdMob mediation to load and show Rewarded Ads from Prodege in the same waterfall with other Rewarded Ads.
- Prodege Publisher Account
- AdMob Account
- Android API 21 or later
- Java version 1.8
- Kotlin 1.9.0
Note: Apps designed for Children and Families program should not be using Prodege SDK, since Prodege does not collect responses from users less than 16 years old.
Note: Prodege SDK requires minSdk 21. If your app supports a lower minSdk you can still build your app please refer to section 7.
- Set up Prodege Rewarded Ads
- Set up AdMob Rewarded Ads
- Add Prodege AdMob Adapter to your project
- Publish your app
Below you can find a step by step guide on how to incorporate Prodege rewarded ads with AdMob mediation:
Register as a Publisher at www.pollfish.com.
Login at www.pollfish.com and click "Add a new app" on the Publisher Dashboard. Copy then the given API key for this app in order to use later on.
Create a Rewarded placement by clicking "Create a Placement". Provide a name an select the ad unit and ad format. Copy the given placement id in order to use later on.
If you have not implemented Rewarded Ads in your app yet, you can follow the documentation Implement as described by AdMob.
Note: If you have already implemented Rewarded Ads in your app you can skip this step.
First you need to sign in to your AdMob account. In your app you can click on Ad Units and then ADD AD UNITS and select Rewarded Ads.

In the configuration of the Ad Unit popup you can specify a name for your rewarded placement and then a name for the reward and a value. If you want to apply the same reward to the user no matter which ad network is served, check the Apply to all networks in Mediation Groups box.
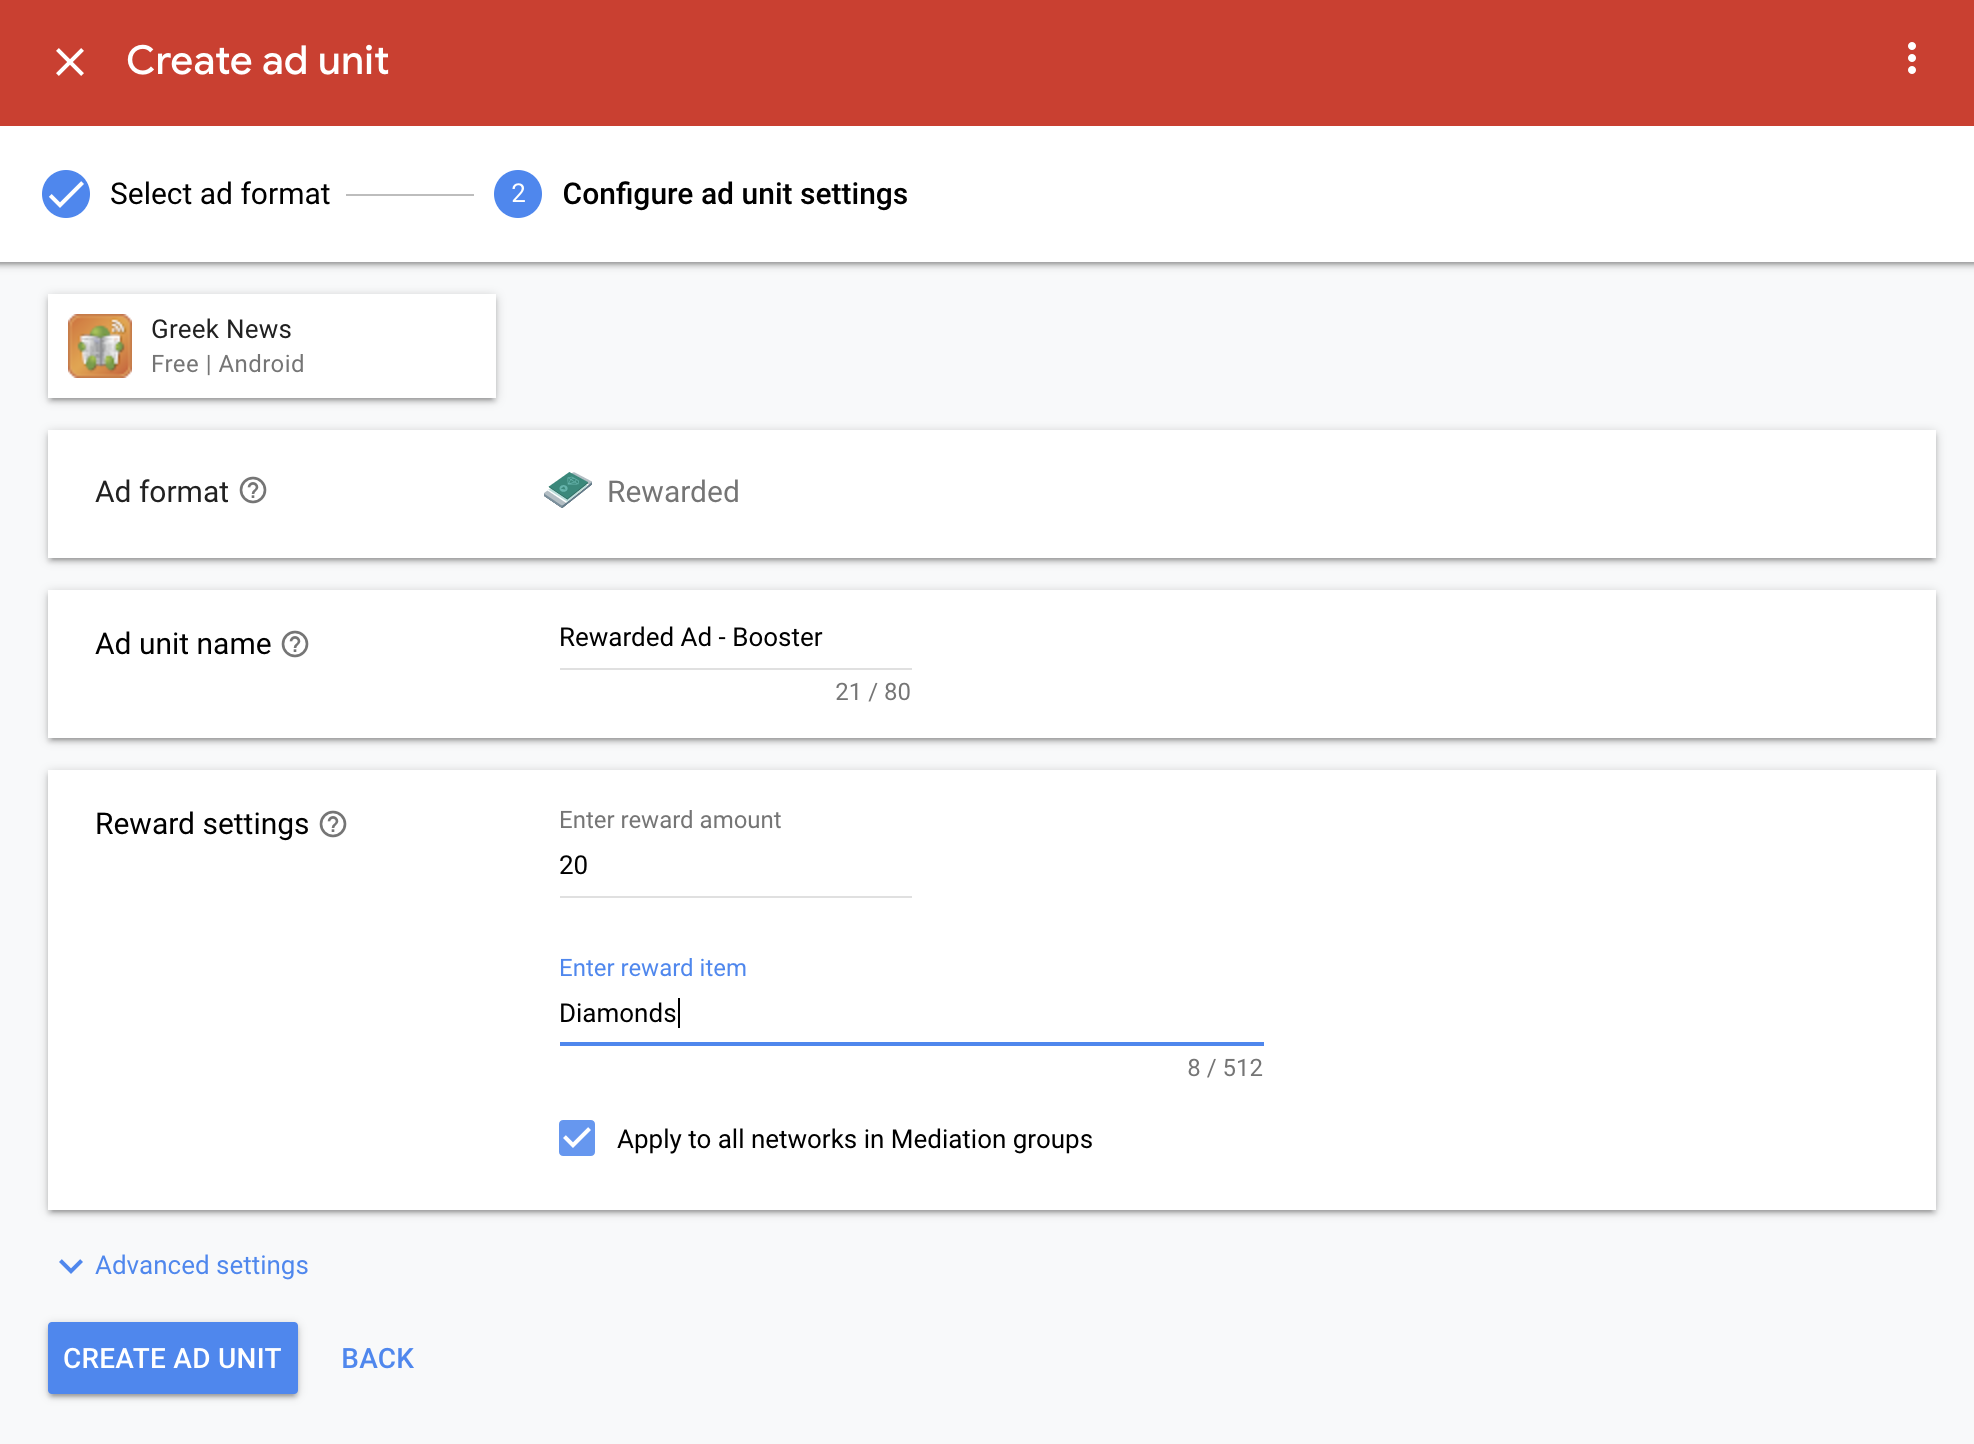
If you don't apply this setting, the Prodege adapter will provide a dynamic value as you specified it on your Prodege Dashboard, in the App Settings area, based on the actual price of each survey completed.
You need to add Prodege to the mediation configuration for your Rewarded Ad unit.
Log in to your AdMob account. On the left side menu, click on the Mediation and then in Mediation Groups Tab. If you already have an existing Mediation Group you will need to modify it (click on the name of the Mediation Group and press Edit).
if you do not have a Mediation Group yet, click to create one with CREATE MEDIATION GROUP.
In the Ad Format drop down menu select Rewarded and for platform Android.
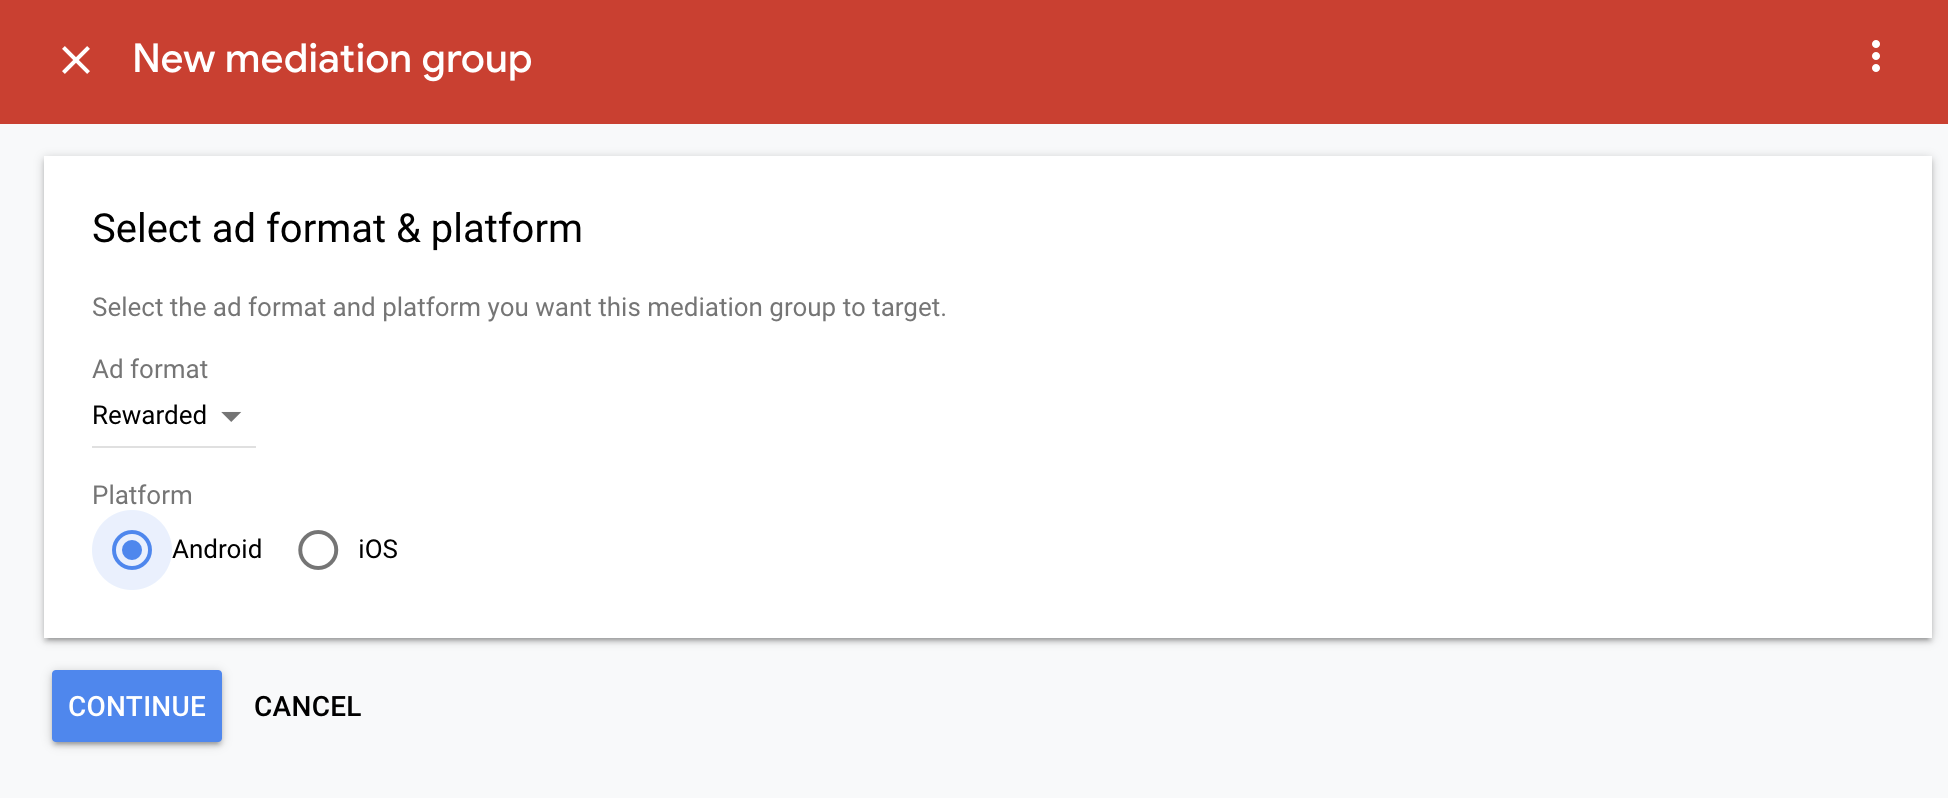
and then you can name the Mediation Group if you do not have one already. Next, set the mediation group status to Enabled.
Afterwards you should click ADD AD UNITS and associate the Mediation group with an existing AdMob Rewarded Ad unit.
You should now see the ad units card populated with the ad units you selected, as shown below:
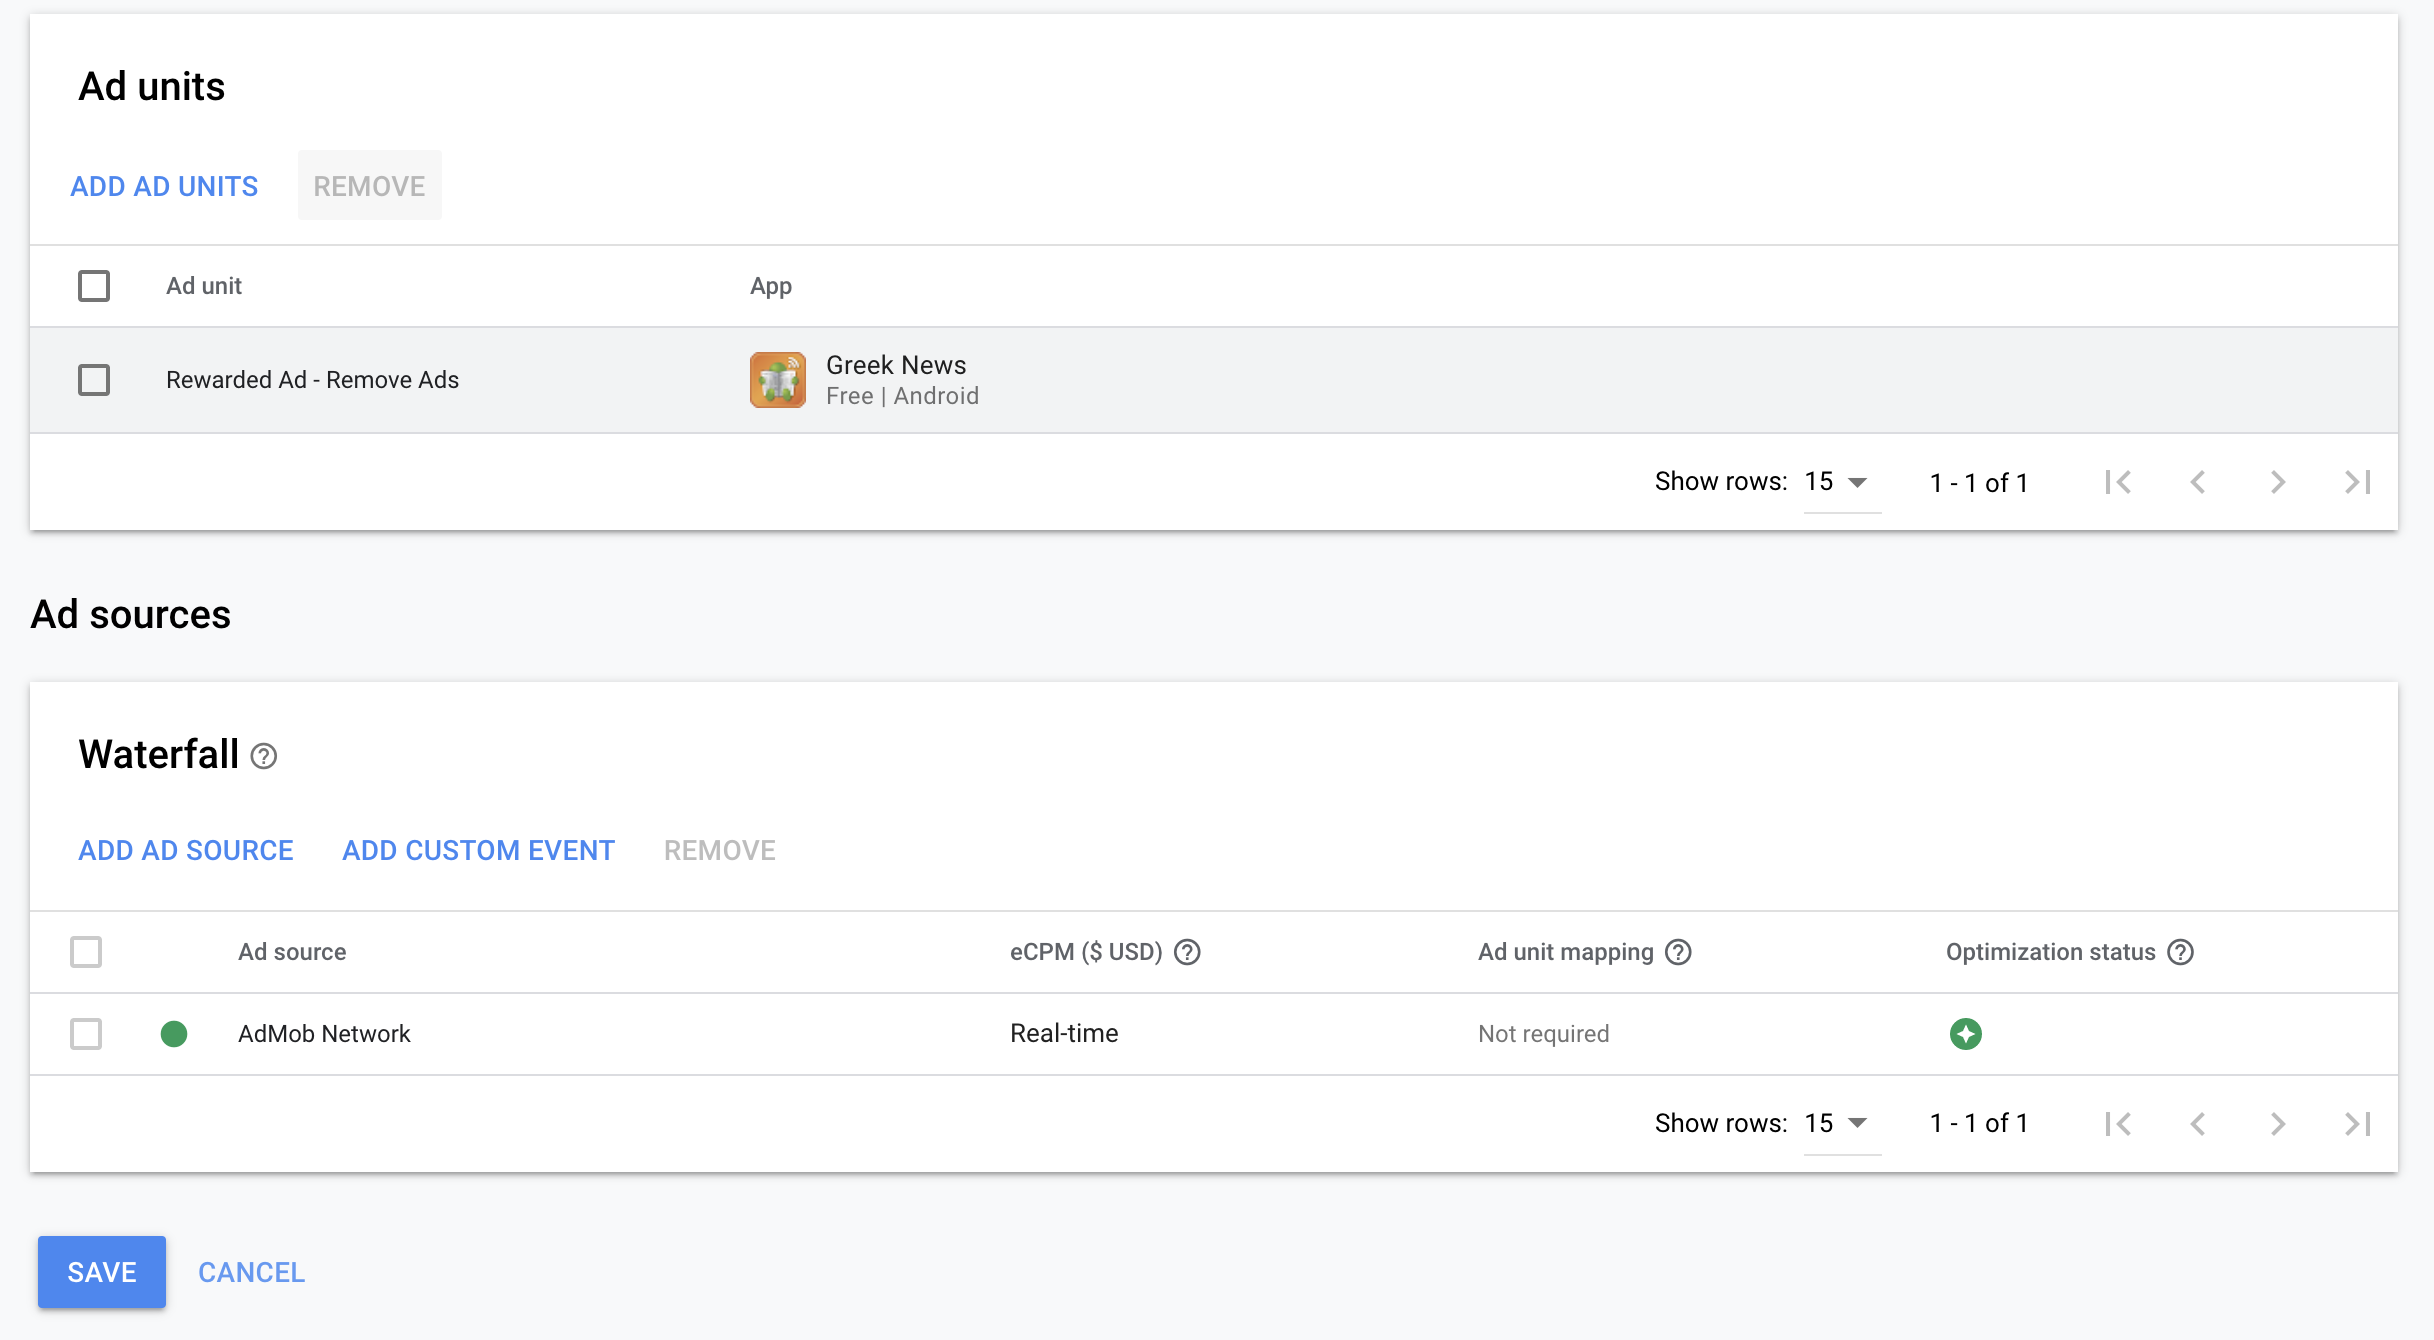
You then have to add Prodege Network to the Mediation Waterfall of the group. Click on ADD CUSTOM EVENT.
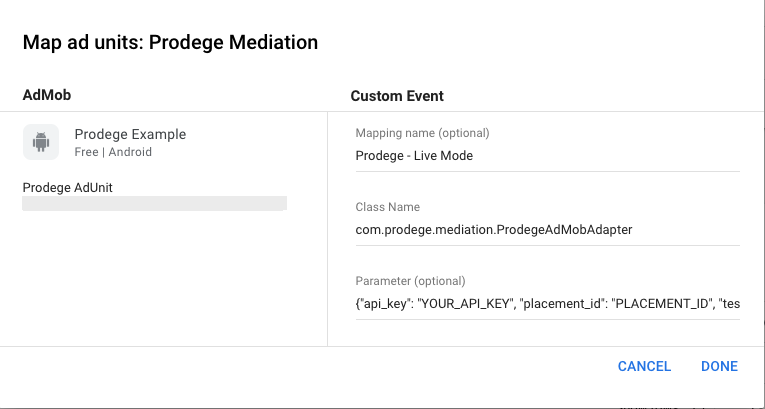
You can add a name, in the Label section, to differentiate Prodege Network from your other ad sources (for example Prodege Netowrk) and an estimated eCPM. Prodege ads average eCPMs, range usually betweenn $10-$50.

You can then configure Prodege ad unit by adding the class name of Prodege AdMob Mediation Adapter.
Class Name: com.prodege.mediation.ProdegeAdMobAdapter
Parameter: JSON with Prodege SDK configuration
Users can pass a JSON string to provide the necessary configuration in order for Prodege SDK to work (alternatively you can pass those params in code as described in section 6).
| Key | Type | Required |
|---|---|---|
2.2.1. api_key Your application's API key as provided by the Publisher Dashboard |
String | Yes |
2.2.2. placement_id Your ad unit's placement id as provided by the Publisher Dashboard |
Boolean | Yes |
2.2.3. test_mode Toggles the Prodege SDK Test mode |
Boolean | No |
2.2.4. request_uuid Sets a pass-through param to be received via the server-to-server callbacks s2s callbacks |
String | No |
2.2.5. muted Toggles Prodege video ads mute state |
Boolean | No |
Your application's API key as provided by the Publisher Dashboard.
Your ad unit's placement id as provided by the Publisher Dashboard.
Toggles the Prodege SDK Test mode.
trueis used to show to the developer how Prodege ads will be shown through an app (useful during development and testing).falseis the mode to be used for a released app in any app store (start receiving paid surveys).
Sets a pass-through param to be received via the server-to-server callbacks.
In order to register for such callbacks you can set up your server URL on your app's page on the Publisher Dashboard. On each conversion you will receive a callback to your server including the requestUuid param passed.
If you would like to read more on s2s callbacks you can read the documentation here.
Sets Prodege video ads mute state.
Example:
{
    "api_key": "YOUR_API_KEY",
    "placement_id": "PLACEMENT_ID",
    "test_mode": true,
    "request_uuid": "YOUR_USER_ID",
    "muted": false
}
Note: Prodege SDK works by default in live mode. If you would like to test with test ads you should use set the testMode to
trueor explicitly request that in code as described in section 6.
Retrieve Prodege AdMob Adapter through maven() with gradle by adding the following line in your app's module build.gradle file:
dependencies {
  implementation 'com.prodege.mediation:prodege-admob:7.0.0-beta07.0'
}Note: If you are using Android Studio, right click on your project and select New Module. Then select Import .JAR or .aar Package option and from the file browser locate the
.aarfile. Right click again on your project and in the Module Dependencies tab choose to add the module that you recently added, as a dependency.
Click here to download the latest version of Prodege Android AdMob Adapter SDK.
Click here to download the latest version of Prodege Android SDK .
Android 12
Apps updating their target API level to 31 (Android 12) or higher will need to declare a Google Play services normal permission in the AndroidManifest.xml file.
<uses-permission android:name="com.google.android.gms.permission.AD_ID" />You can read more about Google Advertising ID changes here.
Note: If you have already implemented Rewarded Ads in your app you can skip this step.
Import the following packages.
Kotlin
import com.google.android.gms.ads.AdError
import com.google.android.gms.ads.AdRequest
import com.google.android.gms.ads.FullScreenContentCallback
import com.google.android.gms.ads.LoadAdError
import com.google.android.gms.ads.MobileAds
import com.google.android.gms.ads.rewarded.RewardedAd
import com.google.android.gms.ads.rewarded.RewardedAdLoadCallback
Java
import com.google.android.gms.ads.AdError;
import com.google.android.gms.ads.AdRequest;
import com.google.android.gms.ads.FullScreenContentCallback;
import com.google.android.gms.ads.LoadAdError;
import com.google.android.gms.ads.MobileAds;
import com.google.android.gms.ads.rewarded.RewardedAd;
import com.google.android.gms.ads.rewarded.RewardedAdLoadCallback;
Initialize AdMob SDK by calling MobileAds.initialize method passing a Context and an OnInitializationCompleteListener listener as arguments.
Kotlin
override fun onCreate(savedInstanceState: Bundle?) {
    // ...

    MobileAds.initialize(this) {
        // Initialization completed
        createAndLoadRewardedAd()
    }
}
Java
@Override
protected void onCreate(Bundle savedInstanceState) {
    // ...

    MobileAds.initialize(this, initializationStatus -> {
        // Initialization completed
        createAndLoadRewardedAd();
    });
}
Request a Rewarded A from AdMob by calling RewardedAd.load passing a Context, you AD_UNIT_KEY, an AdRequest object instance and a RewardedAdLoadCallback abstract class implementation as arguments.
Kotlin
val adRequest = AdRequest.Builder().build()

RewardedAd.load(this, "AD_UNIT_KEY", adRequest, object : RewardedAdLoadCallback() {
    override fun onAdLoaded(rewardedAd: RewardedAd) {

        rewardedAd.fullScreenContentCallback = object : FullScreenContentCallback() {
            override fun onAdFailedToShowFullScreenContent(adError: AdError) {}

            override fun onAdShowedFullScreenContent() {}

            override fun onAdDismissedFullScreenContent() {}
        }
    }

    override fun onAdFailedToLoad(loadAdError: LoadAdError) {}
})
Java
AdRequest request = new AdRequest.Builder().build();

RewardedAd.load(this, "AD_UNIT_KEY", request, new RewardedAdLoadCallback() {

    @Override
    public void onAdLoaded(@NonNull RewardedAd rewardedAd) {
        mRewardedAd.setFullScreenContentCallback(new FullScreenContentCallback() {
            @Override
            public void onAdFailedToShowFullScreenContent(@NonNull AdError adError) {}

            @Override
            public void onAdShowedFullScreenContent() {}

            @Override
            public void onAdDismissedFullScreenContent() {}
        });
    }

    @Override
    public void onAdFailedToLoad(@NonNull LoadAdError loadAdError) {}

});
When the Rewarded Ad is ready, present the ad by invoking rewardedAd.show passing an Activity and a reward completion block. Just to be sure, you can combine show with a check to see if the Ad you are about to show is actually ready.
Kotlin
mRewardedAd?.show(this) { reward: RewardItem ->
    // Reward received
}
Java
if (mRewardedAd != null) {
    mRewardedAd.show(MainActivity.this, reward -> {
        // Reward received
    });
}If everything worked fine during the previous steps, you are ready to proceed with publishing your app.
Note: After you take your app live, you should request your account to get verified through the Publisher Dashboard in the App Settings area.
Note: There is an option to show Standalone Demographic Questions needed for Prodege to target users with surveys even when no actually surveys are available. Those surveys do not deliver any revenue to the publisher (but they can increase fill rate) and therefore if you do not want to show such surveys in the Waterfall you should visit your App Settings are and disable that option. You can read more here.
Prodege AdMob Adapter provides different options that you can use to control the behaviour of Prodege SDK. Any configuration, if applied, will override any configuration done in AdMob's dashboard.
Below you can see all the availbale options for configuring Prodege SDK prior to the AdMob SDK initialization.
An optional id used to identify a user.
Setting the Prodege's userId will override the default behaviour and use that instead of the Advertising Id in order to identify a user.
Note: You can pass the id of a user as identified on your system. Prodege will use this id to identify the user across sessions instead of an ad id/idfa as advised by the stores. You are solely responsible for aligning with store regulations by providing this id and getting relevant consent by the user when necessary. Prodege takes no responsibility for the usage of this id. In any request from your users on resetting/deleting this id and/or profile created, you should be solely liable for those requests.
Kotlin
ProdegeAdMobAdapter.setUserId("MY_USER_ID")Java
ProdegeAdMobAdapter.setUserId("MY_USER_ID");Toggles the Prodege SDK Test mode.
trueis used to show to the developer how Prodege ads will be shown through an app (useful during development and testing).falseis the mode to be used for a released app in any app store (start receiving paid surveys).
If you have already specified the test mode on AdMob's UI, this will override the one defined on Web UI.
Prodege AdMob Adapter works by default in live mode. If you would like to test with test ads:
Kotlin
ProdegeAdMobAdapter.setTestMode(true)Java
ProdegeAdMobAdapter.setTestMode(true);Your application's API key as provided by the Publisher Dashboard.
If you have already specified an api key on AdMob's UI, this will override the one defined on Web UI.
Kotlin
ProdegeAdMobAdapter.setApiKey("API_KEY")Java
ProdegeAdMobAdapter.setApiKey("API_KEY");After configuring the Prodege Max Adapter you can proceed with the AdMob SDK initialization.
Kotlin
MobileAds.initialize(this) {
    // ...
}
Java
MobileAds.initialize(this, initializationStatus -> {
    // ...
});Below you can see all the availbale options of ProdegeNetworkExtras.Builder for configuring your Prodege placement loaded by the AdRequest.
Start by creating a ProdegeNetworkExtras.Builder instance. You can later build upon this instnace based on you preffered configuration.
Kotlin
val builder = ProdegeNetworkExtras.Builder()Java
ProdegeNetworkExtras.Builder builder = new ProdegeNetworkExtras.Builder();Your ad unit's placement id as provided by Publisher Dashboard.
If you have already specified a placement id on AdMob's UI, this param will override the one defined on Web UI.
Kotlin
builder.placementId("PLACEMENT_ID")Java
builder.placementId("PLACEMENT_ID");Sets a pass-through param to be received via the server-to-server callbacks.
In order to register for such callbacks you can set up your server URL on your app's page on the Publisher Dashboard. On each conversion you will receive a callback to your server including the request_uuid param passed.
If you would like to read more on Prodege s2s callbacks you can read the documentation here.
If you have already specified a placement id on AdMob's UI, this param will override the one defined on Web UI.
Kotlin
builder.requestUuid("REQUEST_UUID")Java
builder.requestUuid("REQUEST_UUID");Sets Prodege video ads mute state.
Kotlin
builder.muted(true)Java
builder.muted(true);Finally, build the ProdegeNetworkExtras instance, by calling builder.build() method on the ProdegeNetworkExtras.Builder instance.
Kotlin
val networkExtras = builder.build()

val request = AdRequest.Builder()
    .addNetworkExtrasBundle(ProdegeAdMobAdapter::class.java, networkExtras)
    .build()
Java
Bundle networkExtras = builder.build();

AdRequest request = new AdRequest.Builder()
    .addNetworkExtrasBundle(ProdegeAdMobAdapter.class, networkExtras)
.build();Prodege SDK requires at minimum Android API 21 in order to work. You can still build your app if your app minimum target is lower than 21.
AndroidManifest.xml
<manifest xmlns:android="http://schemas.android.com/apk/res/android"
    xmlns:tools="http://schemas.android.com/tools">

    <uses-sdk tools:overrideLibrary="com.prodege" />

    <!-- ... -->
app/build.gradle
defaultConfig {
    // ...

    multiDexEnabled true
}

dependencies {
    // ...

    implementation 'androidx.multidex:multidex:2.0.1'
}In Market Research monetization users can get screened out within the survey since the Researcher might be looking a different user based on the provided answers. Screenouts do not deliver any revenue for the publisher nor any reward for the users. If you would like to activate payouts on screenouts too please follow the steps as described here.
If you use proguard with your app, please insert the following lines in your proguard configuration file:
-dontwarn com.prodege.**
-keep class com.prodege.** { *; }You can read more info on how the Prodege SDKs work or how to get started with Google AdMob at the following links: