6. Event Groups and Random Map Entity Groups
Event Groups and Random Map Entity Groups are ways to add randomization to an Imperial Commander mission. By using them, you can make sure that no two playthroughs of a mission are exactly the same.
Event Groups are collections of any number of events that can be activated by certain triggers and conditions. When an event group is activated, it randomly selects one of the associated events and launches it. For example, you can add three different events (an enemy deployment, a door trap, and threat increase) to an event group and link that to opening a door. Once the door is opened, the app randomly selects what event to fire. So even when replaying the mission, you can't be sure if you will trigger a trap, face some enemies, or increase threat.
By default, an event group treats its events as unique. This means that the each event in a group will only fire once until the event is "spent" and no longer activates. The next time the event group is activated, it selects a different event. The group will randomly go through each event until all have been fired. When all associated events have been fired, the event group will no longer activate.
In the event group window, you can check Reset Upon Completion. This means that, once the event group has fired all associated events, it "resets" and makes all events available again. The next time it is activated, it once more randomly goes through the list.
If you allow the event to be reset, you can uncheck Each Event Is Unique. This means that events in that group are no longer spent after firing and can occur multiple times, as long as the event group keeps getting triggered.
Create all the events you want to assign to the event group. Creating events is detailed under Creating Events and Triggers. You don't need to set any triggers or conditions for those events. They will be activated by the event group.
Click Properties in the menu bar to open the Properties screen. To the right, under Global Properties, you can see Event Groups and Random Map Entity Groups. Either select an existing event group and click the 🖉 icon, or click the + to add a new event group. Under Mission Events, select the event you want to add and click Add Event to Group. Repeat until you have added all events you want. You can remove events by clicking the X.

Decide whether you want the event group to reset upon completion, and if yes, whether you want the events to be unique (see above).
Determine what needs to happen to activate the event group. There are two different ways.
An event group can be activated by a single trigger. If this is the case, simply select the respective trigger under Triggered By.
More complex activation conditions can be done via the event action Activate Event Group. Create an event that meets all the activation conditions for the event group. (If you want the event group to be activated multiple times, don't forget to hen check the option This Event is Repeatable.) Finally, add the event action Activate Event Group and select the desired event group.
Random Map Entity Groups (RMEGs) distribute map entities randomly between their specific locations. For example, you place three terminals of the colors green, red, and blue. When you add them to a random map entity group, the app randomly selects which terminal to place in which location.
RMEGs help you in randomizing the distribution of entities (for example tokens like terminals or mission tokens) across the map. They don't randomly select spaces to place the tokens, but they randomize the selection of what token appears in what location. You can place any number of entities on any specific locations, then add the entities to a random map entity group. Once the map section with the entity location is revealed, instead of simply placing the default entity you set there in the map editor, Imperial Commander randomly determines which associated entity appears in that location.
To create an RMEG, you need to perform two simple steps: First, create and place the entities at default locations, then add them to a random map entity group.
In the map editor, simply create and place the entities as you would with any other entities. Don't forget to give all of them unique names. Place them in the locations where the random tokens are supposed to appear. Don't worry about what entity to assign to what location, the app will distribute them randomly.
Click Properties in the menu bar to open the Properties screen. To the right, under Global Properties, you can see event groups and random map entity groups. Either select an existing RMEG and click the 🖉 icon, or click the + to add a new RMEG.
In the window that opens, give the RMEG a unique name, then select an entity from the dropdown menu and click ADD ENTITY TO GROUP. Repeat this until all entities are added to the list. You can add any number and any type of entities.
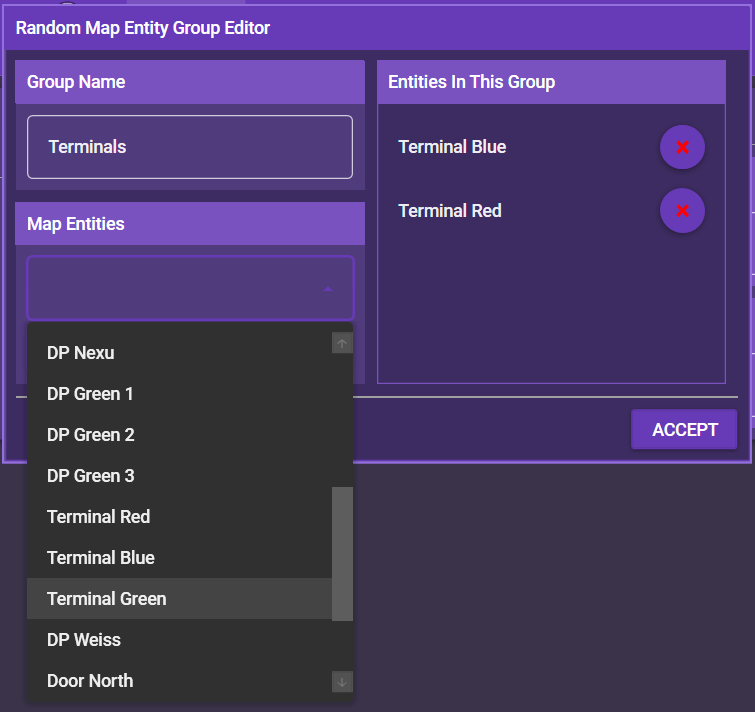
Once you are done, click ACCEPT. At any time, you can remove entities or entire RMEGs by clicking the red X next to them.