Video Demo: https://www.youtube.com/watch?v=2GjJc7iUOko
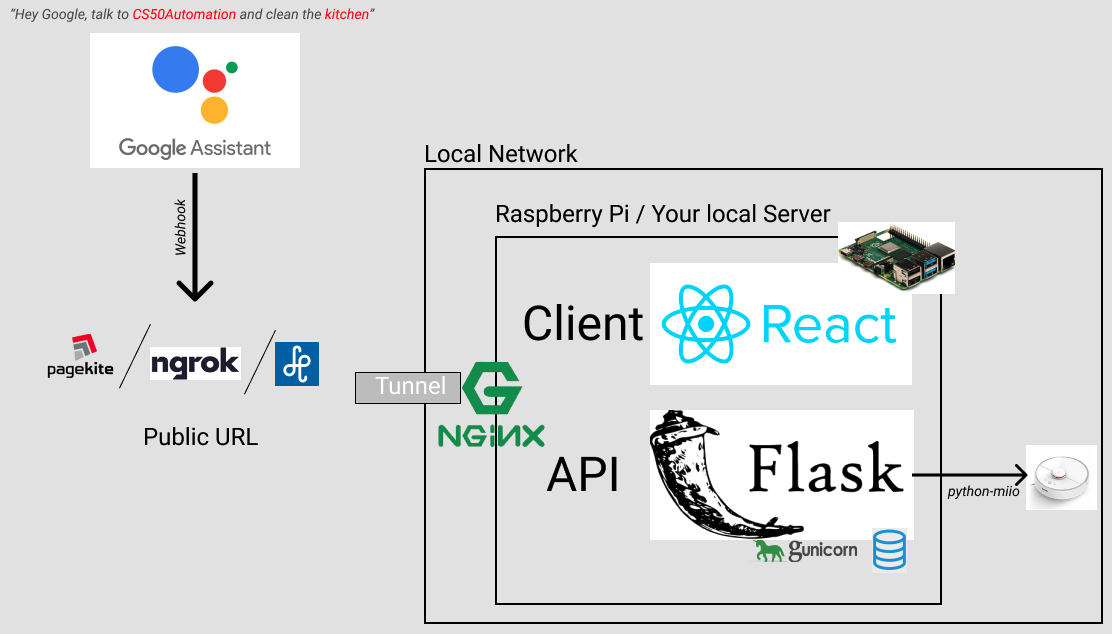
This project is a web application I made as the Final Project for Harvard's CS50 Course. It helps to automate voice-controlled room cleaning with a Roborock S5 vacuum cleaner. This is a feature that is not currently supported by the Xiaomi Home application or Google Home. You can use the voice assistant to start an entire house cleaning, but it was not possible to select individual rooms to clean by voice.
The application consists of a server-side Flask API and client-side React application. The Flask API uses a package called python-miio to control the vacuum cleaner connected to your local network. The idea of the whole stack and technologies used in this project is to control your vacuum cleaner from anywhere outside of your network.
The application uses Google OAuth to manage users and authentication. The voice control part is done using Google Assistant. After you set up the project and all the necessary dependencies, you can tell Google Assistant something like this:
"Hey Google, talk to CS50Automation and clean the kitchen."
- Roborock S5 (only tested with this model and firmware: 3.5.8_002034)
- Need to get your Roborock's IP and Token
- Figure out your Room IDs (see below)
- You need to clone the project and setup on your server (Raspberry Pi)
- You need to make your server publicly available on the internet. You can use port forwarding or a tunneling solution like Ngrok, PageKite or Localtunnel
- Setup a project at Google Cloud Platform to get API key and Secret for OAuth
- Setup an Action for Google Assistant and use the Webhook to call your Server
In this step we are going to use the Xiaomi-cloud-tokens-extractor to aquire the IP and Token of the device.
git clone https://github.com/PiotrMachowski/Xiaomi-cloud-tokens-extractor.git
cd Xiaomi-cloud-tokens-extractor
python3 token_extractor.py
Enter Xiaomi Home credentials, and select server region. If some dependencies are missing (like python3 or requests) make sure to install them before executing the script.
You will get a result similar like this. Mark the IP and the Token for Step 3.
NAME:     <Vacuum Cleaner name>
ID:       <ID>
IP:       <Vacuum Cleaner's IP>
TOKEN:    <YOUR TOKEN>
MODEL:    roborock.vacuum.s5
The API needs to send the correct room Ids in a list to your Roborock. Unfortunately creating this list is a bit cumbersome. One way that worked for me, and I liked the most, is the way, how Homebridge is aquiring these ids. Read more about this in the References section below. (There is also a "Trial and Error" way of getting the Ids and if you are lucky, you can get them quick. It seems to me a fairly time consuming solution, and requires to start and stop your Roborock a lot.)
Setup a timer in the Xiaomi Home app for 00:00 and disable it. You will need to select all your rooms, and mark the order of selection.
After that execute the following script:
python3 get_room_ids.py <ip> <token>
It will output the timer you've just created. Note the 'segments' comma separated list. These are the ids of the rooms in the order, in which you selected them.
<Timer action=['start_clean', {'fan_power': 102, 'segments': '19,16,18,17,20,21', 'repeat': 1, 'clean_order_mode': 0}] cron=0 0 8 4 * enabled=False id=1617799992517 next_schedule=2024-04-08 00:00:00+02:00 ts=2021-04-07 14:53:12.517000>
You will need to overwrite my Room List in file: cs50automation/automation/vacuum/routes.py on line 11. Replace your Room Ids with your Room Names.
rooms = [{"id":19,"name":"Kitchen"},{"id":16,"name":"Living Room"},{"id":18,"name":"Work"},{"id":17,"name":"Corridor"},{"id":20,"name":"Bathroom"},{"id":21,"name":"Bedroom"}]
Navigate to: https://console.cloud.google.com/ and create a new Project. Enter a name, you want your porject to be called.
Make sure, your project is selected. Go to API Dashborad: https://console.cloud.google.com/apis/dashboard
Click on OAuth Consent Screen and configure it. Fill out only the necessary informations.
After that click on Credentials > Create Credentials > OAuth Client ID
Application Type: Web Application
Name: Cs50Automation
Authorized Javascript Domains:
http://localhost:5000
http://localhost:3000
https://<SUBDOMAIN>.pagekite.me or https://<SUBDOMAIN>.loca.lt // (Step 5)
Note your ClientId and Client Secret, you will need them in an upcoming step.
git clone https://github.com/Horbee/cs50automation.git
cd cs50automation
(make sure that node, npm and yarn package manager are installed)
node -v
npm -v
yarn -v
Rename .env.example file and add Google Client ID
cd client
mv .env.example .env
sudo nano .env
REACT_APP_GOOGLE_CLIENT_ID=xxxxxxxxxxxxxxxxxxxxxxxx
(Ctrl + X, Y, Enter to save)
yarn install
yarn build
This will create a /build folder for you, which has your static files, ready to be served by Nginx.
cd ..
python3 -m venv venv
source venv/bin/activate
pip3 install -r requirements.txt
mv .env.example .env
sudo nano .env
You will need to fill the enviroment file with the necessary credentials.
Note: GOOGLE_ASSISTANT_CLIENT_ID is not yet setup. You will need to come back and fill out this information after setting up the Action for Google Assistant.
VACUUM_IP=xxxxxxxxxxxxxxxxxxxxxxxx
VACUUM_TOKEN=xxxxxxxxxxxxxxxxxxxxxxxx
GOOGLE_CLIENT_ID=xxxxxxxxxxxxxxxxxxxxxxxx
GOOGLE_ASSISTANT_CLIENT_ID=
You will need to overwrite my Room List in file: cs50automation/automation/vacuum/routes.py on line 11. Replace your Room Ids with your Room Names. (This was previously generated in Step 2)
sudo apt install nginx
sudo rm /etc/nginx/sites-enabled/default
sudo cp ./service/cs50automation.nginx /etc/nginx/sites-available/cs50automation.nginx
sudo ln -s /etc/nginx/sites-available/cs50automation.nginx /etc/nginx/sites-enabled/
sudo systemctl restart nginx
sudo cp ./service/cs50automation.service /etc/systemd/system/cs50automation.service
sudo systemctl enable cs50automation.service
sudo systemctl start cs50automation.service
Now the Cs50Automation app should be accessible on your network, however you wont be able to log in, since Google OAuth needs a publicly accessible URL to work.
As I developed this project, I tried three providers. All of them were working fine and had their pros and cons.
-
Pagekite seemd to be a very reliable solution, I had it run for weeks, without a problem, it is fast and open source. You can get a subdomain registered, which won't change, but it only gives you 30 days and a limited quota as a free tier.
-
Ngrok seems also to be a reliable service. The only problem is, that the URL it gives you constantly changes, which is not too optimal for our task at hand.
-
Localtunnel can be also a good solution, and it allows you to get your own subdomain.
I created two files inside the service folder (pagekite.service and localtunnel.service). You can configure any of those to start your tunnel and get your public URL up and running. If you use Pagekite, make sure to create an account first.
This step is pretty hard to document. I would strongly suggest to watch the introduction video for a more detailed understanding.
To create my Action I used Dialogflow. It is a natural language processing (NLP) platform that can be used to build conversational applications for multiple platforms.
-
Entity setup: this can be used as a
parameter for an intent, this data will be extracted from the user's sentence. Dialogflow provides predefined system entities that can match many common types of data like dates, times, colors, email addresses, and so on. We create our own custom entities for matchingrooms. My room entity list consists ofkitchen, living room, bathroom, bedroom, work and corridor. -
Intent setup: this is then end-user's intention for one action to do. You can define many intents and when an end-user writes or says something, Dialogflow matches the end-user expression to the best intent in your agent. We create the
clean intentto execute room cleaning. If an end-user says "Clean the kitchen", Dialogflow would match that end-user expression to the clean intent. You can also define your intent toextract the room namefrom the end-user expression. This will be anarray, which will be sent to our API. You need to providetraining phases, fill out theparameterssection andenable webhook call. -
Fulfillment: We will use the
webhooksection to send a request to our API with information about the user's intention.
After finishing the App, you can deploy to Google Assistant.
https://trstringer.com/logging-flask-gunicorn-the-manageable-way/ https://prettyprinted.com/tutorials/automatically_load_environment_variables_in_flask https://blog.miguelgrinberg.com/post/how-to-deploy-a-react--flask-project https://blog.miguelgrinberg.com/post/running-a-flask-application-as-a-service-with-systemd
https://pagekite.net/wiki/Floss/TechnicalManual/
homebridge-xiaomi-roborock-vacuum/homebridge-xiaomi-roborock-vacuum#277
Homebridge's solution to get the room Ids: https://github.com/homebridge-xiaomi-roborock-vacuum/homebridge-xiaomi-roborock-vacuum/blob/8b65bedf55cdf70a322920b5dab78645cfbadc84/index.js#L1020