A shared library is a collection of Groovy scripts shared between different applications for purposes of building Jenkins jobs. In instances where multiple applications have the same build, test and deployment stages, instead of repeating those steps for every application we can create a shared library, which can be used across applications.
How to Set Up a Shared Library
Setting up a shared library can be done in 3 steps:
- Create a separate git repo for the Jenkins pipeline library & push the shared library code to that repo.
a. Create a git repo
b. Create a vars folder
c. Create a .groovy file inside the vars folder
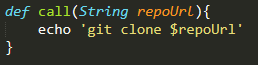
d. Commit your codes into the .groovy file. Your groovy file should also specify the parameters for the call function e.g.
- Integrate the shared library repo in Jenkins under the Manage Jenkins section.
a. Click on Manage Jenkins
b. Click on configure system. Scroll down until you find the Global Pipeline Libraries section.
c. Under the Library section, configure values as below.
i. Name (remember, we will refer to this shared library from Jenkinsfile using this name).
ii. Default version (branch name of our Shared Library git repo).
iii. Under the Retrieval method, choose Modern SCM.
iv. Under Source Code Management, choose Git.
d. Under Project Repository enter your Pipeline Shared Libraries repo URL
e. Configure credentials if your repo requires credentials to checkout code
f. Click on the apply and save buttons.
- Create Jenkinsfile in the project. In that Jenkinsfile, Import & use the shared library.
For each new application to be built that will use the shared library do the following:
a. Create application repo
b. Create Jenkinsfile with 2 lines of code e.g.

c. Configure application pipeline job on Jenkins UI
END