Creating the CubeSatSim Raspberry Pi Image
These are the exact steps I used to create the Pi image, so you can recreate it if you want:
You will need:
- Raspberry Pi Zero W or Pi Zero 2 W (Pi Zero 2 W is preferred since the Pi Zero W won't fully work with Command and Control)
- micro USB cable to power the Pi Zero
- micro SD card 16GB or larger as storage for the Pi Zero
- Computer with micro SD card writer or USB adapter to remotely log into the Pi Zero
First, use the Raspberry Pi Imager to write a Pi OS Bullseye image (the current software does not work with Bookworm or Trixie) to your SD card.
Here are the steps:
First, you will need to download and install the Raspberry Pi Imager software onto your computer https://www.raspberrypi.com/software/
You will then insert the micro SD card into the SD card reader on your computer.
Then, run the Pi Imager.
You can start with the Bullseye version of Raspberry Pi OS (Pi OS Legacy, 32-bit). A Pi Zero or Pi Zero W should only run Lite while a Pi Zero 2 can run the Desktop. Make sure you create a user pi and do the install with that user or there may be issues with configuration files and settings as it references many paths in /home/pi/*. Your Pi will need to have internet access to update settings and install packages.
For the status of our efforts to get the code running on Bookworm, see https://github.com/alanbjohnston/CubeSatSim/discussions/389
Here is a Bullseye Pi OS image that works: https://downloads.raspberrypi.org/raspios_full_armhf/images/raspios_full_armhf-2023-05-03/ Here is the file download link: https://downloads.raspberrypi.org/raspios_full_armhf/images/raspios_full_armhf-2023-05-03/2023-05-03-raspios-bullseye-armhf-full.img.xz
You can use this with the Raspberry Pi Imager, but under OS you need to choose the Use Custom option at the very bottom of the list, then select the downloaded image 2023-05-03-raspios-bullseye-armhf-full.img.xz

Unfortunately, Customization is not supported with a Custom image, so you can't preset your username, password, localization, and WiFi settings.
So after you write this image to your microSD card, you will need to connect a monitor, keyboard, and mouse to your Pi Zero 2 to set these things (make sure you set pi as the username). After that, you can connect it to your WiFi and turn on ssh and vnc for remote access.
After Pi Imager is complete, remove the micro SD card from your computer and insert it in the Pi Zero and power the Pi Zero with a micro USB cable to power it and it will boot up.
You can customize your software by logging into the Pi. If you put in your WiFi information, the Pi Zero should automatically join your WiFi network. You will need your computer to also join this WiFi network using the same SSID and password.
After it finished booting up, you will have network connectivity to your Pi Zero. For example, in the Terminal Window or Windows Command Prompt, you can type (if your hostname is cubesatsim)
ssh pi@cubesatsim.local
The first time you log in on your computer, you will be asked Are you sure you want to continue connecting (yes/no/[fingerprint])?. Type yes then return to continue the login. At the password prompt, type raspberry or what you chose then return but note that the characters will not display as you type them.
Alternatively, you can use a free application such as PuTTY on Windows. Download it here https://www.chiark.greenend.org.uk and open it, setting the Host Name to cubesatsima.local and then click Open to connect:
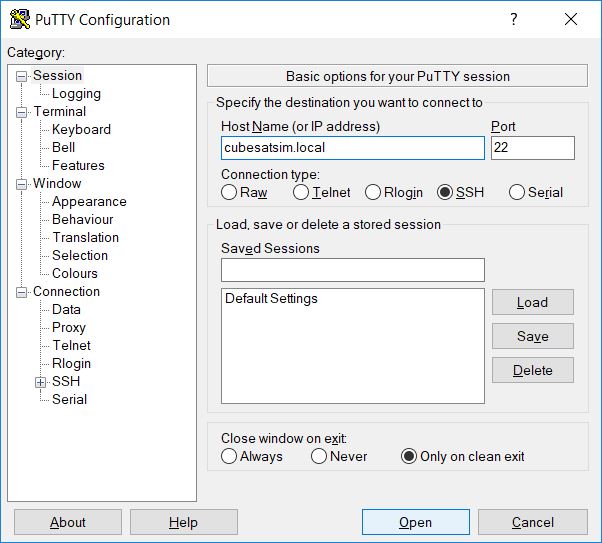
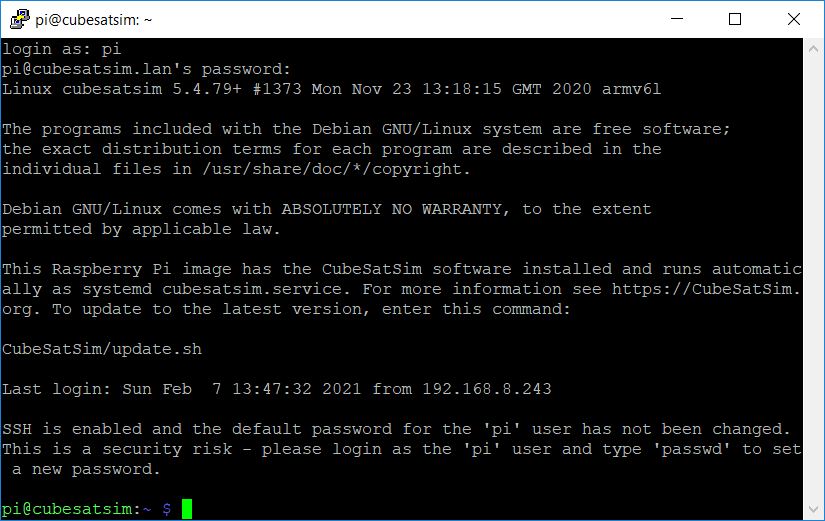
Here is how it looks when you login on Windows using PuTTY after entering the default username pi and password
You can also use
Once you have used SSH to log into your Pi Zero, you are ready to install the CubeSatSim software.
Verify that your Pi Zero is connected to the Internet by typing:
timeout 10 ping amazon.com
If you see messages such as "64 bytes received" then you are online. If not, check your WiFi hub.
To install the software, type these commands (or cut and paste to avoid typos):
sudo apt-get update && sudo apt-get dist-upgrade -y
sudo apt-get install -y git
git clone http://github.com/alanbjohnston/CubeSatSim.git
cd CubeSatSim
git checkout master
You are now ready to install the software.
./install
You will be prompted for your amateur radio callsign. Check your Wiki to see what to enter. If you don't have one or just hit Return, the default AMSAT will be used. The Callsign is transmitted as a CW ID (Morse code) each time the CubeSatSim software starts up.
You will also be prompted for your latitude and longitude - look it up and enter it for the APRS data packets.
After you enter the information, the installation script will run for quite a while. You will need to type y to reboot to complete the installation. After the reboot, you will have to login again using SSH.
Sometimes when you run the installer script while running the Desktop, the Direwolf installation will freeze. But you can just cycle the power to the Pi Zero 2, then run the installer script again and it will complete successfully. Alternatively, if you use sudo raspi-config to change to Boot to Console (System/ Boot Auto Login/ Console or Console Auto Login) then the installer script will complete without any issues.
When it reboots, you will need to SSH to log back into your Pi Zero and do the configuration that follows.
The default transmit frequency of the CubeSatSim will be 434.9 MHz. If you want, you can change it to another frequency in the range 420 - 450 MHz by typing the command CubeSatSim/config -F and then input the desired frequency.
You can see all the settings for your Pi Zero by typing CubeSatSim/config
To see all the commands and options of your Pi Zero by type CubeSatSim/config -h
To see the complete second-by-second log output, which will be very useful later to debug your hardware, type CubeSatSim/log
To see the transmitter log, type CubeSatSim/log -r
You have completed the software installation steps. You should not just suddenly remove power from the Pi Zero or the micro SD storage may become corrupted and you would need to redo all these steps. Instead, you can shut it down gracefully by typing a command, or by using the pushbutton when the STEM Payload Board is plugged into the Pi Zero.
To shutdown, type sudo shutdown now and after about 30 seconds, the Pi will have shutdown and you can unplug the power from it.
If you have an HDMI monitor (and mini HDMI adapter or cable) and a USB keyboard (and micro USB to USB adapter or OTG cable), you can access the console directly.
If you didn't set the WiFi using the Pi Imager but are able to connect a keyboard and HDMI monitor to your Pi Zero, you can configure the WiFi using these steps. First type this command:
sudo raspi-config
Then select System Options by hitting Return, then select Wireless LAN by hitting Return again. Then put your Wi-Fi name in the SSID field then hit Return, then type the Wi-Fi password then Return again. Hit the Tab key twice until Finish is highlighted, then hit Return. You may need to reboot. You can tell if you have Internet by typing:
timeout 10 ping amazon.com
If you see messages such as "64 bytes received" then you are online.
You can now update the Pi Zero software by typing:
cd
CubeSatSim/update
You can also login remotely from your PC if it is on the same Wi-Fi as the Pi Zero. For example, in the Terminal Window or Windows Command Prompt, you can type:
ssh pi@cubesatsim.local
and you should be prompted for the password to login.
If not, you can access your Pi from a computer using just a USB cable. This Ethernet over USB service is known as RNDIS on Windows and USB Gadget on Linux.
On Mac or Linux, you don't need to install any software to use this. On Windows, you need the mDNS discovery program Bonjour. If you already have iTunes installed, you should have it. If not, you can download it from Apple here:
https://support.apple.com/kb/dl999?locale=en_US
Note that it is called Bonjour Printer Services, since that is the most common standalone use for the application. Run the installer and reboot.
On your Pi Zero, connect a micro USB cable to the inner micro USB connector which is labeled "USB", not the one on the edge labeled PWR IN (Power In).
When you connect the other end of the USB cable to your computer, it will power up the Pi and should be accessible by your computer to SSH into.
After it finished booting up, you will have network connectivity to your Pi Zero. For example, in the Terminal Window or Windows Command Prompt, you can type (if your hostname is cubesatsim):
ssh pi@cubesatsim.local
and you can login using the default password raspberry.
Sometimes, this doesn't work on Windows - if you are unable to connect after installing the software, try the steps described here: https://fredricraab.wordpress.com/cubesat-simulators/raspberrypi-zero-windows-10-rndis- driver-problems/
You can set other Localization Options by running sudo rasp-config and selecting as Locale (unchecked en.GB and checked en.US.UTF-8 UTF-8 and C.UTF-8), Timezone (US Eastern), Keyboard (Generic 101-key PC, Other, English (US), English (US), default, no compose), and WiFi Country (set to US - if you don't do this, WiFi won't work on 3B or 4B)
You can edit the Message of the Day file sudo vi /etc/motd Added these lines to it:
This Raspberry Pi image has the CubeSatSim v2.x software installed
and runs automatically as systemd cubesatsim.service. For more
information see https://CubeSatSim.org. To update
to the latest version, enter this command:
CubeSatSim/update
To see configuration options, enter this command:
CubeSatSim/config
You can edit the /boot/config.txt file: sudo vi /boot/config.txt Uncommented this line:
hdmi_safe=1