This project focuses on generating a solution to a problem called Entity Resolution that lies within the scope of Natural Language Processing. Entity Resolution deals with disambiguating entities across, or within, datasets, in order to consolidate and strengthen the integrity of the data.
This document provides a brief overview of the project. Further documentation can be found in academic paper that will be available soon.
The specific use case that is explored deals with matching a user entry, in this case a bank or company address, against an extensive dictionary that contains all of the possible exact addresses.
This approach uses four stages.
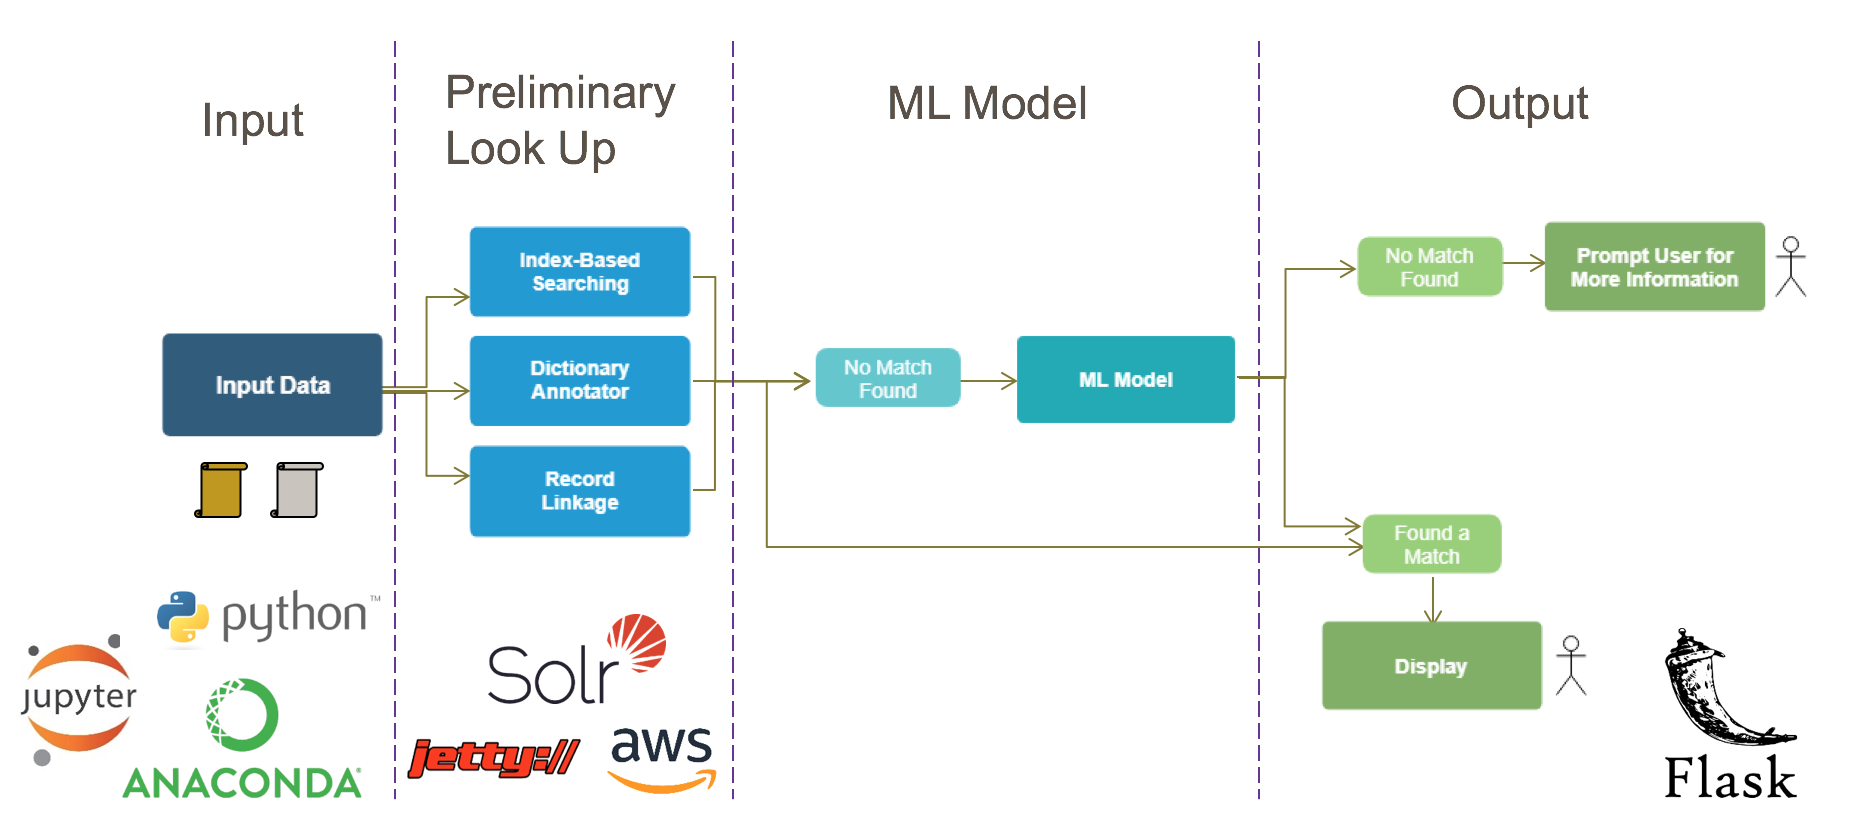
The first is collecting the user input. This input consists of a clean gold copy of all of the addresses that will be queried and the user-entered adress. These user entered addresses can be exact matches, or they may contain ambiguities, missing values, incorrect fields, improper formatting, abbreviations, truncations, and more.
The second step is to send the data through the preliminary lookup stage. This consists of three matching methods-- an index-based search, a dictionary annotator, and a record linkage method. The first method is an index-based search that queries the solr index that is storing the data. The dictionary annotator also makes use of the solr index and utilizes finite state transducers in determining matches. The record linkage method is a python implementation that compares and groups records using a variety of algorithms, such as Jarowinkler and Levenshtein Distance.
If no matches are found in the preliminary lookup stage, the data is sent to the slightly more computationally expensive ML model. This is a semi-supervised ML model that recognizes patterns in training data in order to determine feature importance in discovering matches. This method is unique in that it does not come with a predetermined set of rules, as do the preliminary matching methods, for determining results. The matches that it discovers are dependent on the data on which the model is trained. This model is based on a multitude of methods, which are discussed further in the paper. The most prominent is the Affine Gap Distance, which is used on every different value of the input.
The final step is to provide the user the results from each of the methods. Here, the user has the option to select the correct address, or refine their search if no correct match is found. The user also has the opportunity to evaluate the timing of the operations, compare the results from each method, and evaluate the accuracy of the ML model with performance metrics including precision and recall.
This diagram illustrates some of the differences between each method. It is important to note that the ML model is left blank because of the uniqueness of ML. It does not have a predetermined set of rules for discovering matches. As more data and edge cases are obtained, the matches that are discovered changes, and the accuracy of the model improves.

There are 5 notebooks that you may want to run.
- INDEX_BASED.ipynb is located in the Preliminary folder
- DICTIONARY_ANNOTATOR.ipynb is located in the DictionaryAnnotator folder
- RECORD_LINKAGE.ipynb is located in the RecordLinkage folder
- ML_Model.ipynb is located in the UI folder
- NLP_PLATFORM.ipynb is located in the UI folder
A demonstration of the UI, example queries, and a visual implementation of the dictionary annotator within an AWS Cloud environment can be found in Entity_Resolution.pdf
Follow the instructions below to get this running on your local host.
If you don't already have Python running, download version 3.6.
Make sure that you have Anaconda3 which should install Jupyter Notebook 5.0.0 and will allow you to run the ipynb files.
Go here for instructions on how to download SoDA https://github.com/elsevierlabs-os/soda/blob/master/docs/installation.md. This will include a Solr download. When downloading and starting solr, specify the port to be 8984. This can be done with the following command: bin/solr start -p 8984. Also, make sure that the SoDA port being used is 8080. This is the default.
To upload the data to SoDA, 'cd' into the the SoDA directory, which should be located within a SolrTextTagger folder. From here, type 'sbt'. Within sbt, add the 6 lexicons with the following commands. The paths can be located in .../SWIFT-annie/SoDA/
run companies_name {path_to companies_name1.tsv} 1
run companies_addr {path_to companies_addr1.tsv} 1
run companies_city {path_to companies_city1.tsv} 1
run companies_ctry {path_to companies_ctry1.tsv} 1
run companies_code {path_to companies_code1.tsv} 1
run companies_dict {path_to companies_dict.tsv} 1
Check to make sure the files were uploading by running the jupyter notebook- "DICTIONARY_ANNOTATOR.ipynb" in the DictionaryAnnotator folder.
Note- if you have trouble importing sodaclient when you run the code, make sure that package is located in the site packages folder in anaconda.
Navigate to http://localhost:8984/solr/. This should be up and running if the Solr installation worked in the previous step. From here, create a core called "new_core" within that admin site. If you run into any problems here, try creating the core via commandline, using the command "bin/solr create -c new_core". This reference can be used for more help https://lucene.apache.org/solr/guide/6_6/solr-cores-and-solr-xml.html.
In order to upload the data and run this index-based fast lookup method, navigate to and run the "INDEX-BASED.ipynb" file in the Preliminary folder.
There are many Python packages imported in the Jupyter Notebooks. If these are giving you errors, make sure to install them.
http://lucene.apache.org/solr/guide/7_3/
https://github.com/elsevierlabs-os/soda
https://github.com/OpenSextant/SolrTextTagger
https://dedupe.io/
http://flask.pocoo.org/docs/1.0/
https://getbootstrap.com/
More help and inspiration came from experts at SWIFT