Installing and Configuring VSCode
Visual Studio Code, or VSCode, is currently one of the most popular IDEs for javascript development. Despite being a Microsoft product, it's free and open source, and is effectively a web application itself. Under the hood is a private version of the chromium rendering engine (on which Chrome is based), and the IDE is built as a web application on top of that. This structure means it is fully cross-platform, and also extremely amenable to development in javascript. It has the same advantage that Java-based IDEs like Eclipse have for doing java development.
You are not required to use VSCode for this class. If you prefer to use a different editor, that's fine. But you are required to follow the AirBnB javascript style guide, and our instructions will help you automate that in VSCode. If you use a different editor, you're on your own.
Javascript is a messy language, with multiple layers of new syntax that are supplant older syntax. There are also design errors (like optional semi-colons at the ends of statements) that cause incorrect behavior in certain cases. As a result, it is even more important to follow careful style guidelines in javascript than in other languages. In this class, we will follow the widely used AirBnB Style Guide. You will also use a tool called ESLint to enforce this guide. ESLint is the most common "linter"for javascript; a linter is a tool that is designed to detect potential bugs and style errors in programmers beyond what a compiler can detect. One cool thing about VSCode is that it can run ESLint dynamically as you edit,* so that you can correct any style issues instantly. Some rules will still be annoying, but it's more manageable when the style checking happens as you type.
The final piece of the tool puzzle is Node.js. Node.js lets you run javascript code outside the browser, but more importantly for this class it provides a build environment akin to make and a package manager for javascript libraries akin to python's pip. You'll use it to gain access to ESLint, but almost every significant web development project uses node to manage builds and pull in libraries.
- Follow the instructions at brew.sh to install Brew. Brew is a package manager for installing (mostly) open source software on Mac, much like apt and yum on Linux. It gives you a consistent way to install and update software, and manages all dependencies between packages. In most cases, you're better off installing things via brew than via stand-alone installers when a brew package is available.
- Open a terminal
- Run
brew install nodeto install Node.js - Run
brew cask install visual-studio-codeto install Visual Studio Code.
- Follow these instructions to set up the appropriate node repository for your installation and install the packages. (Most distros already package node, but older distro versions may not package a sufficiently recent version. For instance, Ubuntu 18.04 packages an old version of node.)
- Follow these instructions to download and install Visual Studio Code. It shouldn't matter whether you use the deb/rpm package or the snap version.
- Download Node.js from the web site. We recommend the LTS (long-term support) version rather than the current version. During installation, allow node to automatically download and install the necessary build tools. Installation may take 10-15 minutes and requires you to click buttons several times, but it's otherwise pretty automated.
- Log out and log back in, or restart Windows. This seems to be necessary for Windows to update your system path to include node.
- Download and install Visual Studio Code. It's up to you whether to associate know file types and other options.
Click the gear icon in the lower left of the VSCode window and select Settings.
- Fiddle with the settings to your heart's content.
- Type "tab" into the settings search box and look for the Editor: Tab Size setting. Set it to 2 to conform to the AirBnB style guide. This will save you some grief down the road.
- Type "eol" into the settings search box and look for the **Files: Eol" setting. Change it to "\n" to conform to the AirBnB style guide. This probably won't matter on mac and linux, but will save you tremendous grief on Windows. (Historically, there are three conventions for how to mark the end of a line in text files. Unix uses the ASCII line feed character [Ctrl-J, \n or LF]. Mac traditionally used the ASCII carriage return character [Ctrl-M, \r, or CR], although Mac OS X switched to using LF because it is based on the unix-like BSD. Windows uses a carriage return followed by a linefeed, or CRLF, a convention that can be traced backwards through DOS and CP/M to a range of early operating systems before unix became widely established.)
Now click Extensions in the gear menu. Type ESLint in the search box, and install the extension. You're welcome to explore the numerous other extensions available. If you are used to the keyboard shortcuts in another editor, you can almost certainly find a corresponding keymap plugin for VSCode. If you find yourself developing web applications using the Vue, React, or Angular frameworks, for example, you'll want to install the corresponding plugins.
For every project in this class, you'll need to do the following steps to get style checking set up (based on this page):
- Create a directory/folder for the project. The VSCode file browser has an icon to create folders, but you can also create them in the terminal or any other fashion that you like.
- Open a terminal in the directory you created. You can do this inside VSCode by right-clicking the folder in the file browser and selecting "Open Integrated Terminal." On Mac and Linux, this will open your default terminal, usually bash. On Windows, it will open PowerShell by default. If you install the Windows Subsystem for Linux (recommended), you can use the Remote - WSL extension to use VSCode conveniently with it.
- Type
npm init --yesto create a skeleton node project. This is roughly equivalent to creating a simple, default makefile. If you prefer to use yarn rather than npm, that's fine. If you don't know what yarn is, that's fine too. - Type
npm install eslint eslint-config-airbnb-base eslint-plugin-import -dto install a private copy of ESLint and the AirBnB style for this project. You can also install these things globally, but it's safer to install separate copies in each project to avoid version conflicts. - Create a file name
.eslintrc.js(note the leading .) in the project directory, with the following contents (or copy it from one of your other projects). This will activate the AirBnB style guide, but disable a few warnings that will otherwise drive you crazy. Be warned that.eslintrcwill not show up inlslistings in bash (but will in PowerShell) because files that start with a . are treated as hidden. Usels -ato show them in the terminal.
module.exports = {
  extends: 'airbnb-base',
  env: {
    browser: true,
    node: true,
  },
  rules: {
    'no-unused-vars': 'off',
    'no-console': 'off',
  },
};-
As an alternative to the previous steps, you can copy the
package.jsonand.eslintrc.jsfiles from an existing project that you configured with these rules, or download theskeldirectory from the datavis repo to use as a starting point. In either case you need to runnpm installin the project directory to download ESLint. -
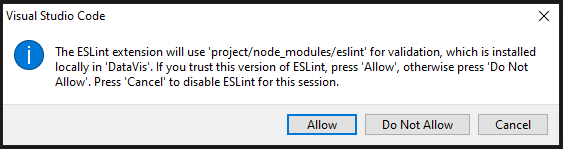
Now you're good to go. Visual Studio Code should automatically style check any javascript file you edit in the project directory using the AirBnB rules. Any errors--and there will be lots of them--will show up in the "Problems" pane. You may get a prompt like the dialog below when you start editing your first file in the project. You should click "Allow" to authorize access to ESLint.