For context, this repository was made with the objective of using reinforcement learning in a locomotion task (specifically walking) on a Unitree Go2. To this end, this repository was used as a base. It's important to notice that this repository also depends on:
- A mujoco playground fork that was maintained by the google-deepmind team (where we adapted the code made for the Go1 to be applied in the Go2). Contains the xml of the go2, the training, and simulation code that will work both synchronously and asynchronously.
The ideal way to order these folders (in the original computer, not the container) is the following:
- Documents
- Go2-Project
- mujoco_playground
- unitree_ros2_ws
- Go2-Project
DISCLAIMER: Even though you should clone this repo along with the Go2-Walking-Unitree repo, you should follow the install instructions inside of the docker container that you will initiate in the following section. Also, it's important to read the whole readme (the examples and rviz section are optional, everything else should be take into account before running the code).
You will need ubuntu 22.04, ros2 humble and python 3.10.12 or greater for this code to work.
Disclaimer: THIS WILL NOT WORK WITH A PREVIOUS VERSION OF PYTHON AS BRAX AND JAX HAD BREAKING CHANGES IN 3.10+.
After cloning the repos in the recommended way, follow this prodecure with the src folder as root to install the dependencies and be able to use it. If you have any error, please consult the official guide for the unitree_ros2 library.
cd unitree_ros2_ws
docker build -t ros2_humble_devel .
After that finishes, you will need to run the following in order to create the container with the necessary permissions (that will allow you to see the xbox360 controller input and share important files/folders + share topics with the unitree go2):
docker run -it --privileged --runtime=nvidia \
    --name joystick_humble_develop \
    -v /dev/input:/dev/input \
    -v ~/Documents/Go2-Project:/root/utils \
    --network host \
    ros2_humble_devel
This should let you in the terminal of the container, where you will run
vncserver :10It will ask for a password, I recommend using 'docker' as it is easy to remind (this will be the password you will put in remmina when connecting to the container). Then, every time you start it, you will wanna run the following in order to turn on the virtual machine:
docker start joystick_humble_develop
docker exec -it joystick_humble_develop bin/bash

# While inside of the container run the following
vncserver :10
With the previous code you will be able to connect to the container and see the graphical interface through the ip 127.0.0.1:5910 and the password you selected.
Run the following inside the container, could work either from Remmina or using the exec -it command given previously.
sudo apt install ros-humble-rmw-cyclonedds-cpp
sudo apt install ros-humble-rosidl-generator-dds-idl
sudo apt install libyaml-cpp-devAfter compiling cyclone-dds, ROS2 dependencies are required for compilation of the unitree_go and unitree_api packages. Therefore, before compiling, it is necessary to source the environment of ROS2.
source /opt/ros/humble/setup.bash # source ROS2 environment
colcon build # Compile all packages in the workspace
Connect Unitree robot and the computer using Ethernet cable. Then, use ifconfig to view the network interface that the robot connected. For example, "eno1" in the following figure.

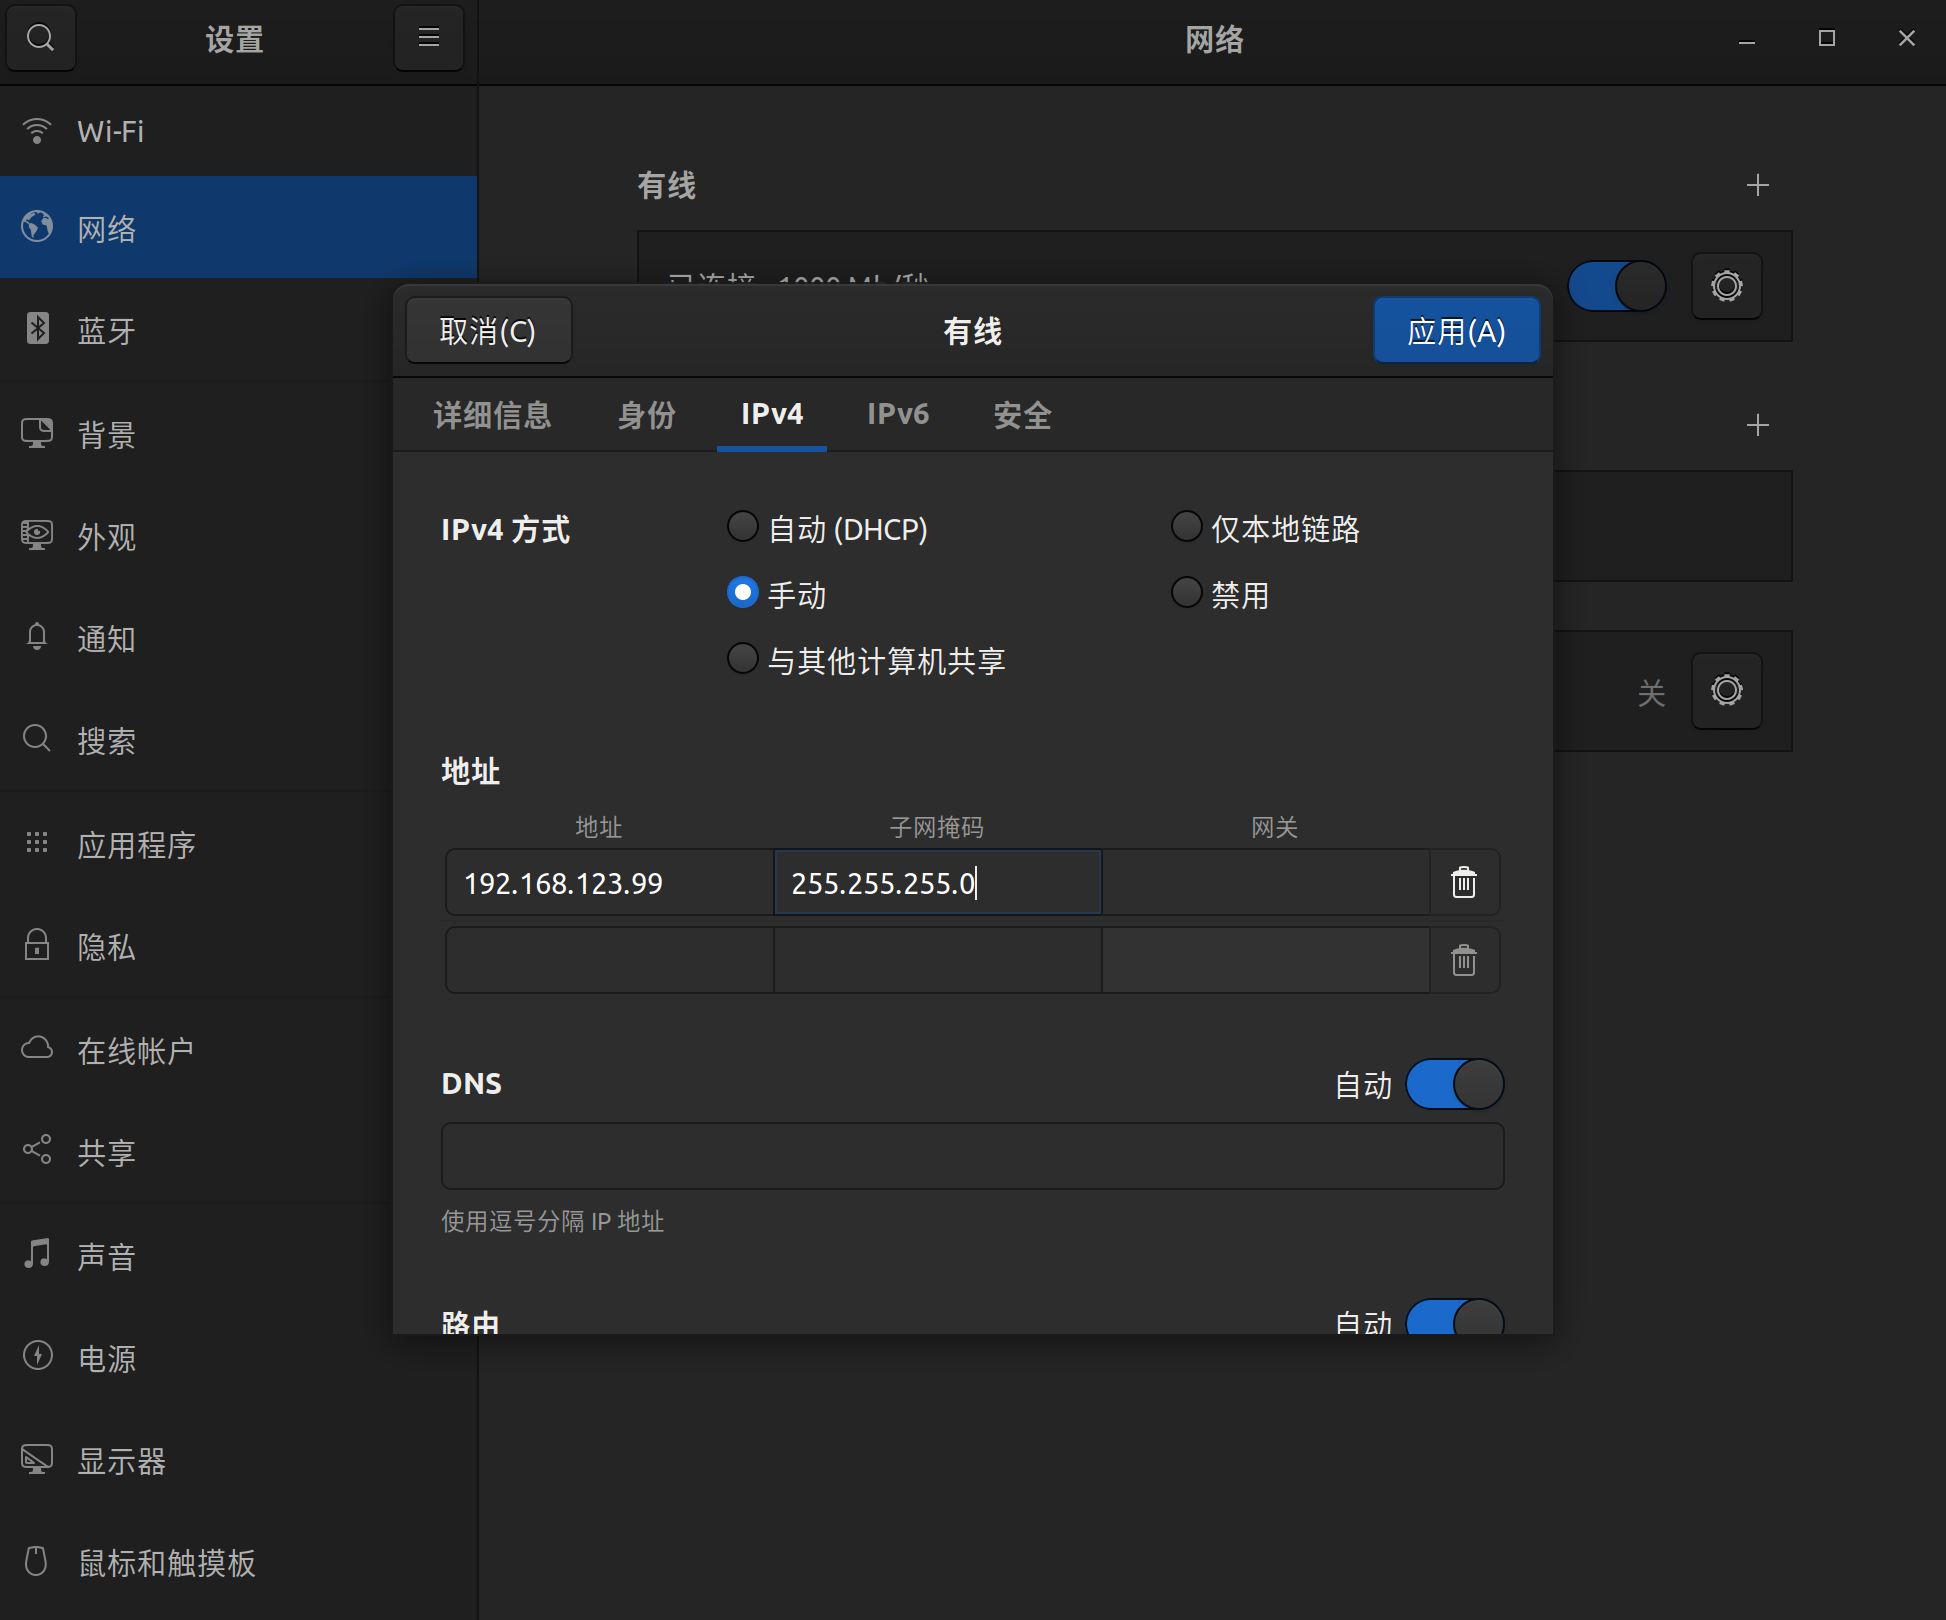
Next, open the network settings, find the network interface that the robot connected.In IPv4 setting, change the IPv4 mode to manual, set the address to 192.168.123.99, and set the mask to 255.255.255.0. After completion, click apply and wait for the network to reconnect.
Open setup.sh file.
sudo vim ~/Documents/Go2-Project/unitree_ros2/setup.sh#!/bin/bash
echo "Setup unitree ros2 environment"
source /opt/ros/humble/setup.bash
source $HOME/utils/unitree_ros2_ws/cyclonedds_ws/install/setup.bash
export RMW_IMPLEMENTATION=rmw_cyclonedds_cpp
export CYCLONEDDS_URI='<CycloneDDS>
<Domain>
<Internal>
<MaxMessageSize>65500B</MaxMessageSize>
<FragmentSize>4000B</FragmentSize>
</Internal>
<General>
<Interfaces>
<NetworkInterface name="eno1" priority="default" multicast="default" />
</Interfaces>
<MaxRexmitMessageSize>65500B</MaxRexmitMessageSize>
</General>
<Discovery>
<ParticipantIndex>none</ParticipantIndex>
</Discovery>
</Domain>
</CycloneDDS>'
export CMAKE_PREFIX_PATH=/opt/inekf:/opt/openrobots:$CMAKE_PREFIX_PATH
export PYTHONPATH=/opt/inekf/lib/python3.10/site-packages:/opt/openrobots/lib/python3.10/site-packages:$PYTHONPATH
export LD_LIBRARY_PATH=/usr/local/lib:/opt/openrobots/lib:$LD_LIBRARY_PATHwhere "eno1" is the network interface name of unitree robot connected. Modify it to the corresponding network interface according to the actual situation.
Source the environment to setup the ROS2 support of Unitree robot:
source ~/utils/Go2-Walking-Project/setup.shIf you don't want to source the bash script every time when a new terminal opens, you can write the content of bash script into ~/.bashrc, but attention should be paid when there are multiple ROS environments coexisting in the system.
If your computer is not connected to the robot but you still want to use Unitree ROS2 for simulation and other functions, you can use the local loopback "lo" as the network interface. Disclamer: They were not modified as setup.sh, but with a little bit of modification, they could also work to have the go2 working locally
source ~/utils/Go2-Walking-Project/setup_local.sh # use "lo" as the network interfaceor
source ~/utils/Go2-Walking-Project/setup_default.sh # No network network interface specified After completing the above configuration, it is recommended to restart the computer before conducting the test.
Ensure that the network of robot is connected correctly, open a terminal and input:
source ~/Documents/Go2-Project/setup.sh
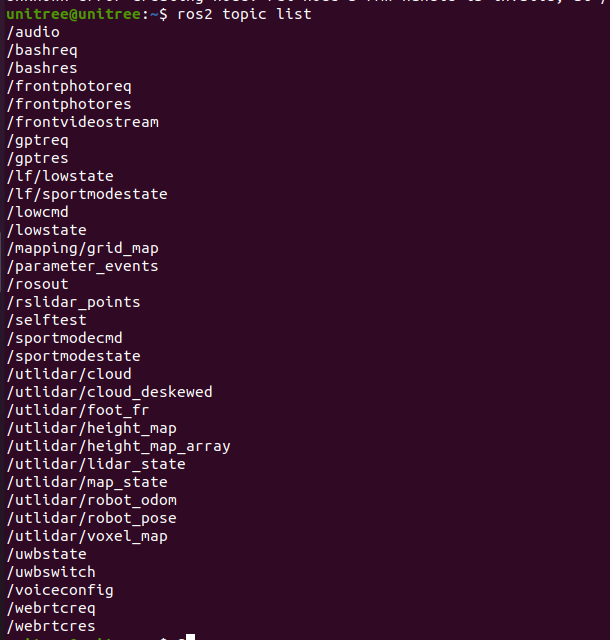
ros2 topic listYou can see the following topics:
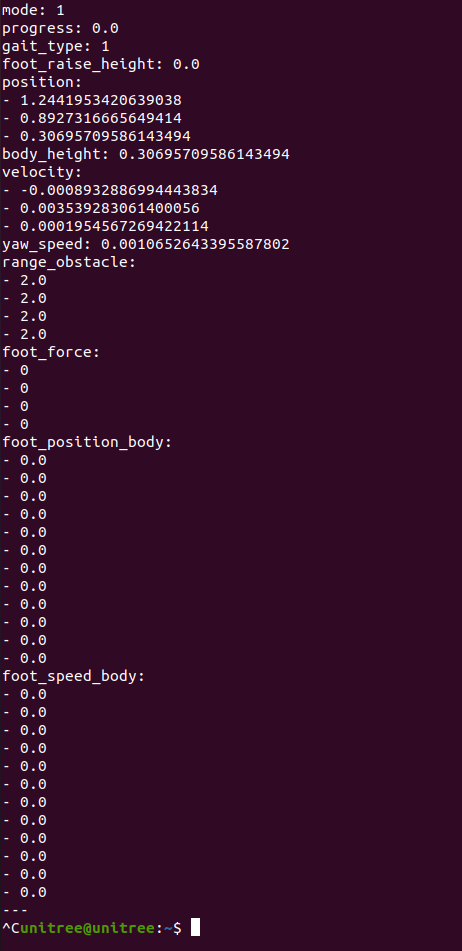
Input ros2 topic echo /sportmodestate,you can see the data of the topic as shown in the following figure:
3. Examples
The source code of examples locates at /example/src/src.
- common: Common functions for all robots.
- g1/lowlevel/g1_low_level_example: Low level control for G1
- h1-2/lowlevel/low_level_ctrl_hg: Low level control for H1-2
- low_level_ctrl: Low level control for Go2/B2
- read_low_state: Read the low state from Go2/B2
- read_low_state_hg: Read the low state from G1/H1/H1-2
- read_motion_state: Read the sport mode state from Go2/B2
- read_ wireless_controller: Read the state of wireless controller from G1/Go2/B2
- record_bag: Ros bag recording example.
- go2/go2_sport_client: High level control for Go2.
- go2/go2_stand_example: Stand example for Go2.
- go2/go2_robot_state_client:Robot State Example for Go2。
Open a terminal and input:
source ~/utils/Go2-Walking-Project/setup.sh
cd ~Documents/Go2-Project/unitree_ros2/example
colcon build
After compilation, run in the terminal:
./install/unitree_ros2_example/bin/read_motion_state You can see the robot status information output from the terminal:
[INFO] [1697525196.266174885] [motion_state_suber]: Position -- x: 0.567083; y: 0.213920; z: 0.052338; body height: 0.320000
[INFO] [1697525196.266230044] [motion_state_suber]: Velocity -- vx: -0.008966; vy: -0.001431; vz: -0.019455; yaw: -0.002131
[INFO] [1697525196.266282725] [motion_state_suber]: Foot position and velcity relative to body -- num: 0; x: 0.204149; y: -0.145194; z: -0.067804, vx: 0.002683; vy: 0.003745; vz: -0.010052
[INFO] [1697525196.266339057] [motion_state_suber]: Foot position and velcity relative to body -- num: 1; x: 0.204200; y: 0.145049; z: -0.068205, vx: -0.001954; vy: -0.003442; vz: -0.004828
[INFO] [1697525196.266392028] [motion_state_suber]: Foot position and velcity relative to body -- num: 2; x: -0.183385; y: -0.159294; z: -0.039468, vx: -0.000739; vy: -0.002028; vz: -0.004532
[INFO] [1697525196.266442766] [motion_state_suber]: Foot position and velcity relative to body -- num: 3; x: -0.182412; y: 0.159754; z: -0.039045, vx: -0.002803; vy: -0.001381; vz: -0.004794
[INFO] [1697525196.316189064] [motion_state_suber]: Gait state -- gait type: 1; raise height: 0.090000
3.1 Usage - State acquisition
3.1.1. Sportmode state
Sportmode state includes position, velcity, foot position, and other motion states of the robot. The acquisition of sportmode state can be achieved by subscribing "lf/sportmodestate" or "sportmodestate" topic, where "lf" represents low frequency. The msg of sportmodestate is defined as:TimeSpec stamp // Time stamp
uint32 error_code //Error code
IMUState imu_state //IMU state
uint8 mode //Sport mode
/*
Sport mode
0. idle, default stand
1. balanceStand
2. pose
3. locomotion
4. reserve
5. lieDown
6. jointLock
7. damping
8. recoveryStand
9. reserve
10. sit
11. frontFlip
12. frontJump
13. frontPounc
*/
float32 progress //Is the dance action being executed?:0. dance false; 1. dance true
uint8 gait_type //Gait type
/*
Gait type
0.idle
1.trot
2.run
3.climb stair
4.forwardDownStair
9.adjust
*/
float32 foot_raise_height
float32[3] position
float32 body_height
float32[3] velocity
float32 yaw_speed
float32[4] range_obstacle
int16[4] foot_force
float32[12] foot_position_body //foot positions in body frame
float32[12] foot_speed_body //foot velcities in body frameFor details, see:https://support.unitree.com/home/en/developer/sports_services.
Complete examples is in /example/src/read_motion_state.cpp. Run in the terminal:
./install/unitree_ros2_example/bin/read_motion_state 3.1.2. Low-level state
The low-level state includes motors states, power information, and other low level states. Low-level states can be obtained by subscribing "lf/lowstate" or "lowstate" topic. The lowstate msg is defined as:uint8[2] head
uint8 level_flag
uint8 frame_reserve
uint32[2] sn
uint32[2] version
uint16 bandwidth
IMUState imu_state //IMU
MotorState[20] motor_state //Motor state
BmsState bms_state
int16[4] foot_force
int16[4] foot_force_est
uint32 tick
uint8[40] wireless_remote
uint8 bit_flag
float32 adc_reel
int8 temperature_ntc1
int8 temperature_ntc2
float32 power_v
float32 power_a
uint16[4] fan_frequency
uint32 reserve
uint32 crcwhere MotorState are defined as:
uint8 mode        // Mode, 0x01 for control
float32 q         // Joint angle
float32 dq        // Joint velocity
float32 ddq       // Joint acceleration
float32 tau_est   // Estimated torque
float32 q_raw     //raw data of q
float32 dq_raw    //raw data of dq
float32 ddq_raw   //raw data of dq
int8 temperature
uint32 lost
uint32[2] reserve
For details, see: https://support.unitree.com/home/en/developer/Basic_services Complete examples is in example/src/read_low_state.cpp.
3.2 Robot control
3.2.1. Sportmode
Sportmode control is implemented by request/response mechanism. Sportmode control can be achieved by sending unitree_api::msg::Request msg to the "/api/sport/request" topic.The Request msg for different sportmode interfaces can be obtained by the SportClient (/example/src/common/ros2_sport_client.cpp) class. For example, control the robot to reach a desired attitude:
 //Create a ros2 pubilsher
rclcpp::Publisher<unitree_api::msg::Request>::SharedPtr req_puber = this->create_publisher<unitree_api::msg::Request>("/api/sport/request", 10);

SportClient sport_req; //Sportclient
unitree_api::msg::Request req; //Sportmode request msg
sport_req.Euler(req,roll,pitch,yaw); //Get Sportmode request msg from Sportclient

req_puber->publish(req); // Publish request msg
For details about SportClient:https://support.unitree.com/home/en/developer/sports_services
Complete examples is in:example/src/sport_mode_ctrl.cpp. Run ./install/unitree_ros2_example/bin/sport_mode_ctrl in terminal. After 1 second of program startup, the robot will walk back and forth in the x direction.
3.2.2. Motor Control
The torque, position and velocity control of motor can be implemented by subscribing "/lowcmd" topic and sending unitree_go::msg::LowCmd msg. LowCmd msg is defined as:uint8[2] head
uint8 level_flag
uint8 frame_reserve
uint32[2] sn
uint32[2] version
uint16 bandwidth
MotorCmd[20] motor_cmd //motor command
BmsCmd bms_cmd
uint8[40] wireless_remote
uint8[12] led
uint8[2] fan
uint8 gpio
uint32 reserve
uint32 crcwhere motor_cmd is defined as:
uint8 mode;  //Mode(Foc mode -> 0x01 ,stop mode -> 0x00)
float q;     //Target position (rad)
float dq;    //Target velocity (rad/s)
float tau;   //Target torque (N.M)
float kp;
float kd;
unsigned long reserve[3];
For details about low_cmd:https://support.unitree.com/home/en/developer/Basic_services
Complete examples is in:example/src/low_level_ctrl.cpo. Run ./install/unitree_ros2_example/bin/sport_mode_ctrl in terminal. The hip motor and calf motor of the RL leg will rotate to the corresponding joint angle.
4. Rviz
We can also use rviz to visualize Unitree robot data.The following is an example of visualizing robot lidar data:Firstly, list all topics:
ros2 topic list
We can find the topic of lida:
utlidar/cloudThen, echo frame_id of lidar:
ros2 topic echo --no-arr /utlidar/cloud
where frame_id: utlidar_lidar

Finally, run rviz:
ros2 run rviz2 rviz2
Add Pointcloud topic: utlidar/cloud in rviz2 and modify Fixed frame to utlidar_lidar. Then, the lidar data is displayed in rviz2.


5. Walking task
In order to be able to make the walking task we need to do a few things. For this, the ideal setup, would be to have multiple terminals or directly a launch file (hasn't been created yet though). Right now this is the setup I use:
Top-left session: INEKF Odometry Top-center session: PlotJuggler Top-right session: Disable/enable sport mode and sport client (to make it sit and stand up) Middle session: Action server Bottom session: Action Client
App used: Tilix
Take the previous into account when running the following steps as they (in the majority of cases) need to be in different sessions.
5.1 After the Go2 was powered on, while is still standing, enable the odometry service
cd ~Documents/Go2-Project/unitree_ros2/cyclonedds_ws
source install/setup.bash
# This will publish the odometry estimation service into the topic /odometry/filtered
ros2 launch go2_odometry go2_odometry_switch.launch.py odom_type:=use_full_odom
5.2. Sit the go2 so it will not fall when we disable sport mode
cd ~Documents/Go2-Project/unitree_ros2/example
source install/setup.bash
# You can use 4 in the following command to make it stand when needed
ros2 run unitree_ros2_example go2_sport_client 3
5.3. Disable sport mode (so it wouldn't collide with the low level control)
cd ~Documents/Go2-Project/unitree_ros2
# You will need to press enter again after running the disabling sport mode code in
# order to disable the sport mode (this was made for a safer control)
python3 disable_sport_mode.py
5.4. Connect the joystick controller and run the action server
cd ~Documents/Go2-Project/unitree_ros2/cyclonedds_ws
source install/setup.bash
ros2 run walking_task_go2 action_server
5.4. Run the action client
cd ~Documents/Go2-Project/unitree_ros2/cyclonedds_ws
source install/setup.bash
ros2 run walking_task_go2 action_client
The joystick has the following commands:
- Left stick: when pushed up and down, the go2 will go forward and backward, respectively. Also, when pushed to the sides, the go2 will move to that side (without inclination/rotation, just walking in that direction).
- Right stick: when pushed to the left, the go2 will rotate to the left. The same is true for pushing to the right.
- Button A: when pressed, the go2 will go to the default pose (standing pose), this will similar to an emergency stop.
5.5. Run PlotJuggler
ros2 run plotjuggler plotjugglerInside of this, you will need to load the layout given in unitree_ros2_ws/cyclonedds_ws/Unitree_Go2_Joints_Odometry.xml. You can find the tutorial for this app in here.
PD: it's possible that you will need to downgrade numpy to 1.x in order to use everything, this shouldn't cause no harm. You can do it using:
python3 -m pip install "numpy<2.0"