A pure python bmssp implementation.
Make sure you have Python 3.11.x (or higher) installed on your system. You can download it here.
pip install bmsspy
- Github: https://github.com/connor-makowski/bmsspy
- Docs: https://connor-makowski.github.io/bmsspy/bmsspy.html
- Paper: https://ssrn.com/abstract=5777186
If you use BMSSPy for your research, please consider citing the following paper:
Makowski, Connor and Guter, Willem and Russell, Tim and Saragih, Austin, BMSSPy: A Python Package and Empirical Comparison of Bounded Multi-Source Shortest Path Algorithm (November 19, 2025). MIT Center for Transportation & Logistics Research Paper No. 2025/034, Available at SSRN: https://ssrn.com/abstract=5777186
Or by using the BibTeX entry:
@article{makowski2025bmsspy,
  title={BMSSPy: A Python Package and Empirical Comparison of Bounded Multi-Source Shortest Path Algorithm},
  author={Makowski, Connor and Guter, Willem and Russell, Tim and Saragih, Austin},
  journal={MIT Center for Transportation & Logistics Research Paper Series},
  number={2025-034},
  year={2025},
  url={https://ssrn.com/abstract=5777186}
}
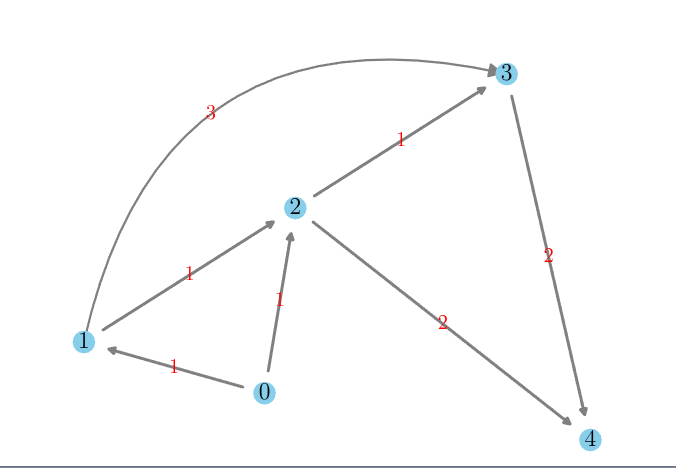
The example use cases in this section are based on the following graph:
from bmsspy import Bmssp

# Graph with 5 nodes: 0..4
# Adjacency-list representation with nonnegative weights
graph = [
    {1: 1, 2: 1},   # 0 -> 1 (1), 0 -> 2 (1)
    {2: 1, 3: 3},   # 1 -> 2 (1), 1 -> 3 (3)
    {3: 1, 4: 2},   # 2 -> 3 (1), 2 -> 4 (2)
    {4: 2},         # 3 -> 4 (2)
    {}              # 4 has no outgoing edges
]

bmssp_graph = Bmssp(graph) # Initialize the graph as a Bmssp graph

# Distances and predecessors from origin 0
res_0 = bmssp_graph.solve(origin_id=0)
print(res_0) #=>
# {
#     'origin_id': 0,
#     'destination_id': None,
#     'predecessor': [-1, 0, 0, 2, 2],
#     'distance_matrix': [0.0, 1.0, 1.0, 2.0, 3.0],
#     'path': None,
#     'length': None
# }

# Shortest path from 0 to 4
res_0_4 = bmssp_graph.solve(origin_id=0, destination_id=4)
print(res_0_4) #=>
# {
#     'origin_id': 0,
#     'destination_id': 4,
#     'predecessor': [-1, 0, 0, 2, 2],
#     'distance_matrix': [0.0, 1.0, 1.0, 2.0, 3.0],
#     'path': [0, 2, 4],
#     'length': 3
# }
In the example above, we only use a single orign, however multiple origins are supported if passed as a set:
# Pass orgin_id as a set of ids
res_02 = bmssp_graph.solve(origin_id={0,2})
print(res_02) #=>
# {
#     'origin_id': [0, 2],
#     'destination_id': None,
#     'predecessor': [-1, 0, -1, 2, 2],
#     'distance_matrix': [0.0, 1.0, 0.0, 1.0, 2.0],
#     'path': None,
#     'length': None
# }
By default graphs that are given are converted to constant degree such that worst case asymtotic run times are based on the constant degree converted graphs. Before returning a result, the constant degree conversion is undone such that the results are in the original passed graph format.
Most real world graphs are not constant degree. Converting to constant degree graphs can add substantial operational overhead during pre and post processing as well as during the actual algorithmic runtime.
To skip the constant degree conversion:
# Set use_constant_degree_graph=False
bmssp_graph = Bmssp(graph=graph, use_constant_degree_graph=False)To avoid extra development overhead, we expect all developers to use a unix based environment (Linux or Mac). If you use Windows, please use WSL2.
For development, we test using Docker so we can lock system deps and swap out python versions easily. However, you can also use a virtual environment if you prefer. We provide a test script and a prettify script to help with development.
- Fork the repo and clone it locally.
- Make your modifications.
- Use Docker or a virtual environment to run tests and make sure they pass.
- Prettify your code.
- DO NOT GENERATE DOCS.
- We will generate the docs and update the version number when we are ready to release a new version.
- Only commit relevant changes and add clear commit messages.
- Atomic commits are preferred.
- Submit a pull request.
Make sure Docker is installed and running.
-
Create a docker container and drop into a shell
./run.sh
-
Run all tests (see ./utils/test.sh)
./run.sh test
-
Prettify the code (see ./utils/prettify.sh)
./run.sh prettify
-
Note: You can and should modify the
Dockerfileto test different python versions.
- Create a virtual environment
python3.XX -m venv venv- Replace
3.XXwith your python version (3.11 or higher)
- Replace
- Activate the virtual environment
source venv/bin/activate
- Install the development requirements
pip install -r requirements/dev.txt
- Run Tests
./utils/test.sh
- Prettify Code
./utils/prettify.sh