- node 22.x.x
- npm 9.x.x
- heroku-22 stack (only for deploys, not need to install locally)
- heroku buildpack pnpm
This is the backend application server. It works with these other parts of the server:
- frontend Web UI
- video Video Ingestion with FFMPEG
presign-service small backend service for presigning URLs(deprecated)- cf-image-worker edge worker for secure image access
And these client repos:
- client C++ client
- python-api API for writing your own clients
- python-api a client for managing the Electric Sheep in Infinidream
./src
├── clients/        # Clients services
├── constants/      # Constants
├── controllers/    # Route controllers
├── database/       # Database connection
├── entities/       # TypeORM entities
├── middlewares/    # Custom middlewares
├── migrations/     # DB Migrations
├── routes/         # Routes
├── schemas/        # Validation schemas
├── shared/         # Shared code
├── types/          # Types
├── utils/          # Utils
└── index.ts        # Express App
Served by swagger on staging.
Install pnpm, follow next instructions. Using npm
npm install -g pnpmCopy env file, replace data with correct environment info
cp .env.example .envInstall all packages
pnpm installInstall husky
pnpm run husky-installRun on dev mode
pnpm run devWe have unit tests, lint tests, and integration tests. Run them all:
cp .env.test .env
pnpm run test
Or run subsets
pnpm run test:ci
pnpm run test:unit
pnpm run test:integration
Or run other code checks:
pnpm run lint
pnpm run typecheckCopy env file
cp .env.example .envInstall Docker and run docker command
docker compose -f "docker-compose.yml" up -d --buildDatabase configurations to connect with a development instance or locally here. Test any non-trivial migrations on a development instance, before deploying to stage.
- When you merge a change from a branch feat/name or fix/name to stage, or push changes directly to stage a deploy is trigger automatically on heroku.
- As stage and development share database, you don't need to run migrations on this environment.
- Before push any change to production branch (main), you have to run migrations on this environment. Use
npm run migration:runcommand usingenv.productionfile values on.envfile. This process will be automated configured in the future. - When you merge a change from a branch feat/name or fix/name to production, or push changes directly to production a deploy is trigger automatically on heroku.
You can create a new entity using
entity_name=EntityName pnpm run entity:createYou can create a new migration using
migration_name=MigrationName pnpm run migration:createAutomatic migration generation creates a new migration file and writes all sql queries that must be executed to update the database
migration_name=MigrationName pnpm run migration:generateTo execute all pending migrations use following command
pnpm run migration:runTo revert the most recently executed migration use the following command
pnpm run migration:revertTo show all migrations and whether they've been run or not use following command
pnpm run migration:showEvery image/video URL served to the frontend goes through this worker. The worker sits at a Cloudflare Workers URL; the R2 bucket is never exposed directly to the public.
Browser → Cloudflare Worker (image-worker) → R2 Bucket
- The browser requests
https://<worker-host>/<r2-key>?sig=<hmac>&w=800&h=600&fit=cover&format=webp&q=85 - The worker validates the HMAC-SHA-256 signature (
sig) over the R2 key using a sharedSIGNING_SECRET. Requests without a valid signature get403 Forbidden. - If resize/format query params are present (
w,h,format), the worker re-fetches the raw object via its own/_raw/<key>endpoint and passes acf.imagetransform to Cloudflare's Image Resizing service before returning the result. - If no transform params are present the worker streams the raw R2 object directly.
- Partial content (
Rangerequests) is supported for video streaming (returns206 Partial Content). - All responses carry
Cache-Control: public, max-age=86400so Cloudflare's CDN caches the transformed image for 24 hours — subsequent requests for the same key+params are served from the edge without hitting R2 again.
Logical grouping of sockets to partition the "remote-control" communication channel
Provide a way to organize sockets into groups, allowing you to broadcast messages to multiple clients at once and direct it only for the user sessions. Room name "USER:id".
Verifies the identity of clients connecting to the server via sockets and adds user data to logic
Warning
Consider this works only for scaling, not vertical scale (change dyno type)
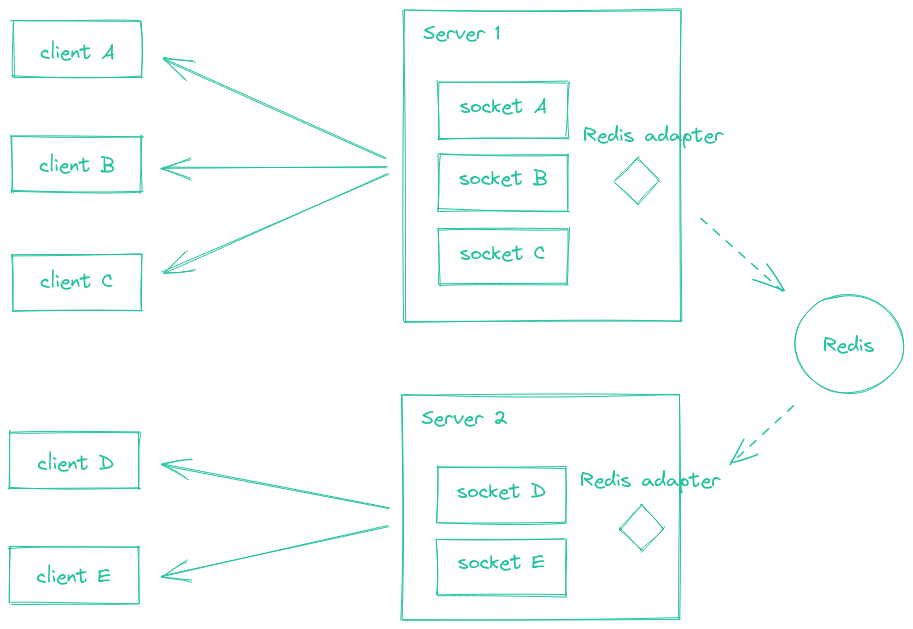
In order to enable autoscaling on Heroku, the project needs to handle websocket messages while having multiple NodeJS instances running.
When deploying multiple Socket.IO servers, there are two things to take care of:
- Enabling sticky session
- Using an redis adapter
To achieve this, it is necessary to follow next steps to fix multiple problems that scaling generates.
Using multiple nodes with Socket.IO will need to make sure that all requests associated with a particular session ID. Found this problem after scaling to 5 dynos.
If you plan to distribute the load of connections among different processes or machines, you have to make sure that all requests associated with a particular session ID reach the process that originated them. Without enabling sticky-session, you will experience HTTP 400 errors due to "Session ID unknown"
Heroku provides Session Affinity feature to solve sticky-sessions problem.
Active http-session-affinity on stage:
heroku features:enable http-session-affinity -a e-dreamThe Redis Adapter is a server-side component which is responsible for broadcasting events to all or a subset of clients. When scaling to multiple Socket.IO servers, is needed to replace the default in-memory adapter by another implementation, so the events are properly routed to all clients (connected to one of the multiple server instances). Adapter is used on src/server.ts file.
The Redis adapter relies on the Redis Pub/Sub mechanism. Every packet that is sent to multiple clients (e.g. io.to("room1").emit() or socket.broadcast.emit()) is:
- sent to all matching clients connected to the current server
- published in a Redis channel, and received by the other Socket.IO servers of the cluster
Authentication is handled by Passport. It provides various strategies that act as middleware to process and validate authentication requests. This application uses next strategies for authentication.
Authenticates users using JWT issued by Amazon Cognito.
Authenticates users using an API key provided in the request header.
Performs a search for the api key in the API_KEYS environment variable, if it exists, it allows the request to continue, the value of the API_KEYS environment variable is defined as follows.
[{ "userId": 1, "apiKey": "API_KEY" }]Performs a search for the api key in the database, if it exists, it allows the request to continue. Definition of ApiKey entity and its values on the entity file.
TS scripts to execute a process.
To run a TS script, use next command. Script should be located on script folder, for example src/script/my_script.ts
script=<SCRIPT_FILE_NAME>.ts pnpm run scriptTakes a range of dates and find all dreams on that range, sends multiple requests to queue jobs to process video file for that dreams.
Update dates range values with desired values in format YYYY-MM-DD
const startDate = new Date("2024-05-01");
const endDate = new Date("2024-05-31");
Update PROCESS_VIDEO_SERVER_URL .env value with the one you are targeting, with url of process video service setting stage or production value.
PROCESS_VIDEO_SERVER_URL=<URL_TO_PROCESS_VIDEO_SERVER>Run the script
script=process-dream.ts pnpm run scriptThis repository includes GitHub Actions workflows to create snapshot backups to Cloudflare R2 using Kopia, list available snapshots, and restore specific files/folders back into R2 (preview or in-place).
- kopia-r2-incremental-alpha
- kopia-r2-incremental-staging
- kopia-list-snapshots
- kopia-restore
- Source buckets (data):
- Alpha:
edream-storage-dreams-alpha - Staging:
edream-storage-dreams-staging
- Alpha:
- Kopia repo buckets (destination for content-addressed repository):
- Alpha:
edream-storage-dreams-alpha-backup - Staging:
edream-storage-dreams-staging-backup
- Alpha:
Workflows: kopia-r2-incremental-alpha, kopia-r2-incremental-staging
How to run
- Automatic: workflows are set with a cron (daily at 06:00 UTC).
- Manual: Actions → select
kopia-r2-incremental-<env>→ Run workflow.
Workflow: kopia-list-snapshots
How to run
- Actions →
kopia-list-snapshots→ Run workflow → pick env (alpha/staging).
Workflow: kopia-restore
Inputs
- env:
alphaorstaging - restore_prefix: Path inside the snapshot to restore (relative to snapshot root).
- Examples:
- Single file at root:
c9ff5735-3119-47d2-899f-1feed193f3ef-_01_10_00033.mp4 - Nested:
035a9088-5533-4435-a39f-545253c22970/4e7838fc-7075-483a-8c71-3153d8894efe/…_processed.mp4 - Folder:
426ae4da-4bab-433d-ba72-a1806000aa86/
- Single file at root:
- Examples:
- snapshot_id (optional):
- Paste a specific snapshot ID to restore from.
- Leave blank to restore from the latest snapshot by time.
- restore_mode:
previeworinplace.
- preview: Copies restored data to
restores/<UTC-timestamp>/<restore_prefix>/inside the destination bucket. It lets you inspect the output without touching the original object paths. - inplace: Copies restored data back to the original path given by
restore_prefixin the destination bucket. This may overwrite existing objects with the same keys and is intended for actual recovery.