Add Coremark and HelloWorld README for Nuclei RV-STAR #13
There are no files selected for viewing
| Original file line number | Diff line number | Diff line change | ||||||||
|---|---|---|---|---|---|---|---|---|---|---|
| @@ -0,0 +1,181 @@ | ||||||||||
| --- | ||||||||||
| sys: debian | ||||||||||
| sys_ver: v1.6.35 | ||||||||||
| sys_var: null | ||||||||||
| provider: milkv | ||||||||||
| status: peripheral | ||||||||||
| last_update: 2026-05-20 | ||||||||||
| model: Milk-V Duo S | ||||||||||
| profile: I2C | ||||||||||
| --- | ||||||||||
|
|
||||||||||
| # RuyiSDK 外设示例 | ||||||||||
|
|
||||||||||
| 可直接在开发板上进行编译和运行的示例,适合初学者快速上手。 | ||||||||||
|
|
||||||||||
| 安装依赖包 | ||||||||||
|
|
||||||||||
| ``` | ||||||||||
|
|
||||||||||
| sudo apt update; sudo apt install -y wget tar zstd xz-utils git build-essential | ||||||||||
|
|
||||||||||
| ``` | ||||||||||
|
|
||||||||||
| 安装 ruyi 包管理器 | ||||||||||
|
|
||||||||||
| ``` | ||||||||||
|
|
||||||||||
| wget https://mirror.iscas.ac.cn/ruyisdk/ruyi/tags/0.47.0/ruyi-0.47.0.riscv64 | ||||||||||
|
|
||||||||||
| chmod +x ruyi-0.47.0.riscv64 | ||||||||||
|
|
||||||||||
| sudo cp -v ruyi-0.47.0.riscv64 /usr/local/bin/ruyi | ||||||||||
|
|
||||||||||
| ``` | ||||||||||
|
|
||||||||||
| 安装工具链 | ||||||||||
|
|
||||||||||
| ``` | ||||||||||
|
|
||||||||||
| ruyi update | ||||||||||
|
|
||||||||||
| ruyi install gnu-plct llvm-plct | ||||||||||
|
|
||||||||||
| ``` | ||||||||||
|
|
||||||||||
| ## I2C | ||||||||||
|
|
||||||||||
| 本文介绍如何使用 RuyiSDK 在 Milk-V Duo S 开发板上快速部署编译环境,并构建 SSD1306 I2C OLED 屏幕测试程序,验证屏幕显示功能。 | ||||||||||
|
|
||||||||||
| ### 1. 准备工作 | ||||||||||
|
|
||||||||||
| * **开发板**:Milk-V Duo S (512M, SG2000) | ||||||||||
|
|
||||||||||
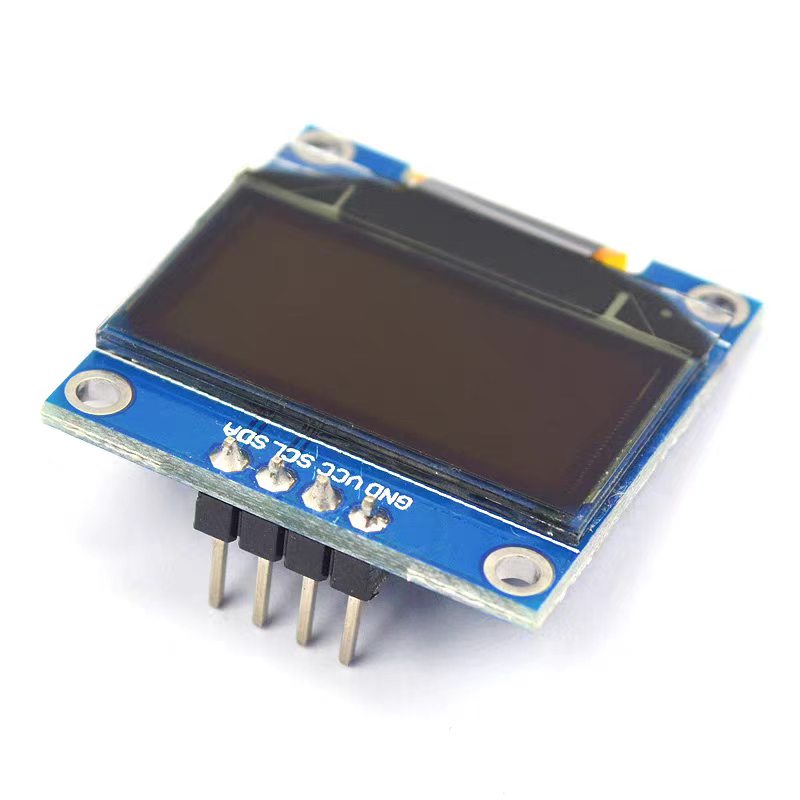
| * **传感器**:0.96寸 OLED 屏幕(SSD1306,I2C接口) | ||||||||||
|
|
||||||||||
| * **其他**:microSD 卡、USB Type-C 数据线、杜邦线 4 根(母对母) | ||||||||||
|
|
||||||||||
| #### 操作系统安装与启动验证 | ||||||||||
|
|
||||||||||
| 确保您的开发板已准备好系统。 | ||||||||||
|
|
||||||||||
| 参考文档:https://github.com/DuoQilai/riscv-board-custom-dev/blob/main/Duo_S/boot_DuoS.md | ||||||||||
|
|
||||||||||
| ### 2. 硬件连接 | ||||||||||
|
|
||||||||||
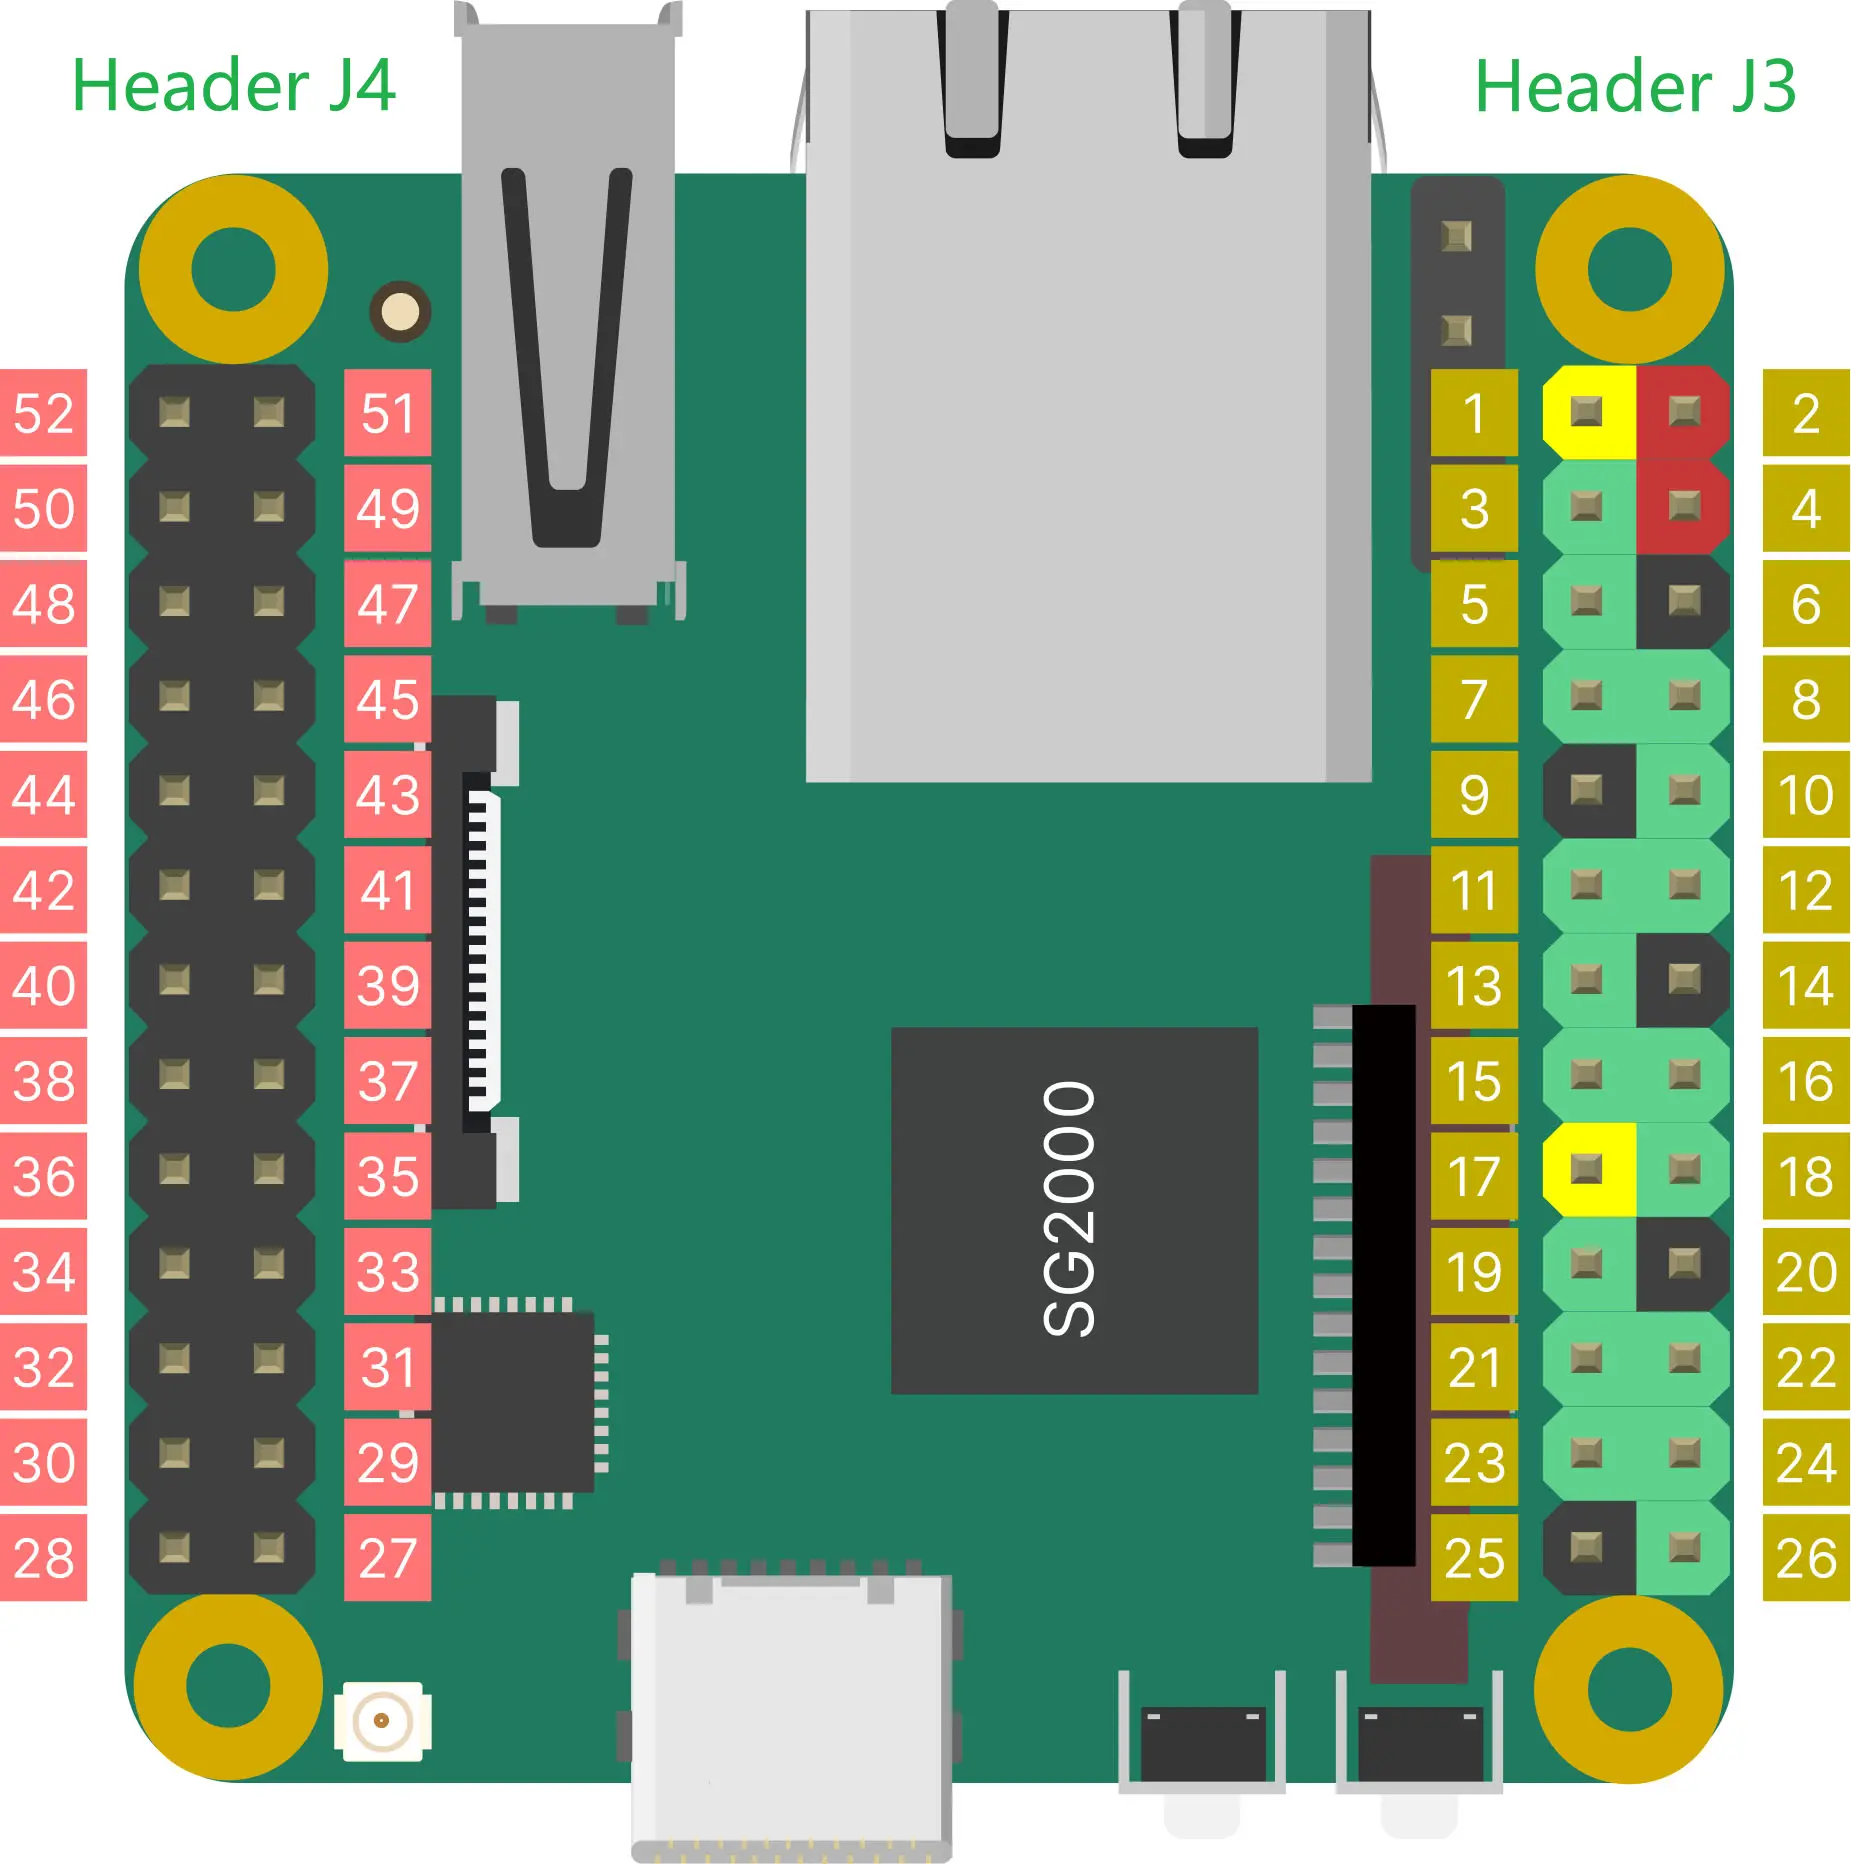
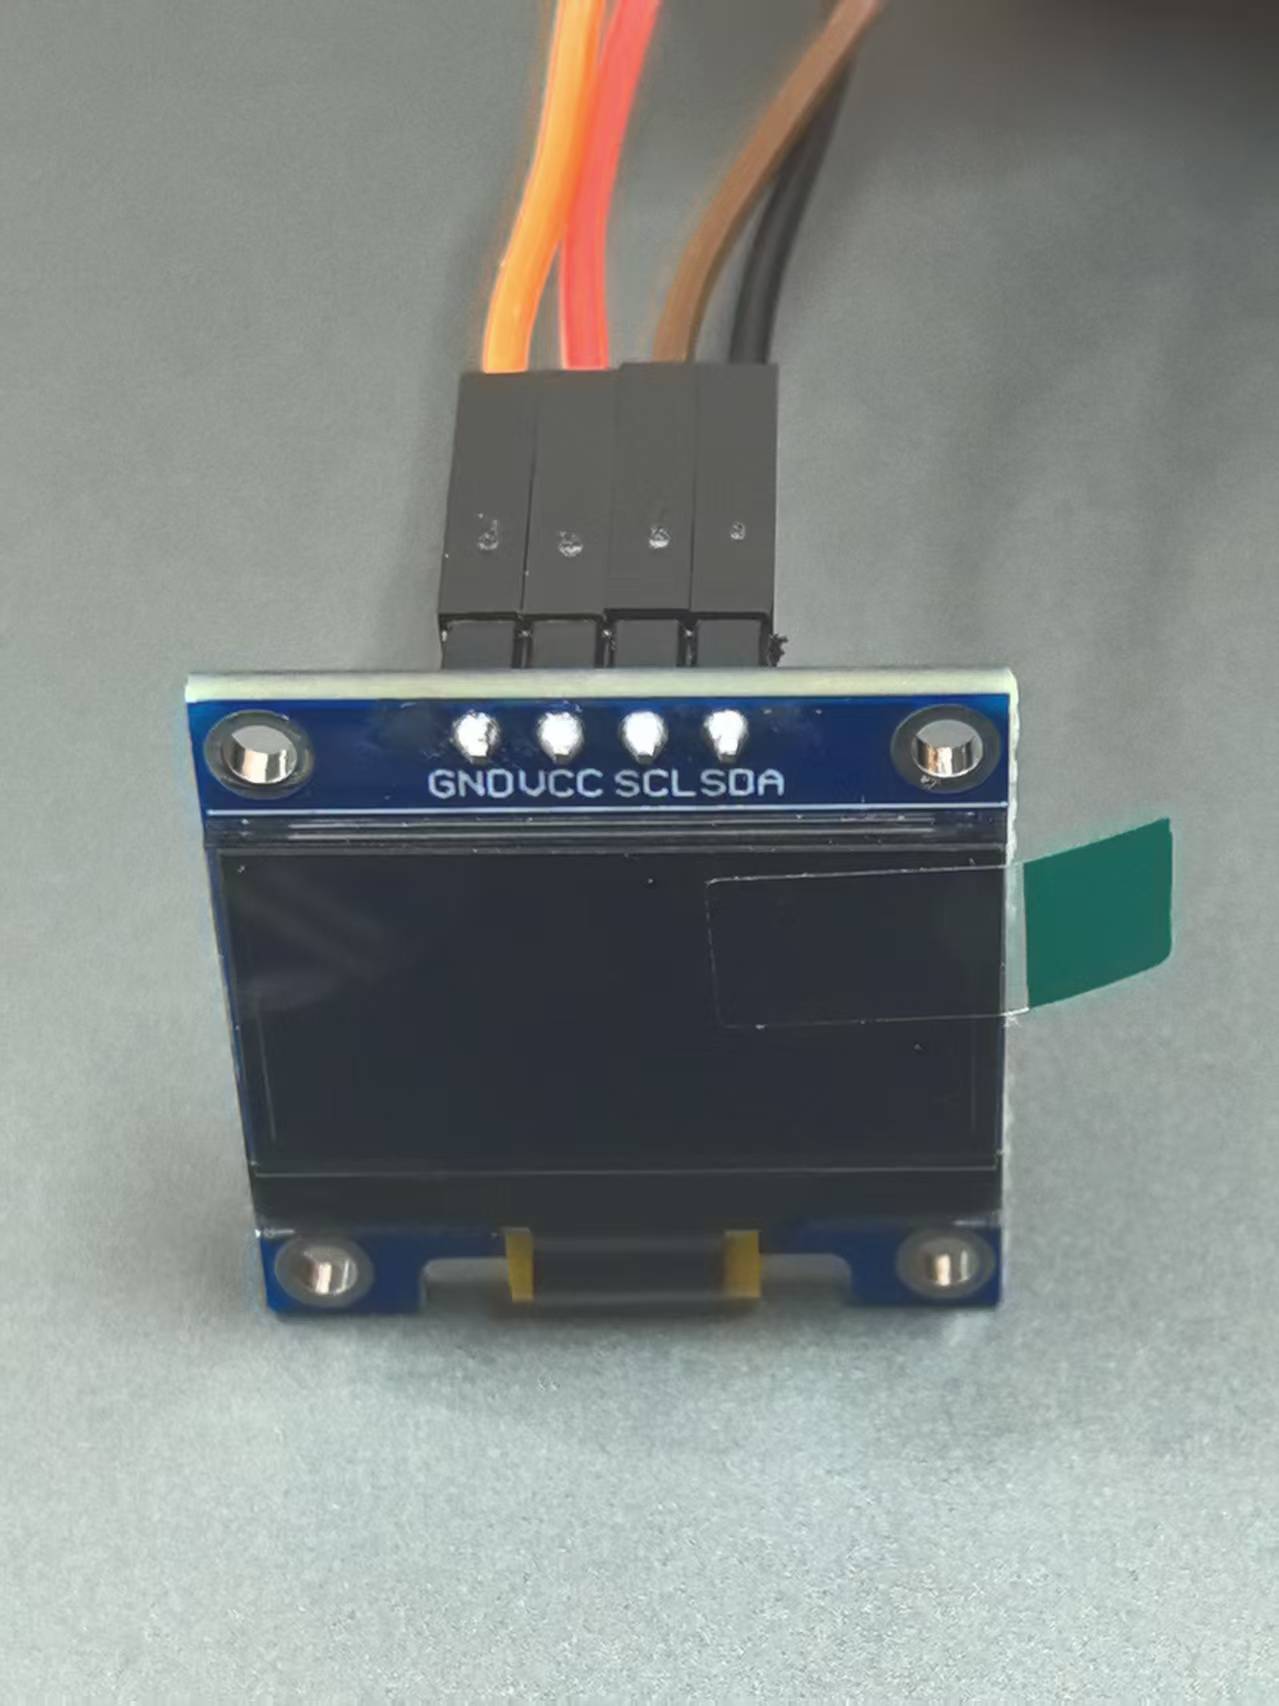
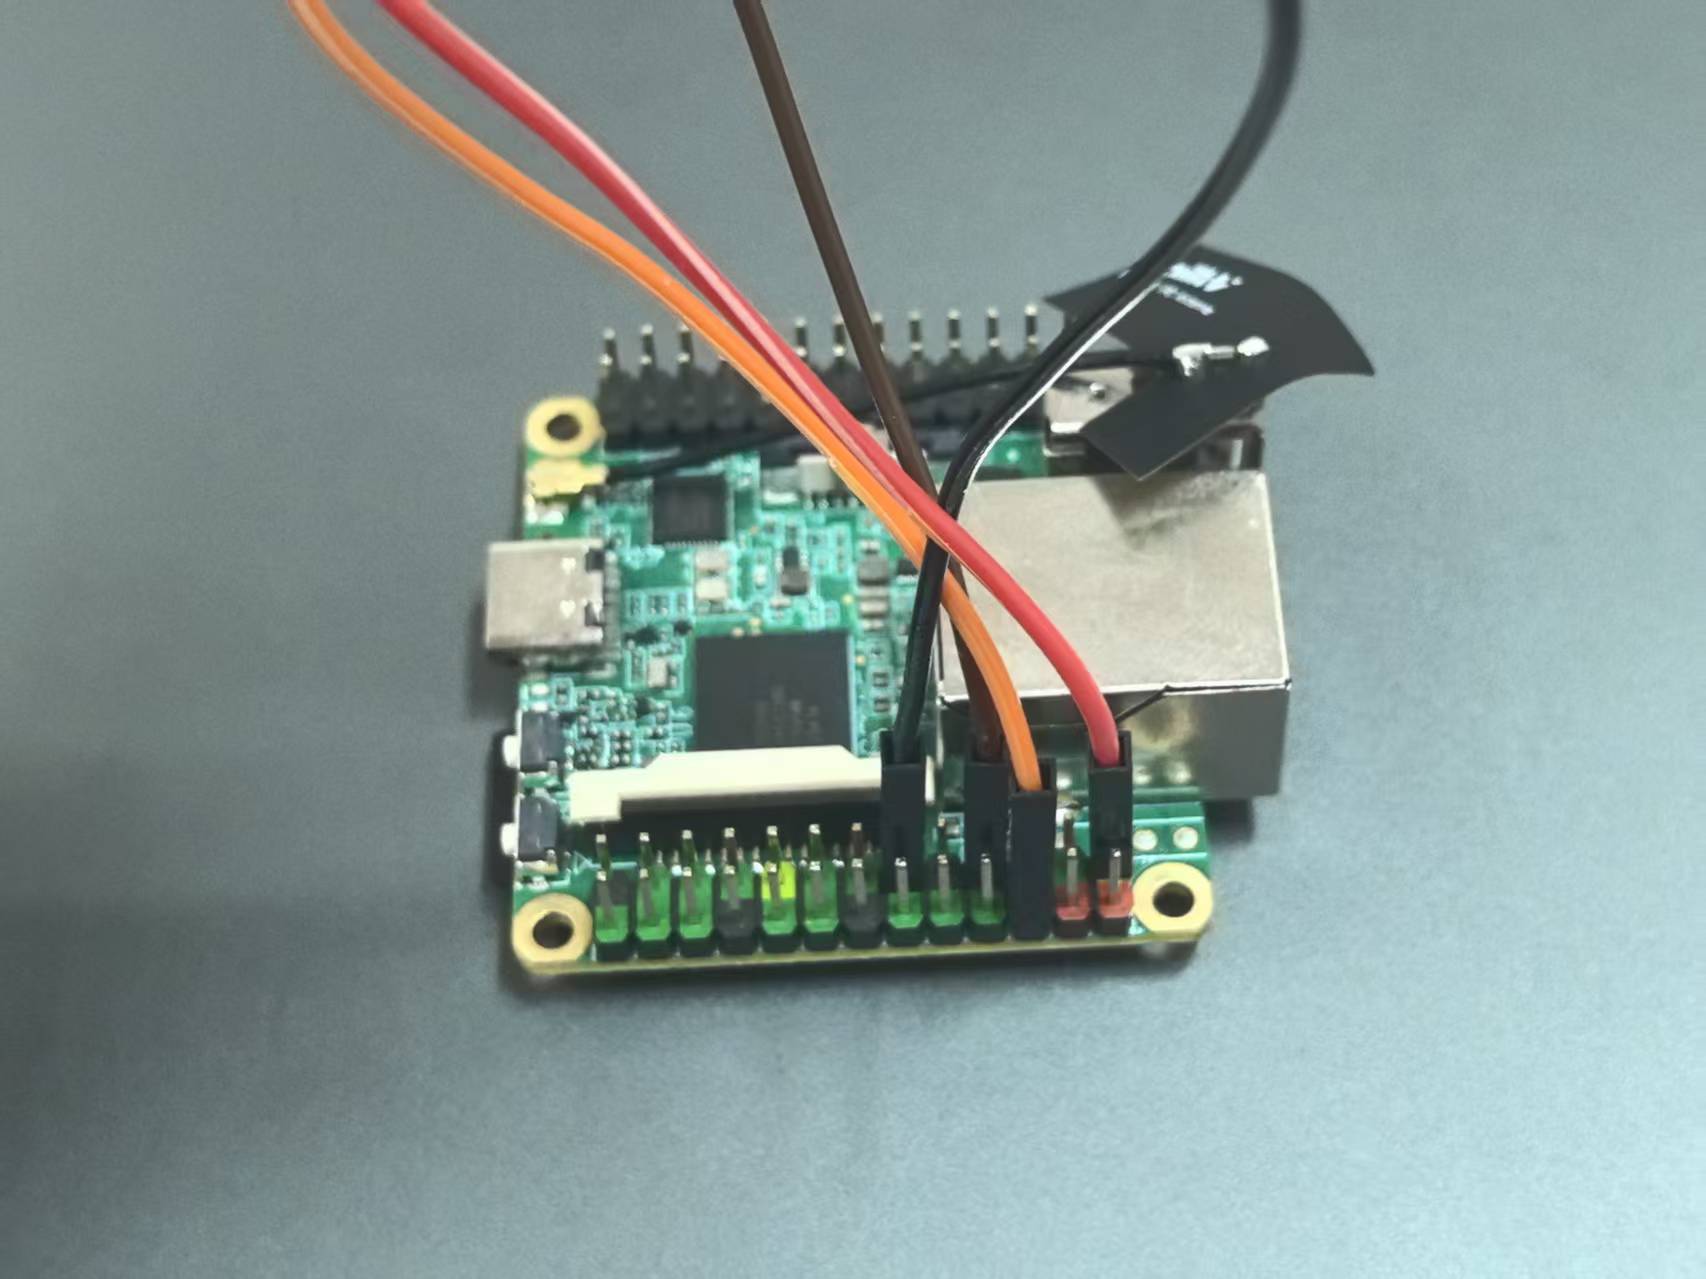
| 请参考以下引脚对照表及图片将模块连接至 Duo S。 | ||||||||||
|
|
||||||||||
| [](https://raw.githubusercontent.com/ZihanCheng63/ruyisdk-dev-archive/main/videos/Duo_s/OLED%E6%98%BE%E7%A4%BA%E5%B1%8F.png) | ||||||||||
|
|
||||||||||
|
|
||||||||||
|
|
||||||||||
| [](https://raw.githubusercontent.com/ruyisdk/board-docs/main/Duo_S/images/duos-pinout-v1.1.webp) | ||||||||||
|
|
||||||||||
|
|
||||||||||
|
|
||||||||||
| | 连接名称 | VCC | GND | SCL | SDA | | ||||||||||
| | -------- | --- | --- | --- | --- | | ||||||||||
| | 连接引脚 | 3.3V | GND | PIN7 | PIN11 | | ||||||||||
|
|
||||||||||
| | OLED模块 | 信号 | Milk-V Duo S | | ||||||||||
| | -------- | ---- | ------------- | | ||||||||||
| | VCC | 3.3V供电 | J3头部 1脚(3.3V) | | ||||||||||
| | GND | 地 | J3头部 6脚(GND) | | ||||||||||
| | SCL | I2C时钟 | J3头部 7脚(B18) | | ||||||||||
| | SDA | I2C数据 | J3头部 11脚(B11) | | ||||||||||
|
|
||||||||||
|
|
||||||||||
|
|
||||||||||
|
|
||||||||||
| [](https://raw.githubusercontent.com/ZihanCheng63/ruyisdk-dev-archive/main/videos/Duo_s/image-2026052001.png) | ||||||||||
|
|
||||||||||
| [](https://raw.githubusercontent.com/ZihanCheng63/ruyisdk-dev-archive/main/videos/Duo_s/image-2026052002.png) | ||||||||||
|
|
||||||||||
| ### 3. 获取源码 | ||||||||||
|
|
||||||||||
| #### 克隆源码 | ||||||||||
|
|
||||||||||
| ```bash | ||||||||||
|
|
||||||||||
| ruyi extract milkv-duo-examples | ||||||||||
|
|
||||||||||
| mv milkv-duo-examples-* duo-examples | ||||||||||
|
|
||||||||||
| cd duo-examples | ||||||||||
|
|
||||||||||
| ``` | ||||||||||
|
|
||||||||||
| ### 4. 编译应用与验证 | ||||||||||
|
|
||||||||||
| #### 创建虚拟环境 | ||||||||||
|
|
||||||||||
| ```bash | ||||||||||
|
|
||||||||||
| ruyi venv -t toolchain/gnu-plct manual venv-gnu-plct | ||||||||||
|
|
||||||||||
| . ~/duo-examples/venv-gnu-plct/bin/ruyi-activate | ||||||||||
|
|
||||||||||
| ``` | ||||||||||
|
|
||||||||||
| #### 验证工具链版本 | ||||||||||
|
|
||||||||||
| ```bash | ||||||||||
|
|
||||||||||
| riscv64-plct-linux-gnu-gcc -v | ||||||||||
|
|
||||||||||
| ``` | ||||||||||
|
|
||||||||||
| #### 编译 I2C 程序 | ||||||||||
|
|
||||||||||
| ```bash | ||||||||||
|
|
||||||||||
| cd i2c/ssd1306_i2c | ||||||||||
|
Contributor
There was a problem hiding this comment. suggestion: Avoid hard-coding a specific home directory in the compile command; use a relative path instead. Since users have already
Suggested change
|
||||||||||
|
|
||||||||||
| riscv64-plct-linux-gnu-gcc -o ssd1306_i2c ssd1306_i2c.c -I/home/pingguo/duo-examples/include/system -L/home/pingguo/duo-examples/libs/system/musl_riscv64 -lwiringx | ||||||||||
|
|
||||||||||
| ``` | ||||||||||
|
|
||||||||||
| #### 验证结果 | ||||||||||
|
|
||||||||||
| 检查生成的二进制文件: | ||||||||||
|
|
||||||||||
| ```bash | ||||||||||
|
|
||||||||||
| file ssd1306_i2c | ||||||||||
|
|
||||||||||
| ``` | ||||||||||
|
|
||||||||||
| ### 5.传输并运行 | ||||||||||
|
|
||||||||||
| 默认用户名:`root`,默认密码:`milkv` | ||||||||||
|
|
||||||||||
| ```bash | ||||||||||
|
|
||||||||||
| # 传输到开发板 | ||||||||||
|
|
||||||||||
| scp ssd1306_i2c root@192.168.42.1:/root/ | ||||||||||
|
|
||||||||||
| # SSH 登录开发板 | ||||||||||
|
|
||||||||||
| ssh root@192.168.42.1 | ||||||||||
|
|
||||||||||
| # 配置引脚功能 | ||||||||||
|
|
||||||||||
| duo-pinmux -w B18/IIC1_SCL | ||||||||||
|
|
||||||||||
| duo-pinmux -w B11/IIC1_SDA | ||||||||||
|
|
||||||||||
| # 运行测试 | ||||||||||
|
|
||||||||||
| ./ssd1306_i2c | ||||||||||
|
|
||||||||||
| ``` | ||||||||||
|
|
||||||||||
| 运行后 OLED 屏幕应显示文字内容: | ||||||||||
|
|
||||||||||
| ```bash | ||||||||||
|
|
||||||||||
| Hello MilkV Duo! | ||||||||||
| Hello MilkV Duo! | ||||||||||
|
|
||||||||||
| ``` | ||||||||||
| Original file line number | Diff line number | Diff line change |
|---|---|---|
| @@ -0,0 +1,189 @@ | ||
| --- | ||
| sys: debian | ||
| sys_ver: v1.6.35 | ||
| sys_var: null | ||
| provider: milkv | ||
| status: peripheral | ||
| last_update: 2026-05-07 | ||
| model: Milk-V Duo S | ||
| profile: PWM | ||
| --- | ||
|
|
||
| # RuyiSDK 外设示例 | ||
|
|
||
| 可直接在开发板上进行编译和运行的示例,适合初学者快速上手。 | ||
|
|
||
| 安装依赖包 | ||
|
|
||
| ``` | ||
|
|
||
| sudo apt update; sudo apt install -y wget tar zstd xz-utils git build-essential | ||
|
Contributor
There was a problem hiding this comment. issue (bug_risk): Replace non-breaking spaces in the command with regular spaces to ensure it runs correctly when copy-pasted. There are non‑breaking spaces in this command (e.g., between |
||
|
|
||
| ``` | ||
|
|
||
| 安装 ruyi 包管理器 | ||
|
|
||
| ``` | ||
|
|
||
| wget https://mirror.iscas.ac.cn/ruyisdk/ruyi/tags/0.47.0/ruyi-0.47.0.riscv64 | ||
|
|
||
| chmod +x ruyi-0.47.0.riscv64 | ||
|
|
||
| sudo cp -v ruyi-0.47.0.riscv64 /usr/local/bin/ruyi | ||
|
|
||
| ``` | ||
|
|
||
| 安装工具链 | ||
|
|
||
| ``` | ||
|
|
||
| ruyi update | ||
|
|
||
| ruyi install gnu-plct llvm-plct | ||
|
|
||
| ``` | ||
|
|
||
| ## PWM | ||
|
|
||
| 本文介绍如何使用 RuyiSDK 在 Milk-V Duo S 开发板上快速部署编译环境,并构建 PWM 测试程序,验证芯片脉宽调制输出功能。 | ||
|
|
||
| ### 1. 准备工作 | ||
|
|
||
| * **开发板**:Milk-V Duo S (512M, SG2000) | ||
|
|
||
| * **其他**:microSD 卡、USB Type-C 数据线 | ||
|
|
||
| #### 操作系统安装与启动验证 | ||
|
|
||
| 确保您的开发板已准备好系统。 | ||
|
|
||
| 参考文档:https://github.com/DuoQilai/riscv-board-custom-dev/blob/main/Duo_S/boot_DuoS.md | ||
|
|
||
| ### 2. 获取源码 | ||
|
|
||
| #### 克隆源码 | ||
|
|
||
| ```bash | ||
|
|
||
| ruyi extract milkv-duo-examples | ||
|
|
||
| mv milkv-duo-examples-* duo-examples | ||
|
|
||
| cd duo-examples | ||
|
|
||
| ``` | ||
|
|
||
| ### 3. 编译应用与验证 | ||
|
|
||
| #### 修改源码 | ||
|
|
||
| ```bash | ||
|
|
||
| cd pwm | ||
|
|
||
| nano pwm.c | ||
|
|
||
| ``` | ||
|
|
||
| 修改以下内容: | ||
|
|
||
| ```bash | ||
|
|
||
| # 将初始化参数改为 milkv_duos | ||
|
|
||
| if (wiringXSetup("milkv_duos", NULL) == -1) | ||
|
|
||
| ``` | ||
|
|
||
| 保存并退出。 | ||
|
|
||
| #### 创建虚拟环境 | ||
|
|
||
| ```bash | ||
|
|
||
| ruyi venv -t toolchain/gnu-plct manual venv-gnu-plct | ||
|
|
||
| . ~/duo-examples/venv-gnu-plct/bin/ruyi-activate | ||
|
|
||
| ``` | ||
|
|
||
| #### 验证工具链版本 | ||
|
|
||
| ```bash | ||
|
|
||
| riscv64-plct-linux-gnu-gcc -v | ||
|
|
||
| ``` | ||
|
|
||
| #### 编译 PWM 程序 | ||
|
|
||
| ```bash | ||
|
|
||
| cd pwm | ||
|
|
||
| riscv64-plct-linux-gnu-gcc pwm.c -o pwm \ | ||
| -I../include \ | ||
| -I../wiringX/src \ | ||
| -L../libs/system/musl_riscv64 \ | ||
| -lwiringx | ||
|
|
||
| ``` | ||
|
|
||
| #### 验证结果 | ||
|
|
||
| 检查生成的二进制文件: | ||
|
|
||
| ```bash | ||
|
|
||
| file pwm | ||
|
|
||
| ``` | ||
|
|
||
| ### 4.传输并运行 | ||
|
|
||
| 默认用户名:`root`,默认密码:`milkv` | ||
|
|
||
| ```bash | ||
|
|
||
| # 传输到开发板 | ||
|
|
||
| scp pwm root@192.168.42.1:/root/ | ||
|
|
||
| # SSH 登录开发板 | ||
|
|
||
| ssh root@192.168.42.1 | ||
|
|
||
| # 配置引脚功能 | ||
|
|
||
| duo-pinmux -w A16/PWM_4 | ||
|
|
||
| # 运行测试 | ||
|
|
||
| ./pwm | ||
|
|
||
| ``` | ||
|
|
||
| 运行后终端提示: | ||
|
|
||
| ```bash | ||
|
|
||
| PWM Period fixed to 1000ns, please set Duty in range of 0-1000. | ||
| Enter -> Pin:Duty | ||
|
|
||
| ``` | ||
|
|
||
| 按提示输入 [引脚号]:[占空比],例如: | ||
|
|
||
| ```bash | ||
|
|
||
| 8:500 | ||
|
|
||
| ``` | ||
|
|
||
| 程序输出: | ||
|
|
||
| ```bash | ||
|
|
||
| pin 8 -> duty 500 | ||
|
|
||
| ``` | ||
There was a problem hiding this comment.
Choose a reason for hiding this comment
The reason will be displayed to describe this comment to others. Learn more.
issue (bug_risk): Normalize spaces in the
aptcommand to avoid copy-paste issues.This command uses non‑breaking spaces between tokens (e.g., after
sudo,install, and beforezstd), which can break copy‑paste into a terminal. Please replace them with regular spaces.